
What is Custom Authorizer?
On Feb 11, 2016, a blog entry of AWS Compute Blog, “Introducing custom authorizers in Amazon API Gateway”, announced that Custom Authorizer had been introduced into Amazon API Gateway. Thanks to this mechanism, an API built on Amazon API Gateway can delegate validation of a Bearer token (such as an OAuth or SAML token) presented by a client application to an external authorizer. The figure below is an excerpt from the online document “Enable Amazon API Gateway Custom Authorization” and “Lambda Auth function” at the top position in the figure is an authorizer. API Gateway delegates validation of a token to the authorizer if it is configured so.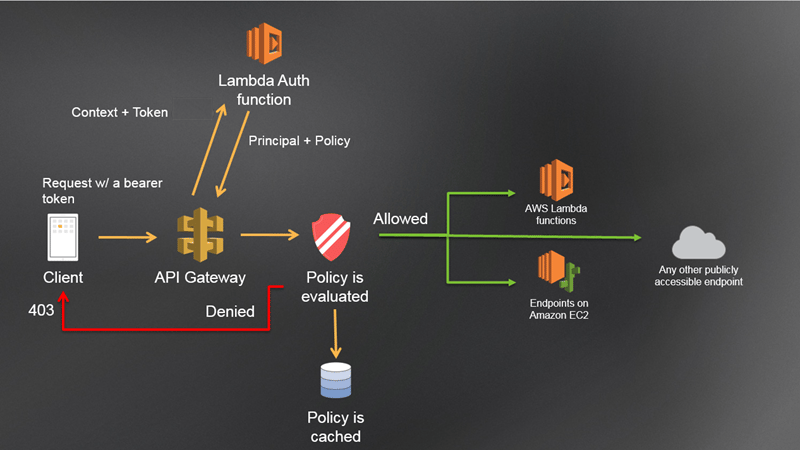
As the same as before, Amazon API Gateway itself does not provide OAuth server functionalities, but you can protect APIs built on Amazon API Gateway by OAuth access tokens by utilizing Custom Authorizer.
In this document, we use the term “Custom Authorizer”, which has been renamed as “Lambda Authorizer”.
Before Custom Authorizer was introduced, introspection and validation of an access token had to be executed in an implementation of a lambda function in order to protect APIs by OAuth access tokens. Our document “Amazon API Gateway + AWS Lambda + OAuth” shows how to do it using the old way.
No example
The online document and the blog show implementation examples of an authorizer. However, the example in the online document usesallow, deny and unauthorized as token values in order to simplify the code example, so it is not a practical example. On the other hand, the example in the blog uses JWT (RFC 7519) as a token value, so it is a practical example. But, it does not include any code to make a query to an external server to get information about a token. It is because JWT is a form where information is embedded in a token itself, and so information can be extracted only by decoding the token value.
That is, there is no example to communicate with an authorization server to get information about an access token. The lack of a code example for the use case is unfriendly to developers considering the following.
- An authorizer has to be implemented as an AWS Lambda function.
- As a language for AWS Lambda implementation, node.js is recommended more than others.
- There is no standardized way to process network communication synchronously in node.js (AFAIK).
Authorizer example
We show an authorizer example written in node.js which communicates with an external authorization server. The introspection API used here is not the one defined in RFC 7662 (OAuth 2.0 Token Introspection) but Authlete’s introspection API. However, you can still get generic knowledge as to the following points.- How to extract the HTTP method and the resource path of the request from the value of
event.methodArn.
(inextract_method_and_pathfunction) - How to extract an access token which is embedded in the form defined in RFC 6750, 2.1. from the value of event.authorizationToken.
(inextract_access_tokenfunction) - How to complete network communication with an authorization server synchronously in
exports.handlerusing waterfall function of async module. - How to communicate with an introspection API of an authorization server using request module.
(inintrospectfunction) - How an authorizer generates a response to API Gateway.
(ingenerate_policyfunction) - How to set an HTTP status code to reject an request.
(inexports.handlerfunction)
Create a lambda function deployment package
Here we show how to create a lambda function deployment package including the custom authorizer code above. First, save the authorizer code shown above asindex.js.
Then, open the file with a text editor and replace SERVICE_ID and SERVICE_ACCESS_TOKEN with actual values. Both come from the Authlete Management Console: the service ID is shown on the service’s page, and a service access token is issued under Service Access Tokens on that page. See “Getting Started” for details.
Next, modify the implementation of get_required_scopes function as necessary. The role of the method is to return a list of necessary scopes based on the HTTP method and the resource path of a request. See the comment in index.js for details.
Then, move to the directory where index.js is placed and execute the following commands to install async module and requet module.
index.js file and node_modules directory.
Configure Custom Authorizer
See the online document and the blog about how to use the uploaded lambda function as an implementation of Custom Authoriser.Test
Here we assume that GET mydemoresource (which is created by going through the steps described in the Amazon API Gateway online document, “Walkthrough: Create API Gateway API for Lambda Functions”) is protected by the Custom Authorizer. First, access mydemoresource without an access token. Don’t forget to replace{your-api-id} and {region-id} with your own.
MaSp49VXQnAmg_Si2i02PsvKlTSHMuxp3zJH00OA5mc is a valid access token. (See the next section as to how to issue an access token.)
{"Hello":"World"}.
How to issue an access token
Authlete does not host an authorization server, so issue an access token for your service to test the integration. The quickest way is Authlete’s Create Access Token API, which mints an access token without running a full OAuth flow. Don’t forget to replace{service-id}, {service-access-token} and {client-id} with your own, and set subject and scopes to values supported by your service.
accessToken field of the response.