Documentation Index
Fetch the complete documentation index at: https://developers.authlete.com/llms.txt
Use this file to discover all available pages before exploring further.
This page is for Authlete 2.x. For 3.0, see Using Demo Authorization Server (3.0).
Sign-up to Authlete and Creating a Service (2.x)
Preface
These instructions describe how to sign up to Authlete, create a new 2.x service and register an OAuth/OIDC client to the service, then verify the setup by calling the Authlete/api/auth/authorization endpoint.
Instruction Steps
We will cover the following steps:- Sign up to Authlete
- Create an API service instance
- Log in to Developer Console
- Register an OAuth/OIDC Client
- Connect to the API
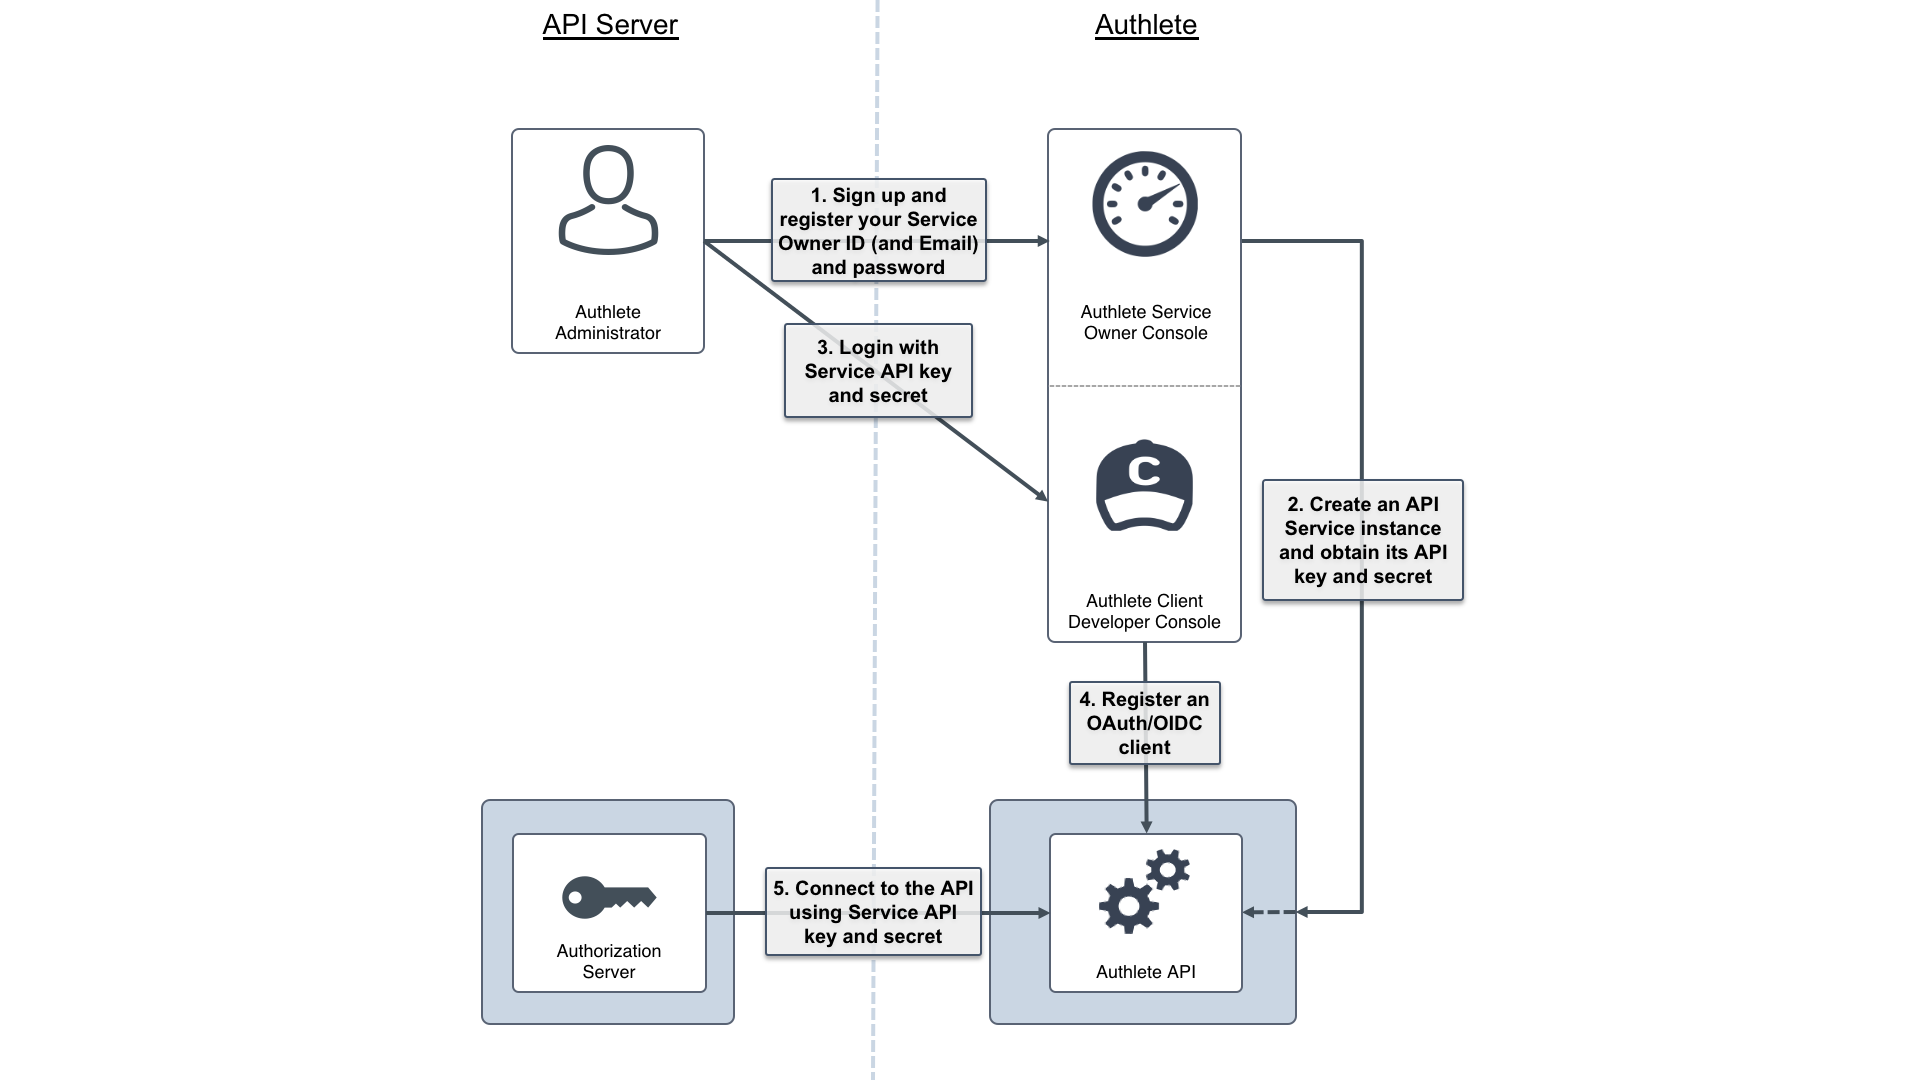
1. Sign up to Authlete
You need your own Service Owner account before using Authlete APIs as your authorization server backend.- Open the Authlete Service Owner signup page:
https://so.authlete.com/accounts/signup. - Complete the form and keep your Login ID and Password safe.
- After registration, log in to the Service Owner Console at
https://so.authlete.com/accounts/loginusing the same credentials.
 Once logged in successfully, you have access to Authlete’s Service Owner Console.
 You can log out at any time with the Log out link in the upper-right corner.
2. Create an API service instance
Next, create your first Authlete API service.- Log in to the Service Owner Console at
https://so.authlete.com/accounts/login. - Click Create Service.
- Enter an arbitrary name for the service and click Create.
- Confirm creation in the dialog.


| Item | Value example |
|---|---|
| API Key | 10738933707579 |
| API Secret | Xg6jVpJCvsaXvy2ks8R5WzjdMYlvQqOym3slDX0wNhQ |
| Client Application Developer Console | https://cd.authlete.com/10738933707579 |
- The API Key and API Secret are used:
- As the Login ID and Password for the Developer Console.
- As credentials for your authorization server to call Authlete APIs.
- The Client Application Developer Console URL will be used in the next step.
3. Log in to Developer Console
Now add client information to the new service.- Open the Developer Console URL for your service (for example,
https://cd.authlete.com/10738933707579). - Log in with:
- Login ID: your API Key (for example,
10738933707579) - Password: your API Secret (for example,
Xg6jVpJCvsaXvy2ks8R5WzjdMYlvQqOym3slDX0wNhQ)
- Login ID: your API Key (for example,

4. Register an OAuth/OIDC client
Once logged into the Developer Console:-
Click Create App.

-
On the Basic tab, enter:
- Client Name: any descriptive name.
- Client Type:
CONFIDENTIAL.

- Switch to the Authorization tab and configure:
| Item | Value |
|---|---|
| Redirect URIs | https://client.example.org/cb/example.com |
| Client Authentication Method | CLIENT_SECRET_BASIC |
- Click Create and confirm in the dialog.


| Item | Value example |
|---|---|
| Client ID | 12818600553323 |
| Client Secret | -olDIKD9BihRfB8O1JxobUEKBZ7PIV5Z6oaqxAshmoUtUZgB-wjmmxTYDiDV6vM_Mgl267PeNrRftq8cWplvmg |
| Client Type | CONFIDENTIAL |
| Redirect URIs | https://client.example.org/cb/example.com |
| Client Authentication Method | CLIENT_SECRET_BASIC |
client_id and client_secret when your client calls the authorization server.
5. Connect to the API
Finally, verify that the environment works by calling Authlete’s/api/auth/authorization API, acting as the authorization server.

Linux/Mac example
Use the followingcurl command (replace API Key, API Secret, and Client ID with your own values):
Windows (PowerShell) example
On Windows 10, usecurl.exe, escape " characters, and use backticks for line continuation:
Conclusion and next steps
In this guide, you:- Signed up for an Authlete 2.x Service Owner account.
- Created an API service instance.
- Logged into the Developer Console and registered an OAuth/OIDC client.
- Verified connectivity by calling the
/api/auth/authorizationAPI.
- Read OAuth 2.0 Basics (2.x) to walk through the full authorization code flow using Authlete 2.x APIs: OAuth 2.0 Basics (2.x).
- Read OIDC Basics (2.x) to add OpenID Connect and ID tokens on top of OAuth 2.0: OIDC Basics (2.x).
- Explore sample authorization server implementations on GitHub: Authorization server implementations.