
For Authlete 2.x documentation, see 2.x version.
Overview
This document describes overview of **Authorization Code Flow in **FAPI 2.0 Security Profile and instruction on how to configure Authlete services and clients to make them comply with it.FAPI 2.0 Security Profile feature is available since Authlete 2.3.
Introduction
The below is a diagram that roughly describes Authorization Code Flow in FAPI 2.0 Security Profile.\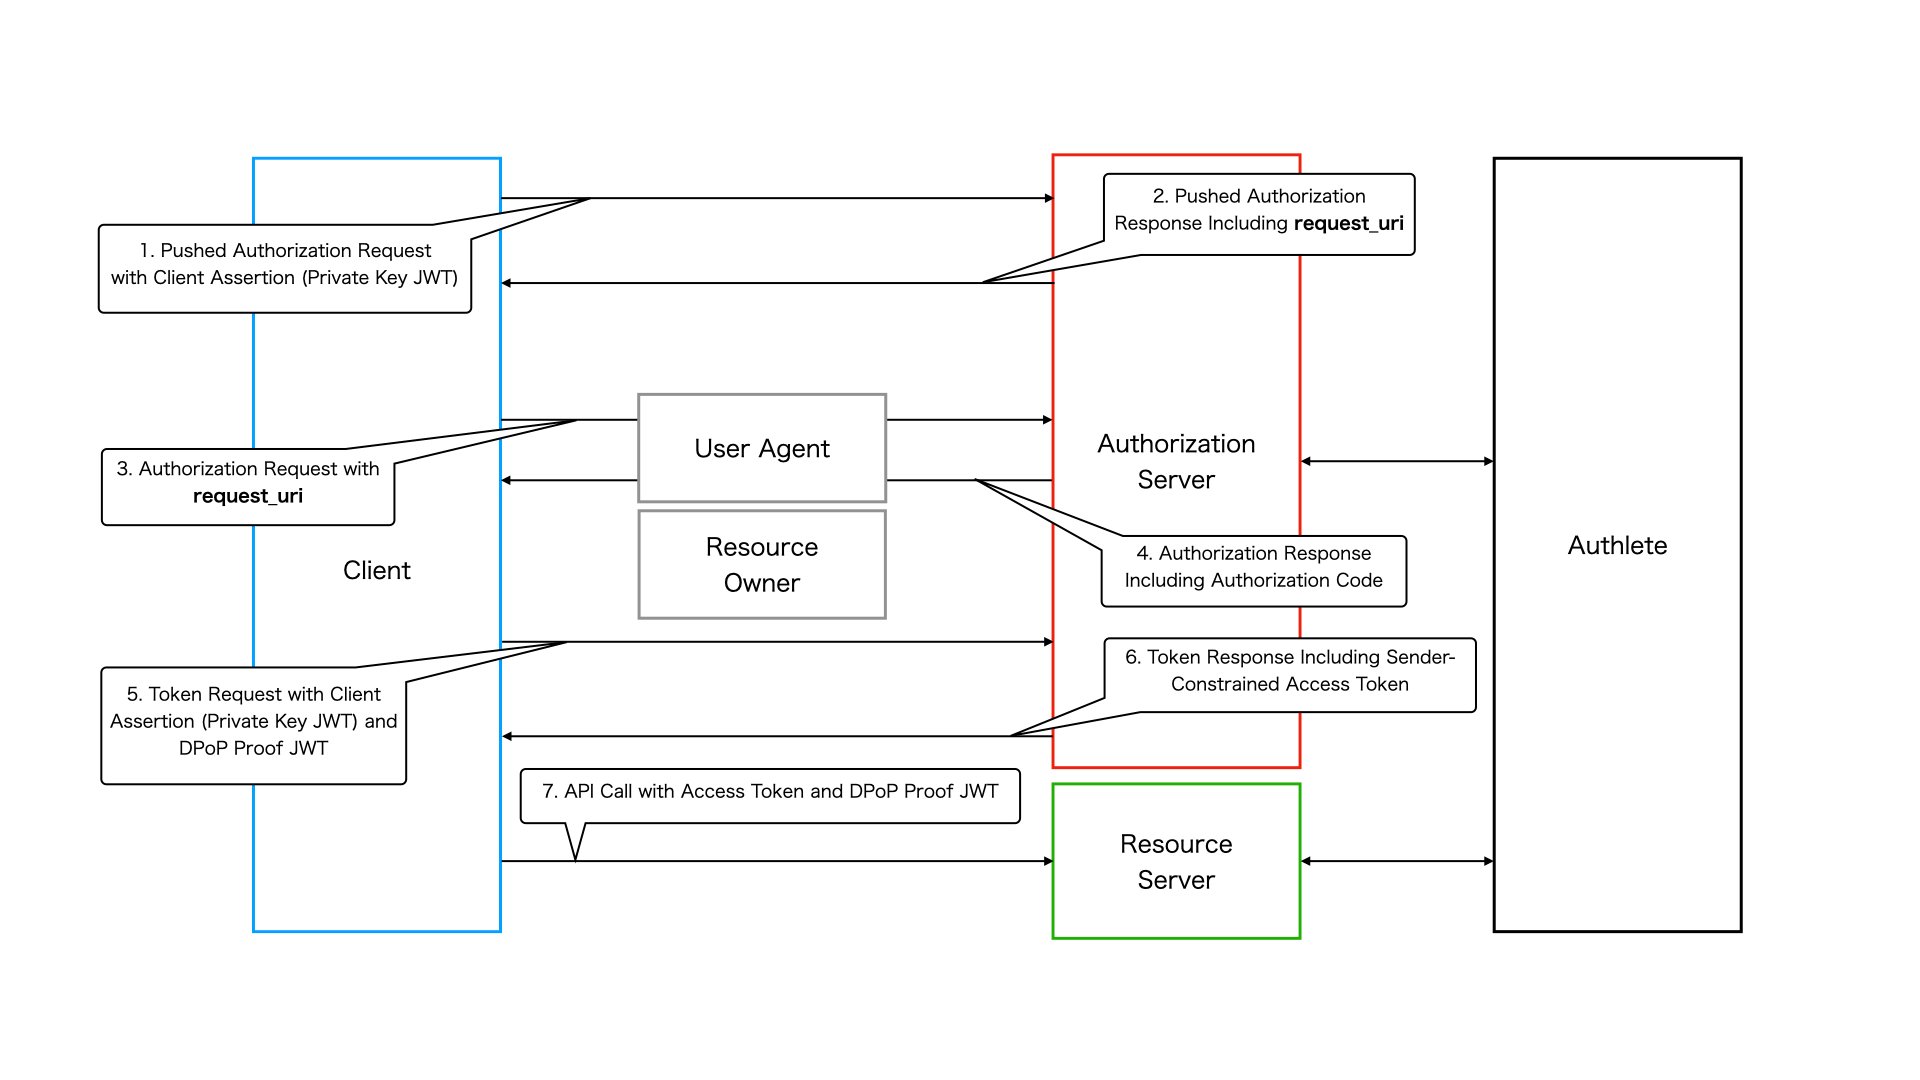
1. Pushed Authorization Request
A client sends a request to the pushed authorization request endpoint of the authorization server to register authorization request parameters. FAPI 2.0 Security Profile imposes some requirements on authorization request parameters such as response_type. It also requires the client to be authenticated with mutual TLS authentication or private_key_jwt . In this document, we useprivate_key_jwt for client authentication.
2. Pushed Authorization Response
If the request is processed successfully, the pushed authorization request endpoint makes a response that contains a request_uri.3. Authorization Request
The client sends an authorization request including therequest_uri to the authorization endpoint of the authorization server. This is done via the user agent.
4. Authorization Response
If the request is processed successfully, the authorization endpoint makes a response that contains an authorization code and the user agent redirects to the client’s redirect URI.5. Token Request
The client sends a token request to the token endpoint of the authorization server with the authorization code. The token endpoint needs to issue an access token that is **sender-constrained with mutual TLS or **DPoP based on FAPI 2.0 Security Profile. In this document, we use DPoP as a sender-constrained access token mechanism. Note that private_key_jwt is used for client authentication at the token endpoint as well as at the pushed authorization request endpoint.6. Token Response
If the request is processed successfully, the token endpoint makes a response that contains a sender-constrained access token.7. API Request
The client sends a request to a resource endpoint with the access token along with a proof-of-possession for the access token (a DPoP proof JWT in this document).Setting up a FAPI Service
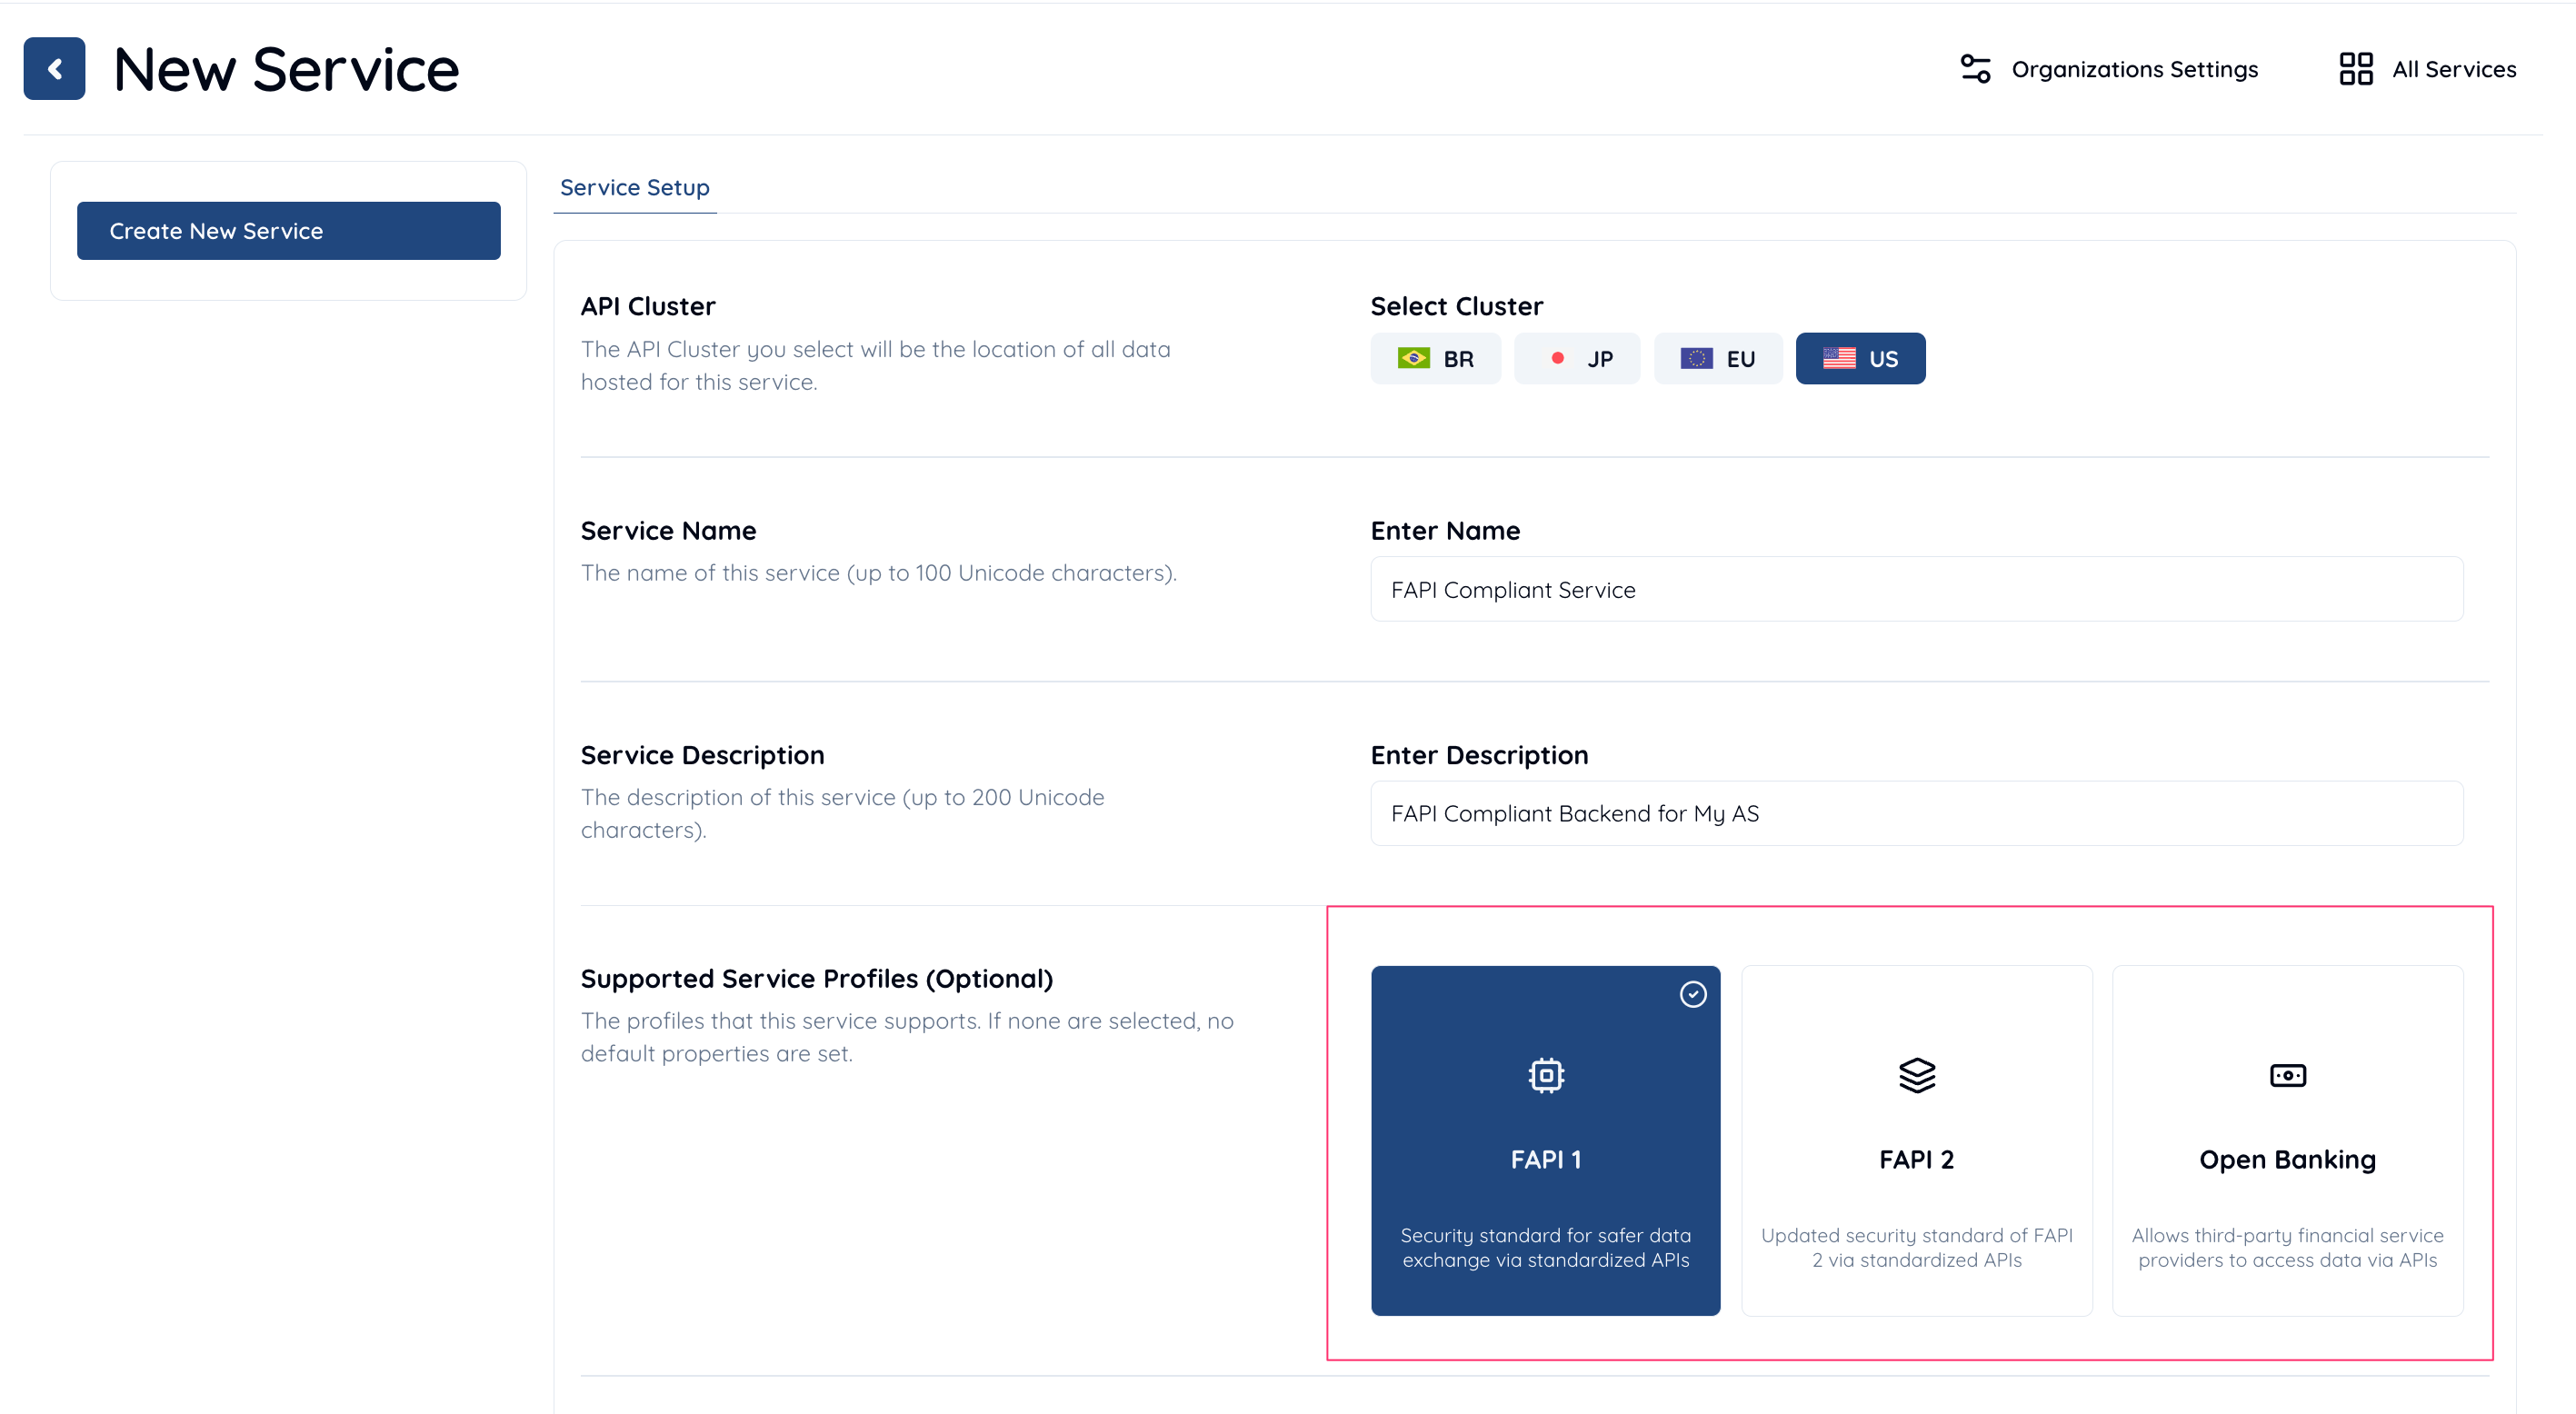
- Login to Authlete Management Console.
- Create a new Service with FAPI Profile.
Scope Attribute
Since Authlete 2.3, a new scope attribute has been introduced, specifically reserved for the FAPI 2.0 Security Profile. The attribute is defined as follows:
Scopes associated with this attribute are referred to as “FAPI 2.0 Security Profile” scopes.
To configure a FAPI 2.0 Security Profile scope for your service:
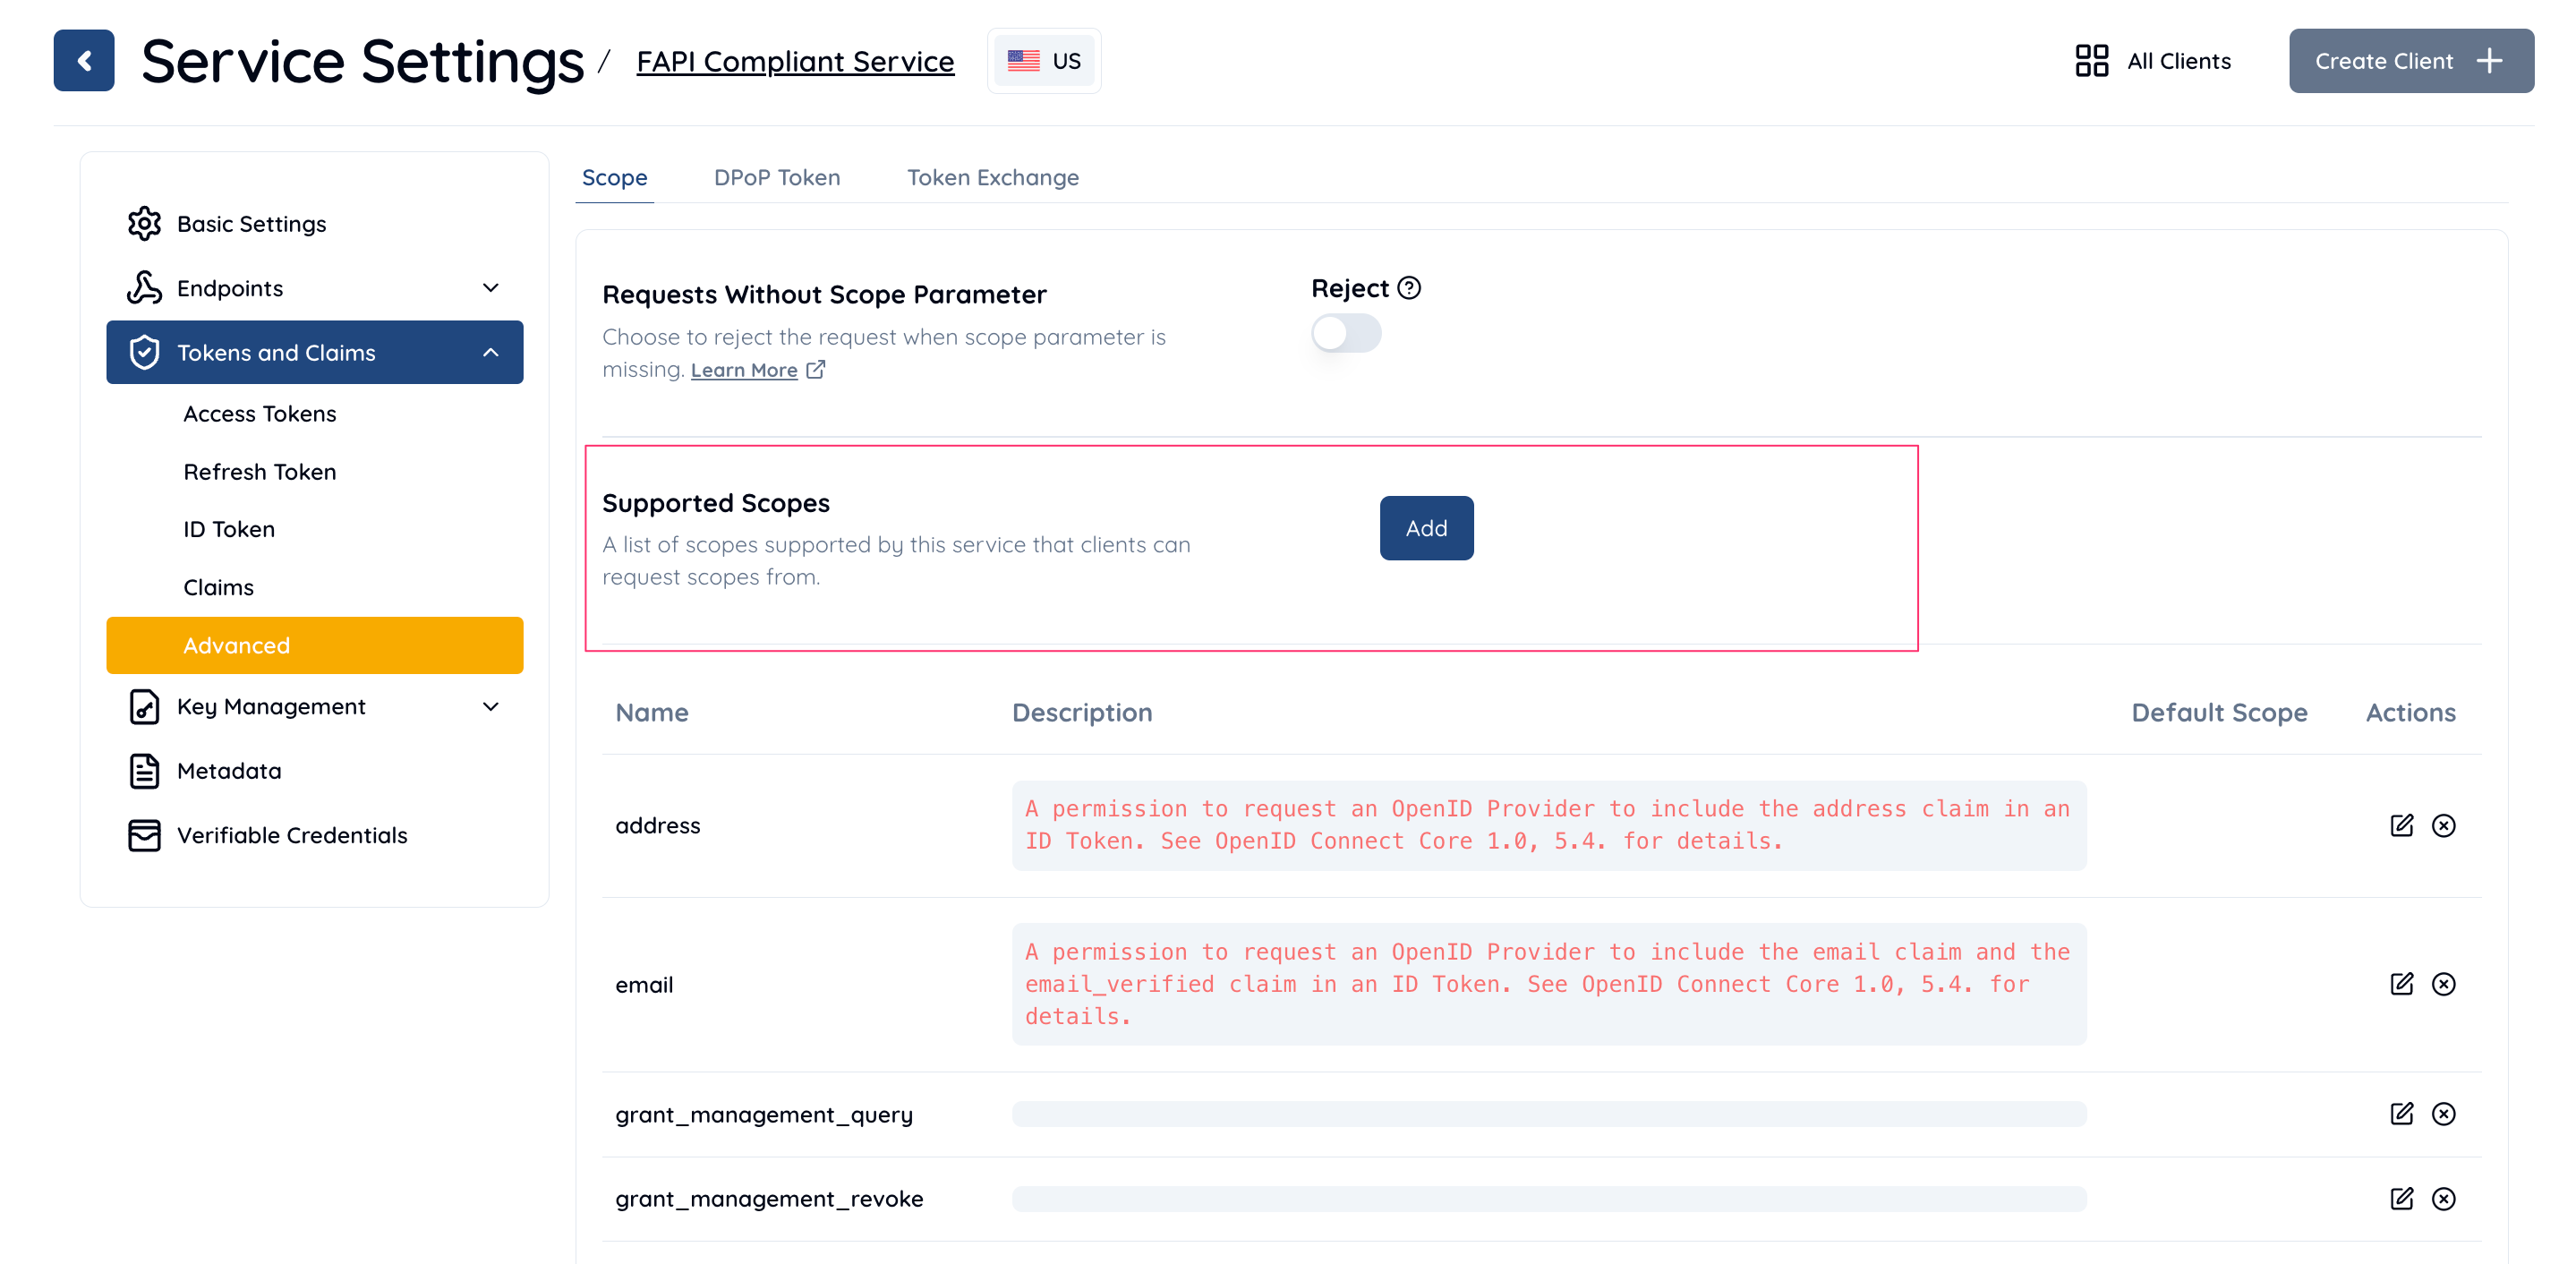
- Open Service Settings in the Management Console.
- Navigate to Tokens & Claims > Advanced > Scope.
- In the Supported Scopes section, click the Add button.
- In the Add/Edit Supported Scope dialog:
- Enter a name and description for your custom scope.
- Under the Scope Attributes section, click Add.
- Set the following:
- Key:
fapi2 - Value:
sp
- Key:
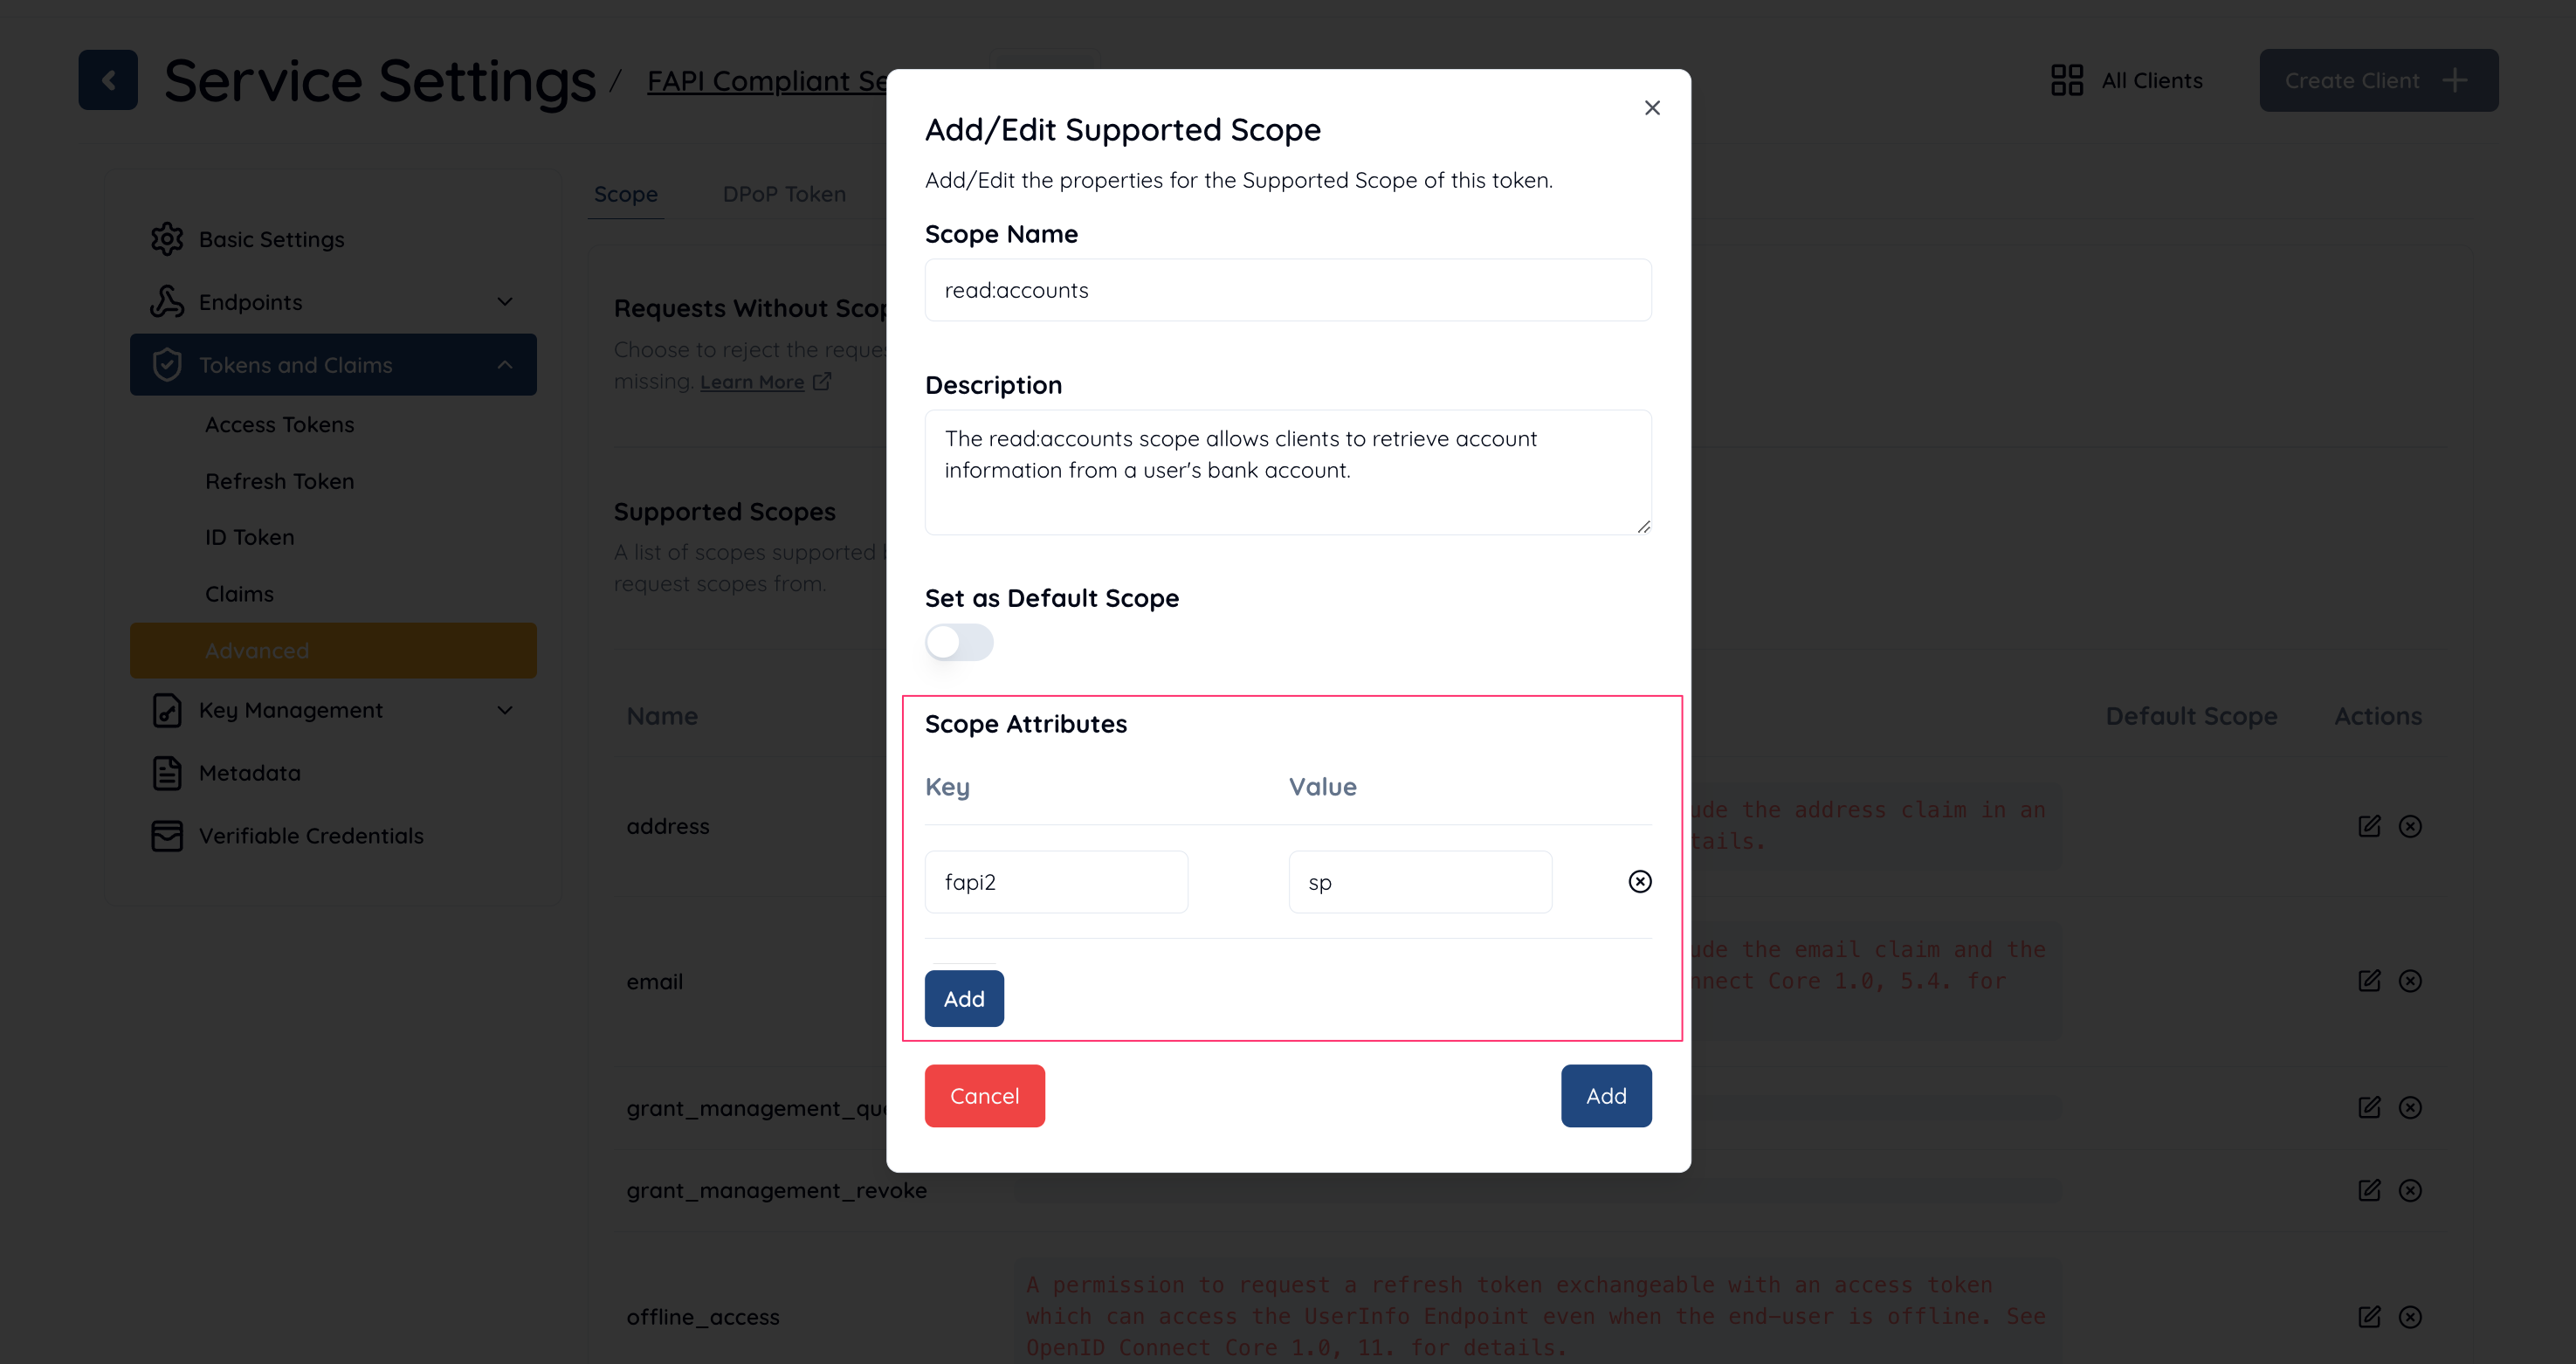 By following these steps, you can configure a scope that complies with the FAPI 2.0 Security Profile.
Service Configuration
Configure your service as follows to make it comply with FAPI 2.0 Security Profile.Client Configuration
Configure your service as follows to make it comply with FAPI 2.0 Security Profile.API call test
In this section, we simulate API calls that the authorization server makes against Authlete APIs in the context of Authorization Code Flow in FAPI 2.0 Security Profile.1. /pushed_auth_req API
Let’s assume the client sends a valid request to the pushed authorization request endpoint of authorization server in the context of Authorization Code Flow in FAPI 2.0 Security Profile. According to FAPI 2.0 Security Profile, Requirements for Clients , the request would be like below.- the scope parameter is assigned to “read:accounts”, which is a FAPI 2.0 Security Profile scope and
- the client is authenticated with private_key_jwt.
2. /auth/authorization API
After obtaining a request URI from the pushed authorization request endpoint, the client sends an authorization request including the request URI to the authorization endpoint of the authorization server like below.3. /auth/authorization/issue API
After the authorization server receives a successful response from /auth/authorization API, the end-user authorizes/denies the client on the browser, the authorization result is conveyed to the authorization server and the authorization server calls Authlete /auth/authorization/issue API with the result. The following is a curl command that simulates a request from the authorization server to Authlete /auth/authorization/issue API.4. /auth/token API
After the client receives a successful response containing an authorization code from the authorization endpoint, the client sends a token request to the token endpoint of the authorization server as below.- be authenticated with private key JWT and
- present a DPoP proof JWT for the authorization server to issue a sender-constrained access token. (DPoP proof JWT must be signed with PS256, ES256 or EdDSA.)