
Preface
This document describes overview of security provisions defined in Financial-grade API Security Profile 1.0 - Part 2: Advanced (hereinafter called “FAPI”) and configuration instructions of Authlete through steps for building a FAPI compliant authorization server. It is strongly advised that you have basic knowledge of OpenID Connect and Authlete by doing the following tutorial.Components
In this tutorial, we assume the following components. Note that only Authlete’s console and APIs are up and running, while an authorization server (OIDC identity provider) and a resource server don’t actually exist. Instead you will use curl command to simulate how these servers make API requests to Authlete on receiving authorization requests, token requests and token introspection requests from clients (OIDC relying party).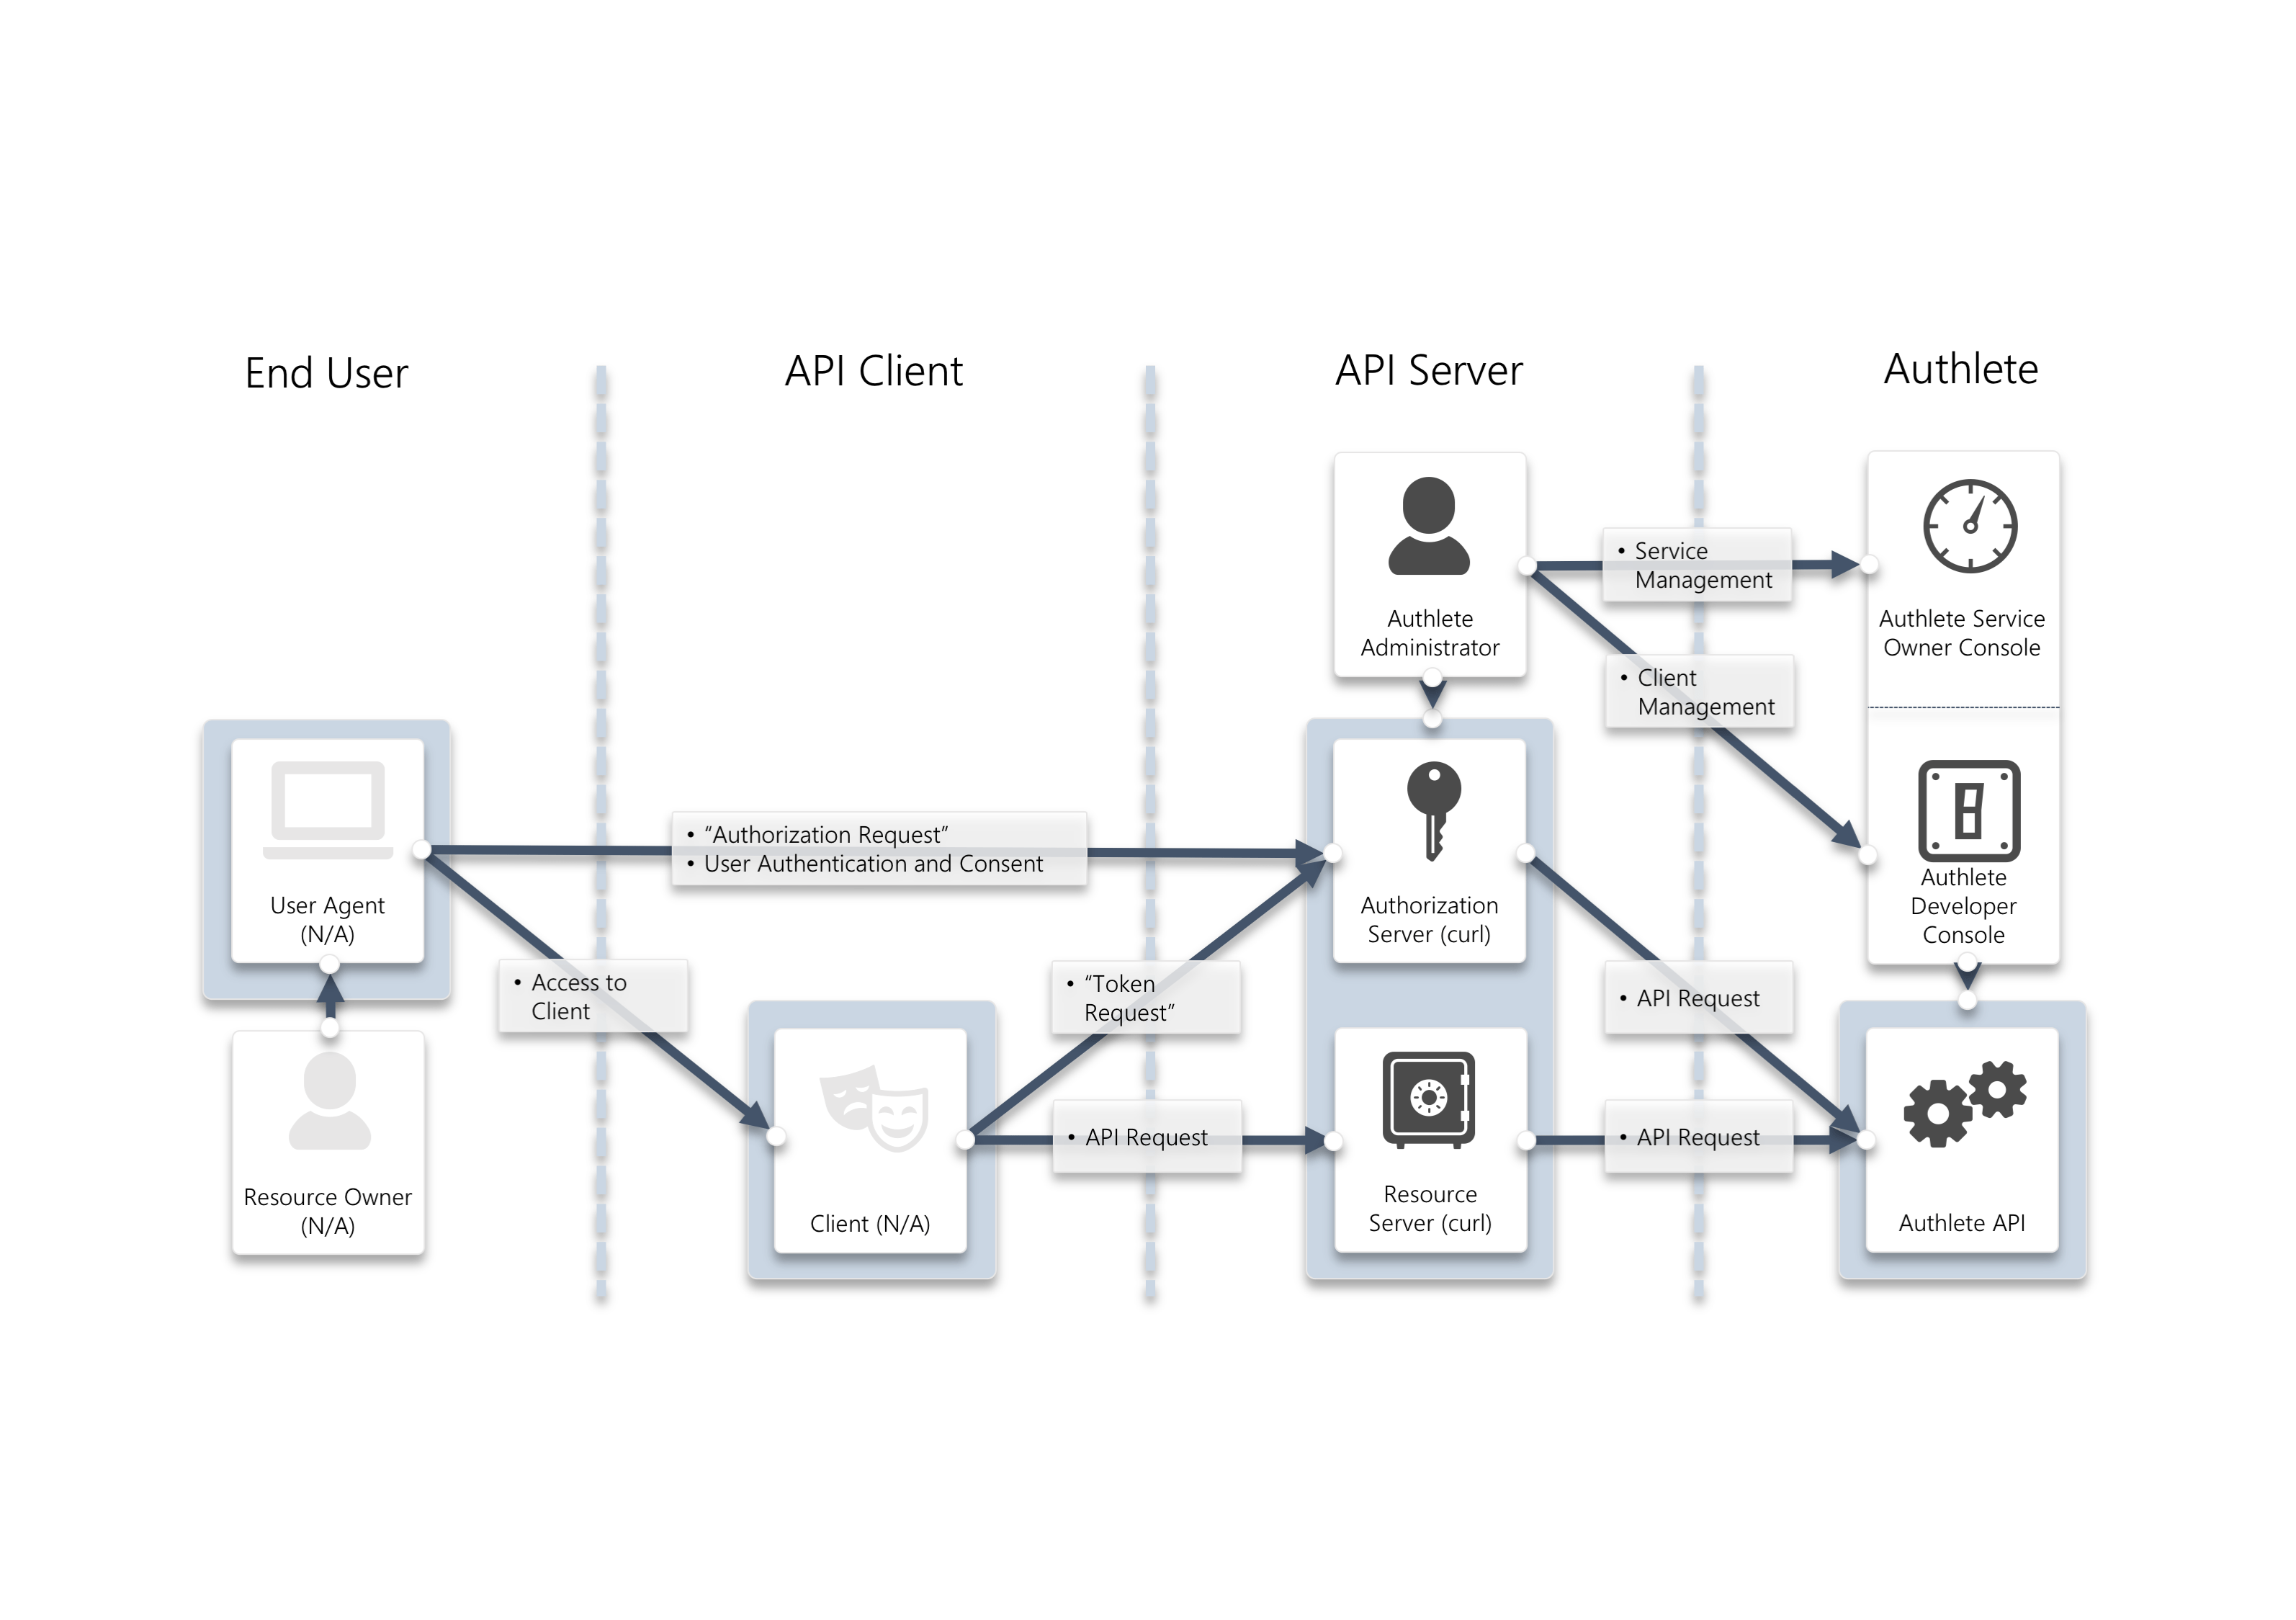
NoteIn this tutorial, OIDC identity provider and relying party are described as authorization server and client respectively for convenience.
Interaction between API client and API server using FAPI
In this document, you will configure Authlete to enable the following token granting process and API access flows in a FAPI-compliant manner.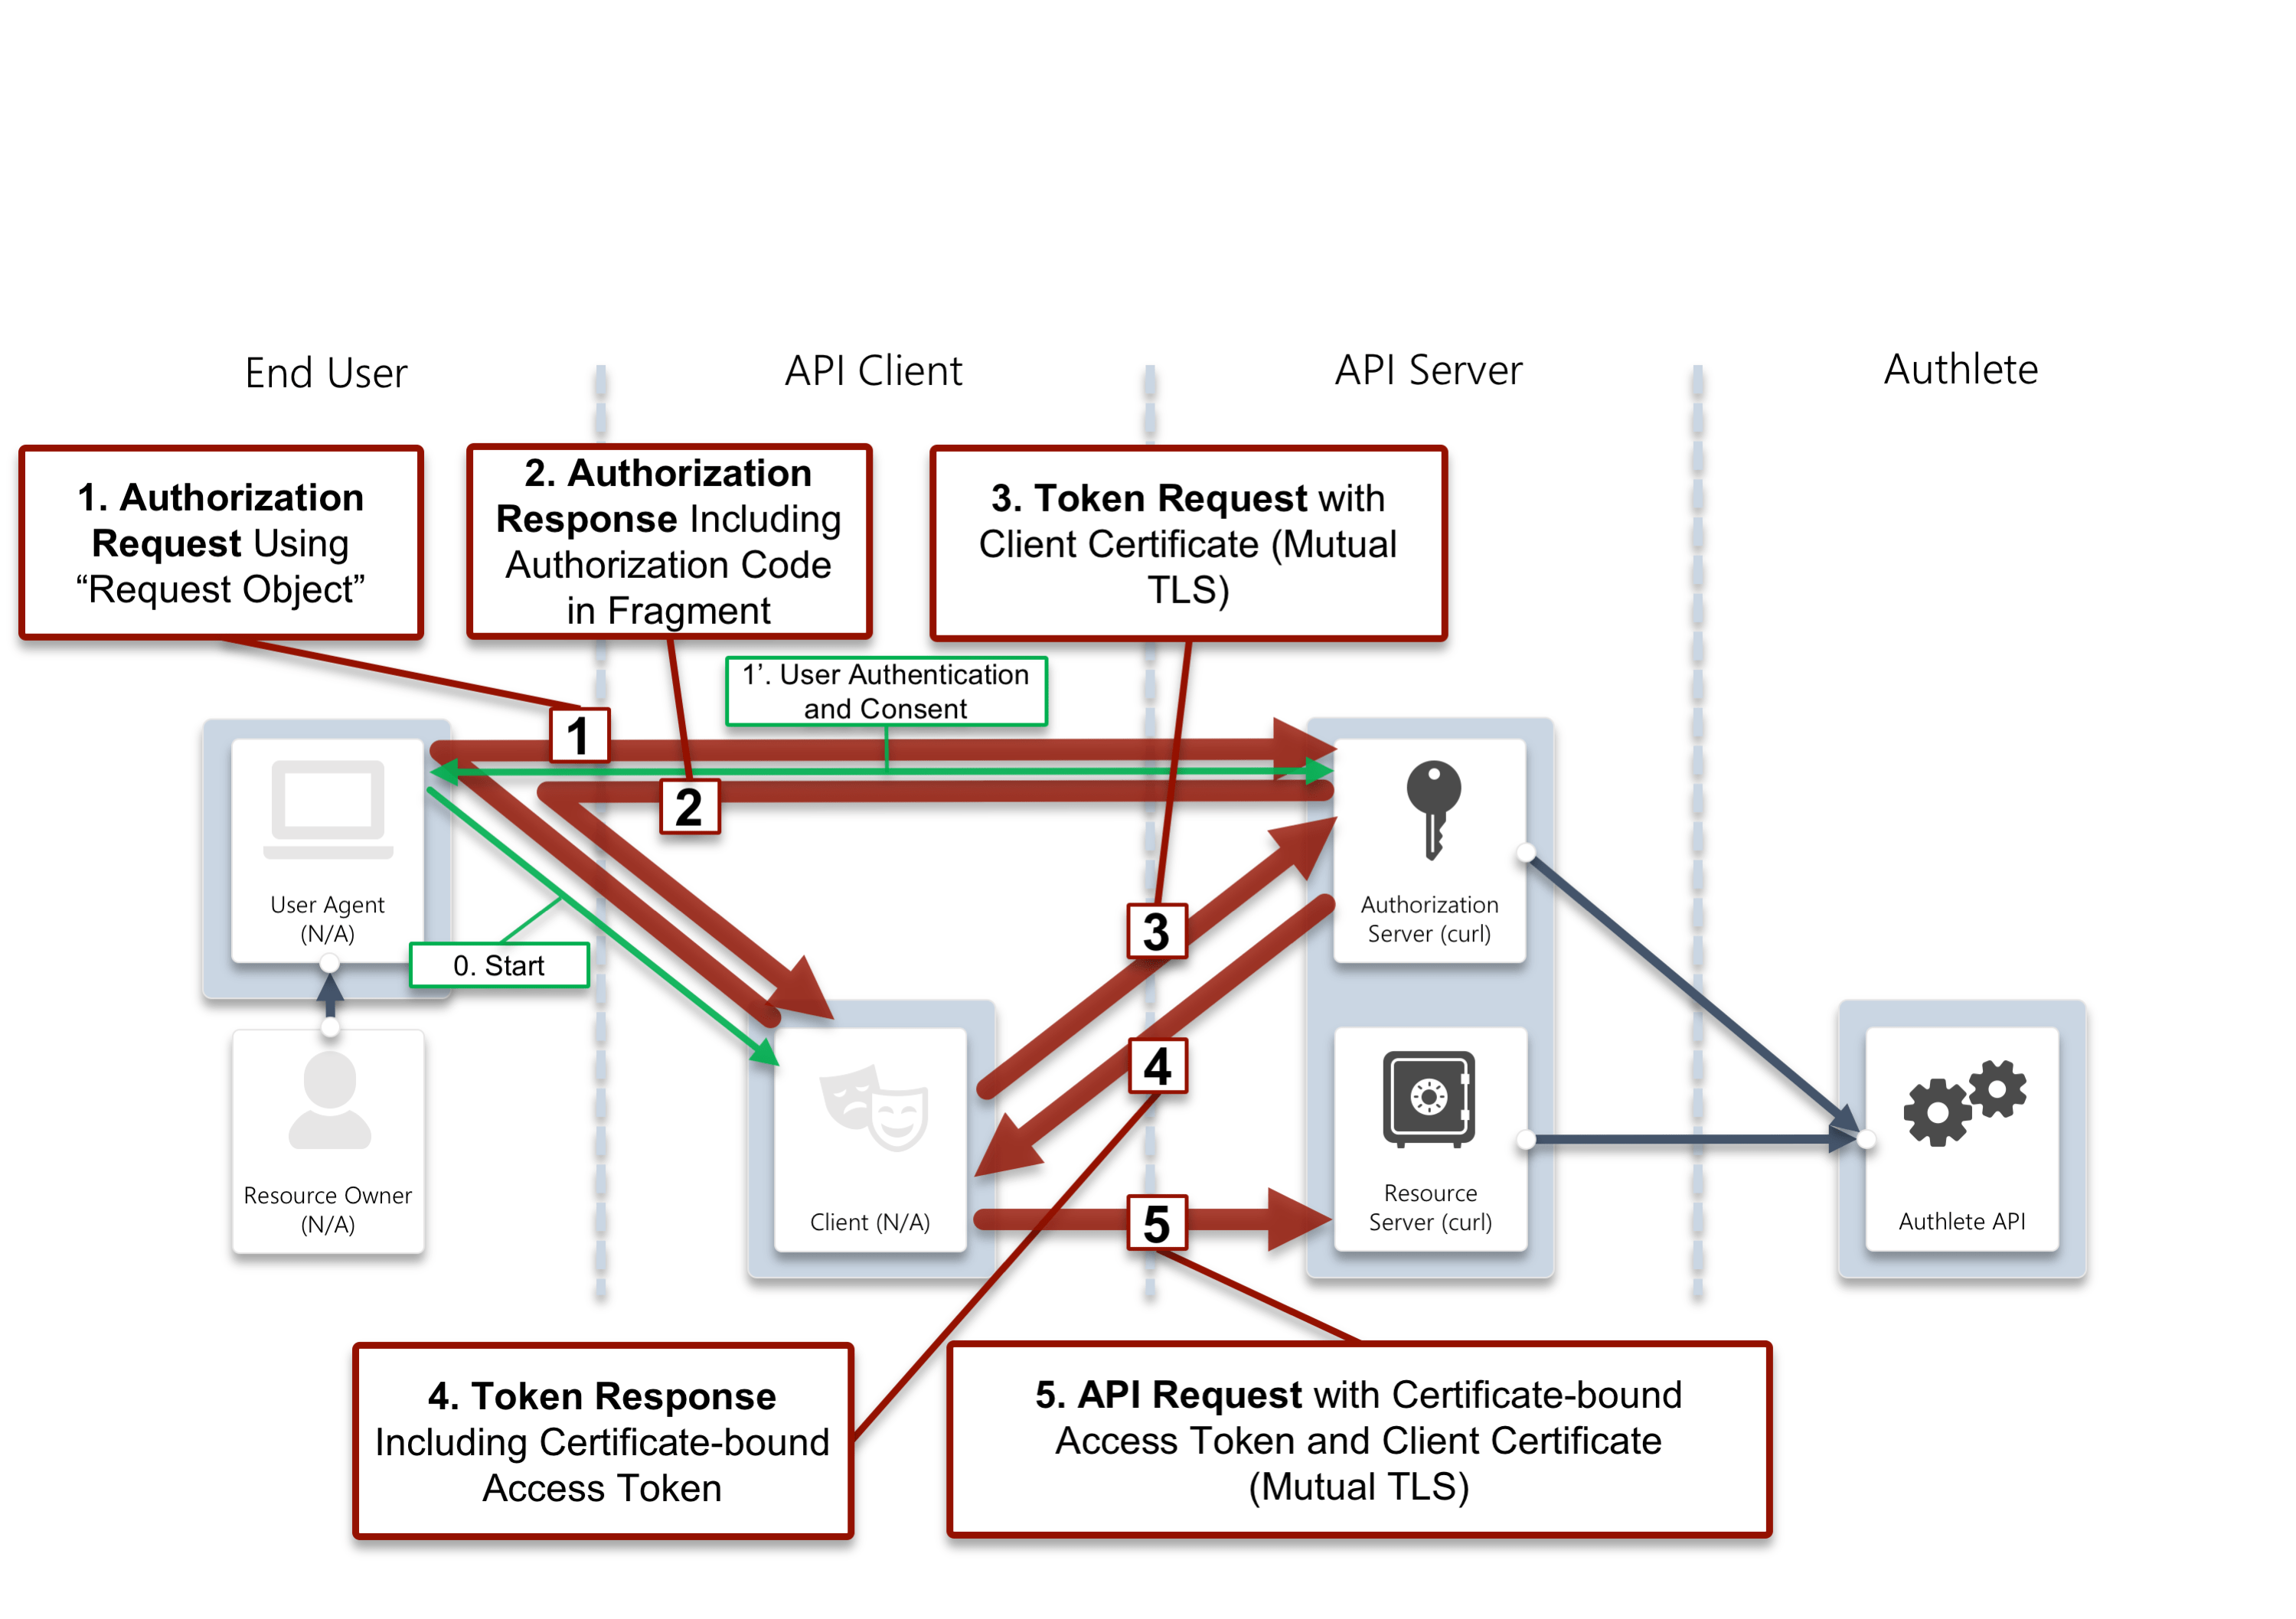
1. Authorization request
A FAPI-compliant client has to employ a request object to craft an authorization request to a FAPI-compliant authorization server. The request object is passed to the server by either value (usingrequest parameter) or reference (request_uri parameter). In this document, the client will be using the former one.
Using Pushed Authorization Requests (PAR) is recommended for passing the object by reference.
In addition to the request object, you have to comply with other security provisions of FAPI, such as response_type parameter. In this document, the client will be using response_type=code id_token.
You need to configure JARM (JWT Secured Authorization Response Mode for OAuth 2.0) when using response_type=code.
Other settings, including claims, are to be explained later.
2. Authorization response
In this document, the server will be making a response include thecode as a fragment since response_type=code id_token is specified in the previous step.
3. Token request
An authorization server has to employ public key methods to authenticate clients on receiving a token request. In this document, the server will be using mutual TLS authentication.4. Token response
An authorization server has to bind an access token with a client certificate obtained from mutual TLS communication at token endpoint of the server, and make a token response to the client.5. API request
An client and a resource server have to establish a mutual TLS communication. The resource server will be verifying the binding between the client certificate and the access token in an API request and then making a response if the binding is valid.Initial setup
Create a Service in Authlete Management Console
- Log in to the Authlete Management Console at https://console.authlete.com/.
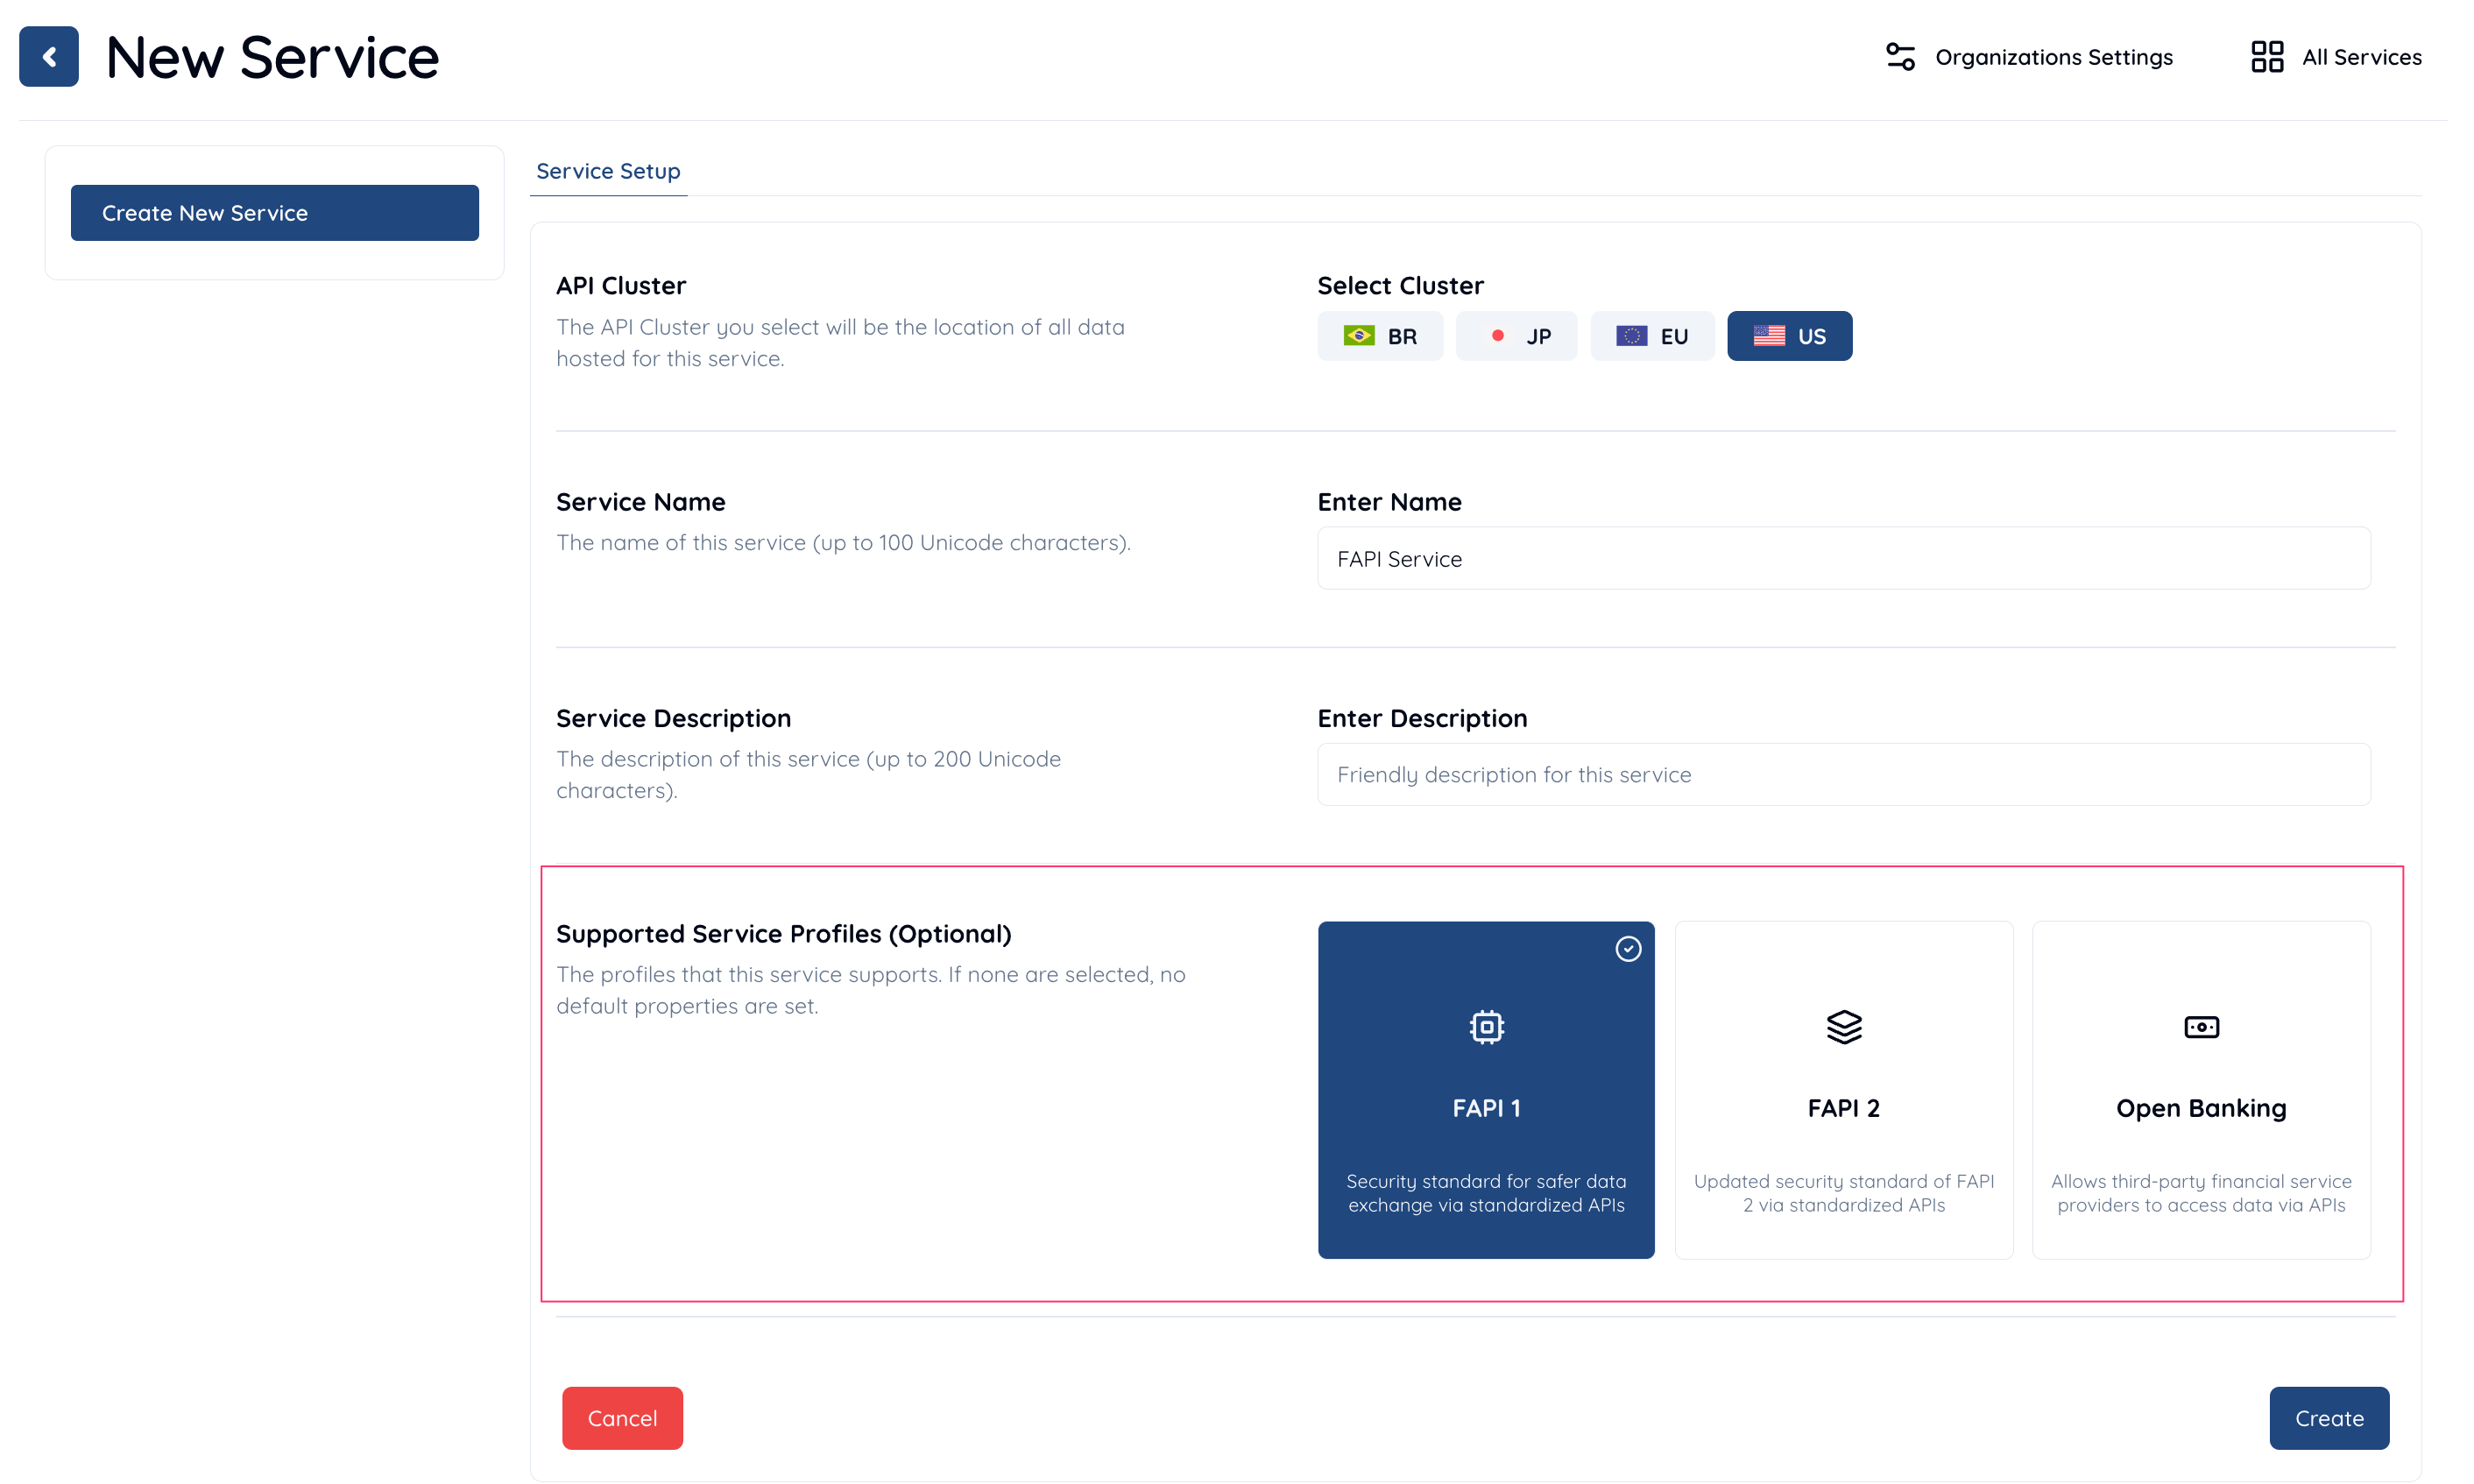
- Go to your descired Organization. Click the Create New Service button. This will open the service creation page.
-
Fill in the following fields:
- Service Name: Provide an arbitrary name for your service, e.g.,
FAPI Service. - Service Description: (Optional) Add a friendly description for your service.
- Service Name: Provide an arbitrary name for your service, e.g.,
-
In the FAPI Profile section (optional), toggle to
Enable: - After completing the details, click the Create button.
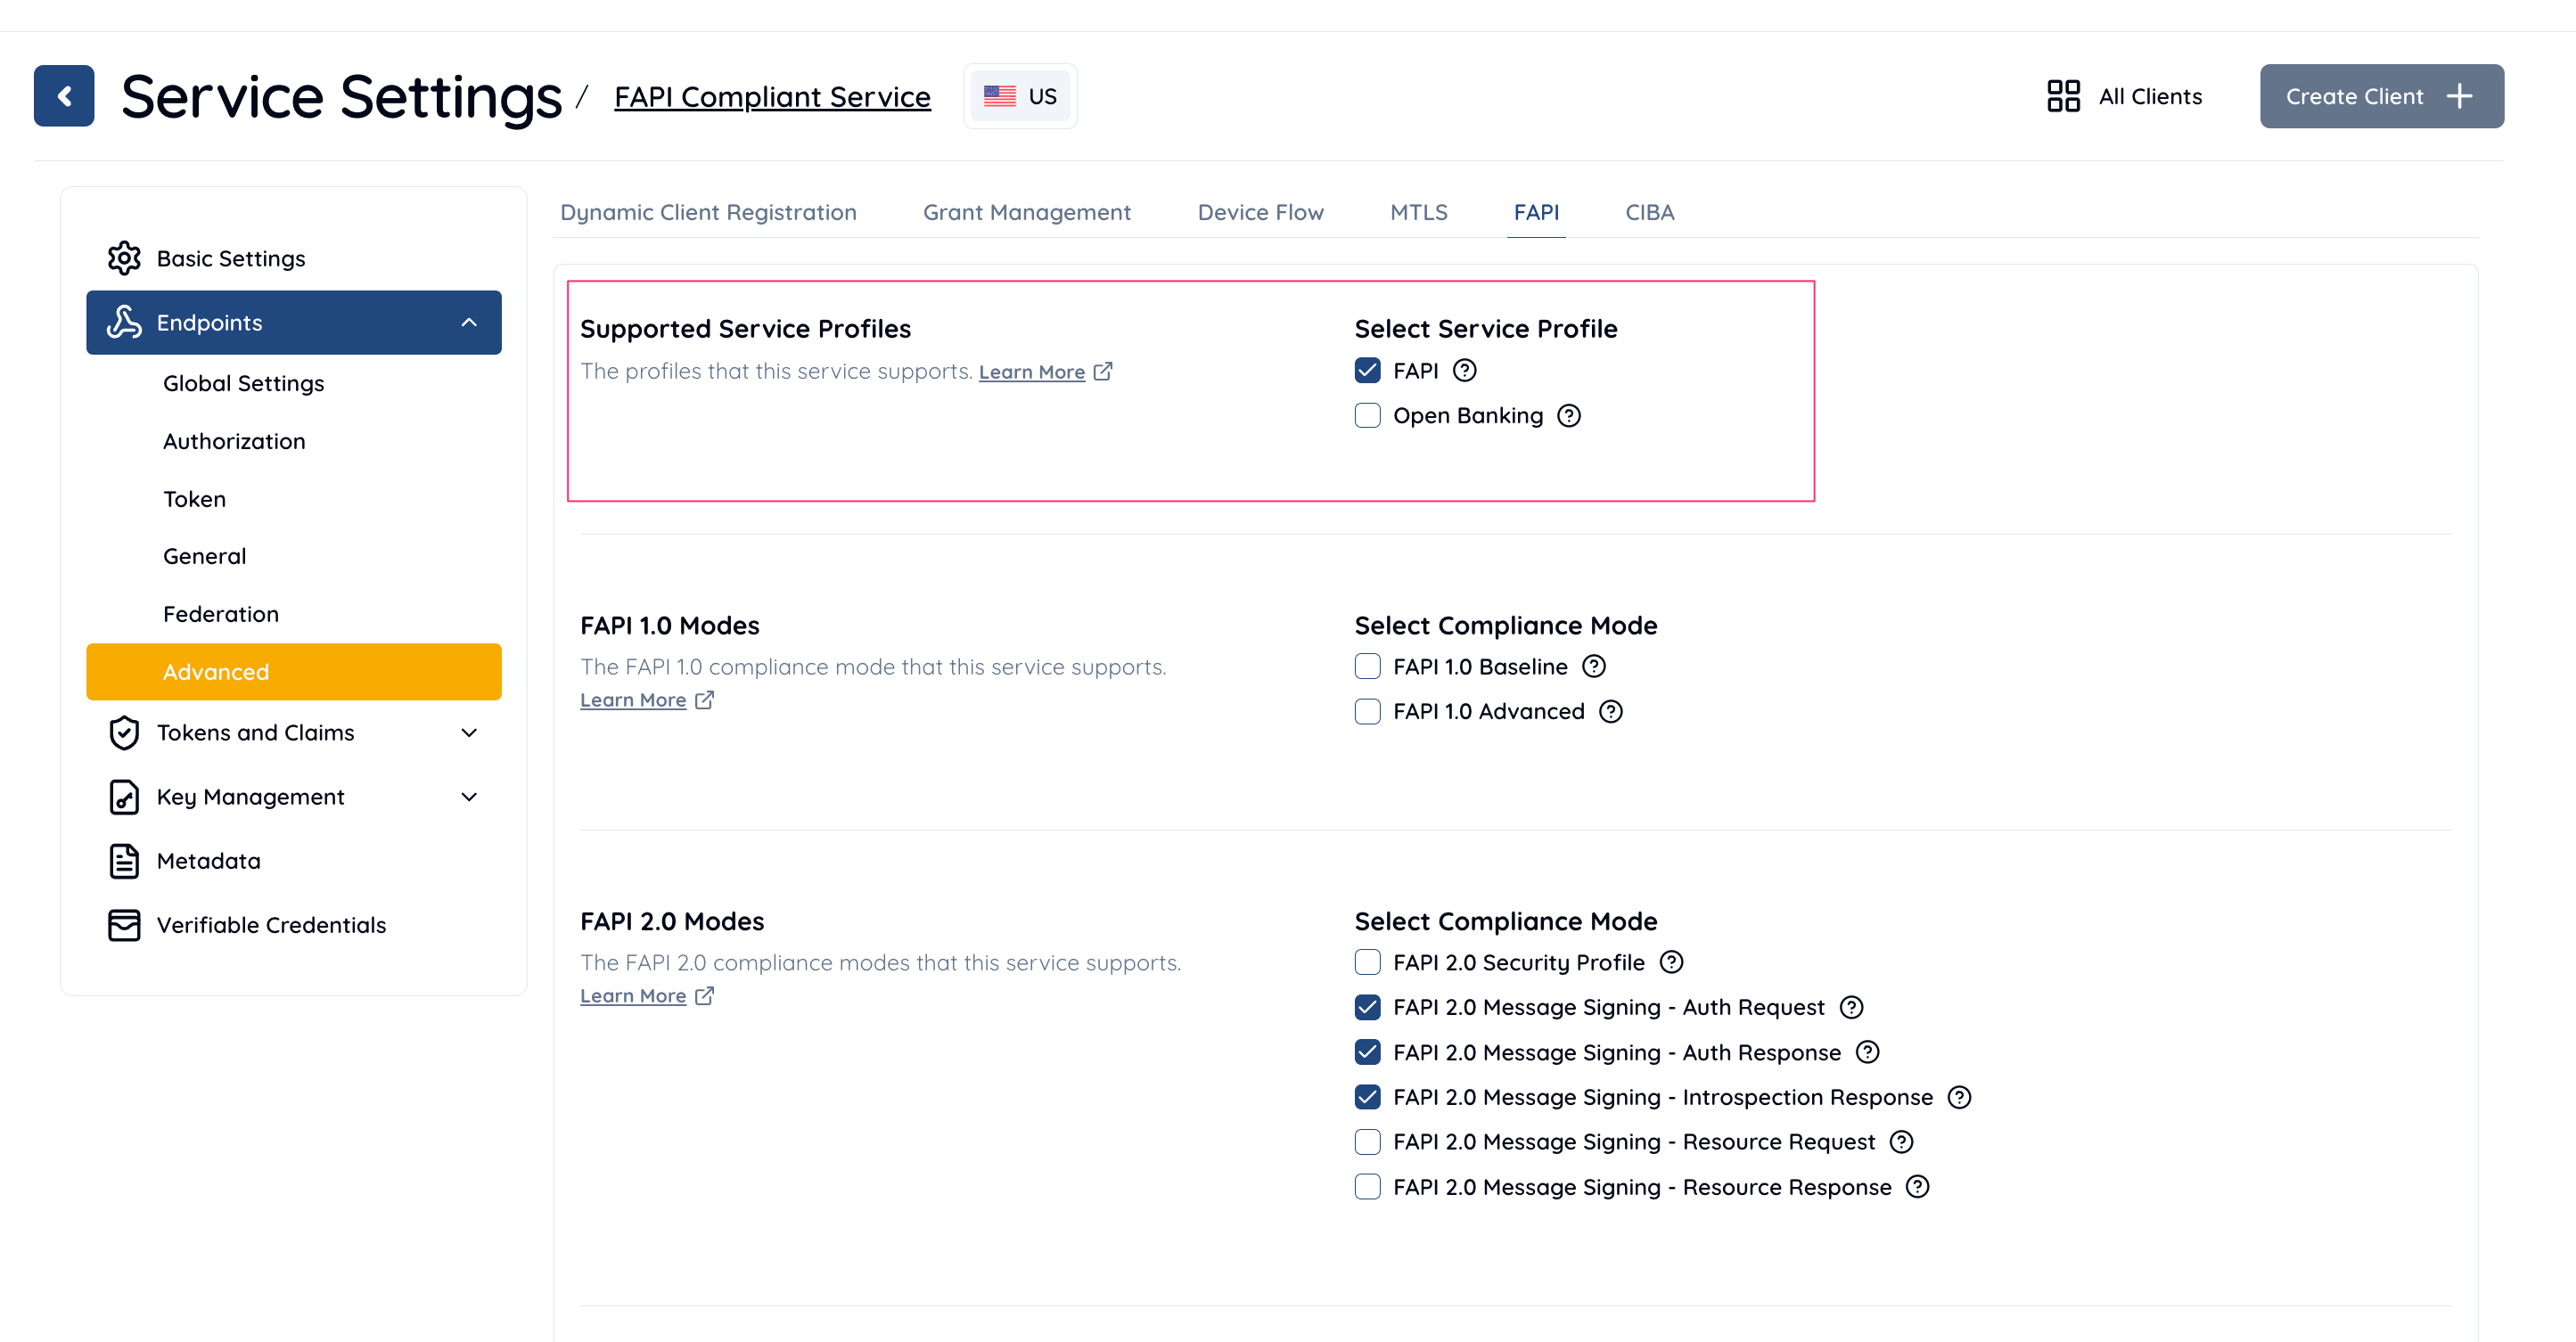
 If you have an existing service where you want to enable FAPI, open the Service Settings for your service and navigate to Endpoints > Advanced.
- In the FAPI section, enable the FAPI Profile option.
- If you want to statically apply FAPI compliance, you can select the appropriate compliance level here. For this tutorial, we will dynamically apply compliance based on request scope, so leave this section unchecked.
- Click Save Changes to apply the configuration.
Adding a Scope and Scope Attribute to Enforce FAPI
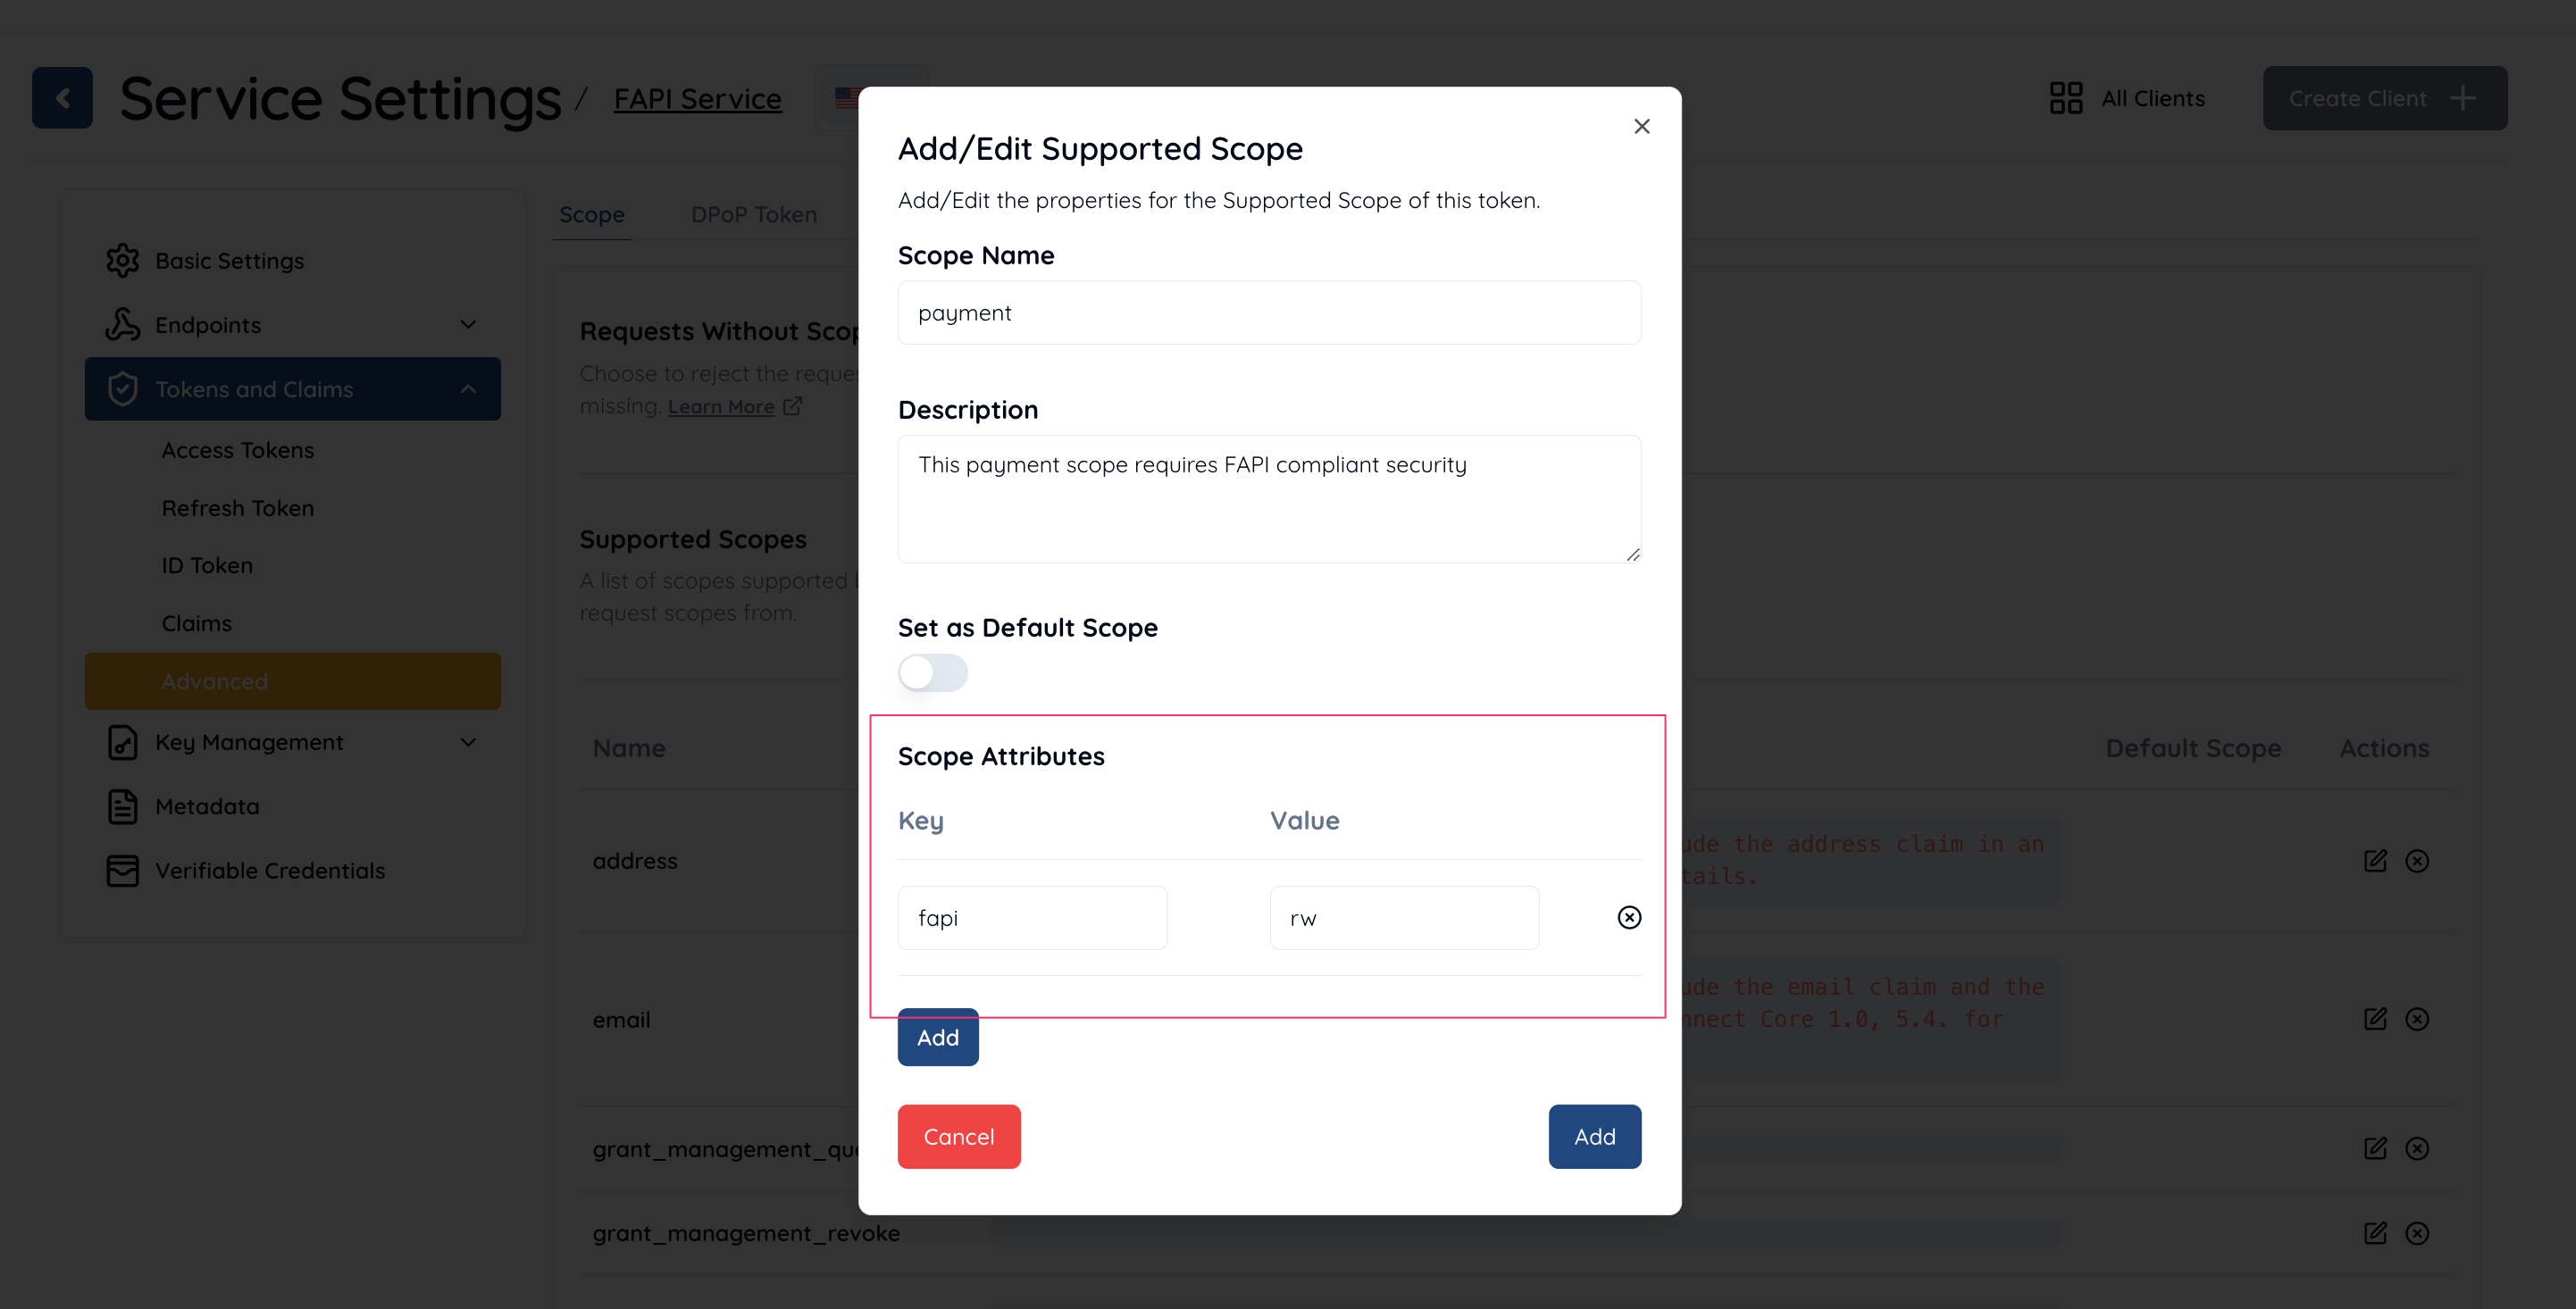
To add a scope with FAPI enforcement:- Navigate to Service Settings > Tokens and Claims > Advanced > Scope.
- In the Supported Scopes section, click the Add button to create a new scope.
- Fill in the scope details:
- Scope Name: Enter the name of the scope, e.g.,
payment. - Description: Provide a description, such as:
This payment scope requires FAPI compliant security.
- Scope Name: Enter the name of the scope, e.g.,
- Leave Set as Default Scope disabled unless you want this scope to be applied by default for all request.
- Under Scope Attributes, add a key-value pair to enforce FAPI:
- Key:
fapi - Value:
rw
- Key:
- Click Add to add the scope.
- Click Save to save the scope.
Adding a New Client
In the Authlete Management Console, locate and click on your FAPI Service, then click the Create Client button.-
Enter the following details:
- Client Name: Enter
FAPI Client. - Client ID: Leave this blank to allow Authlete to generate the
client_id. - Client Description: (Optional) Add a friendly description for the client.
- Client Type: Select CONFIDENTIAL.
- Client Name: Enter
- Click the Create button to create the client.
-
The Client ID will be automatically generated by Authlete. This
client_idwill be used by the client to make requests to the authorization server. A Client Secret will also be generated but is not used in this tutorial.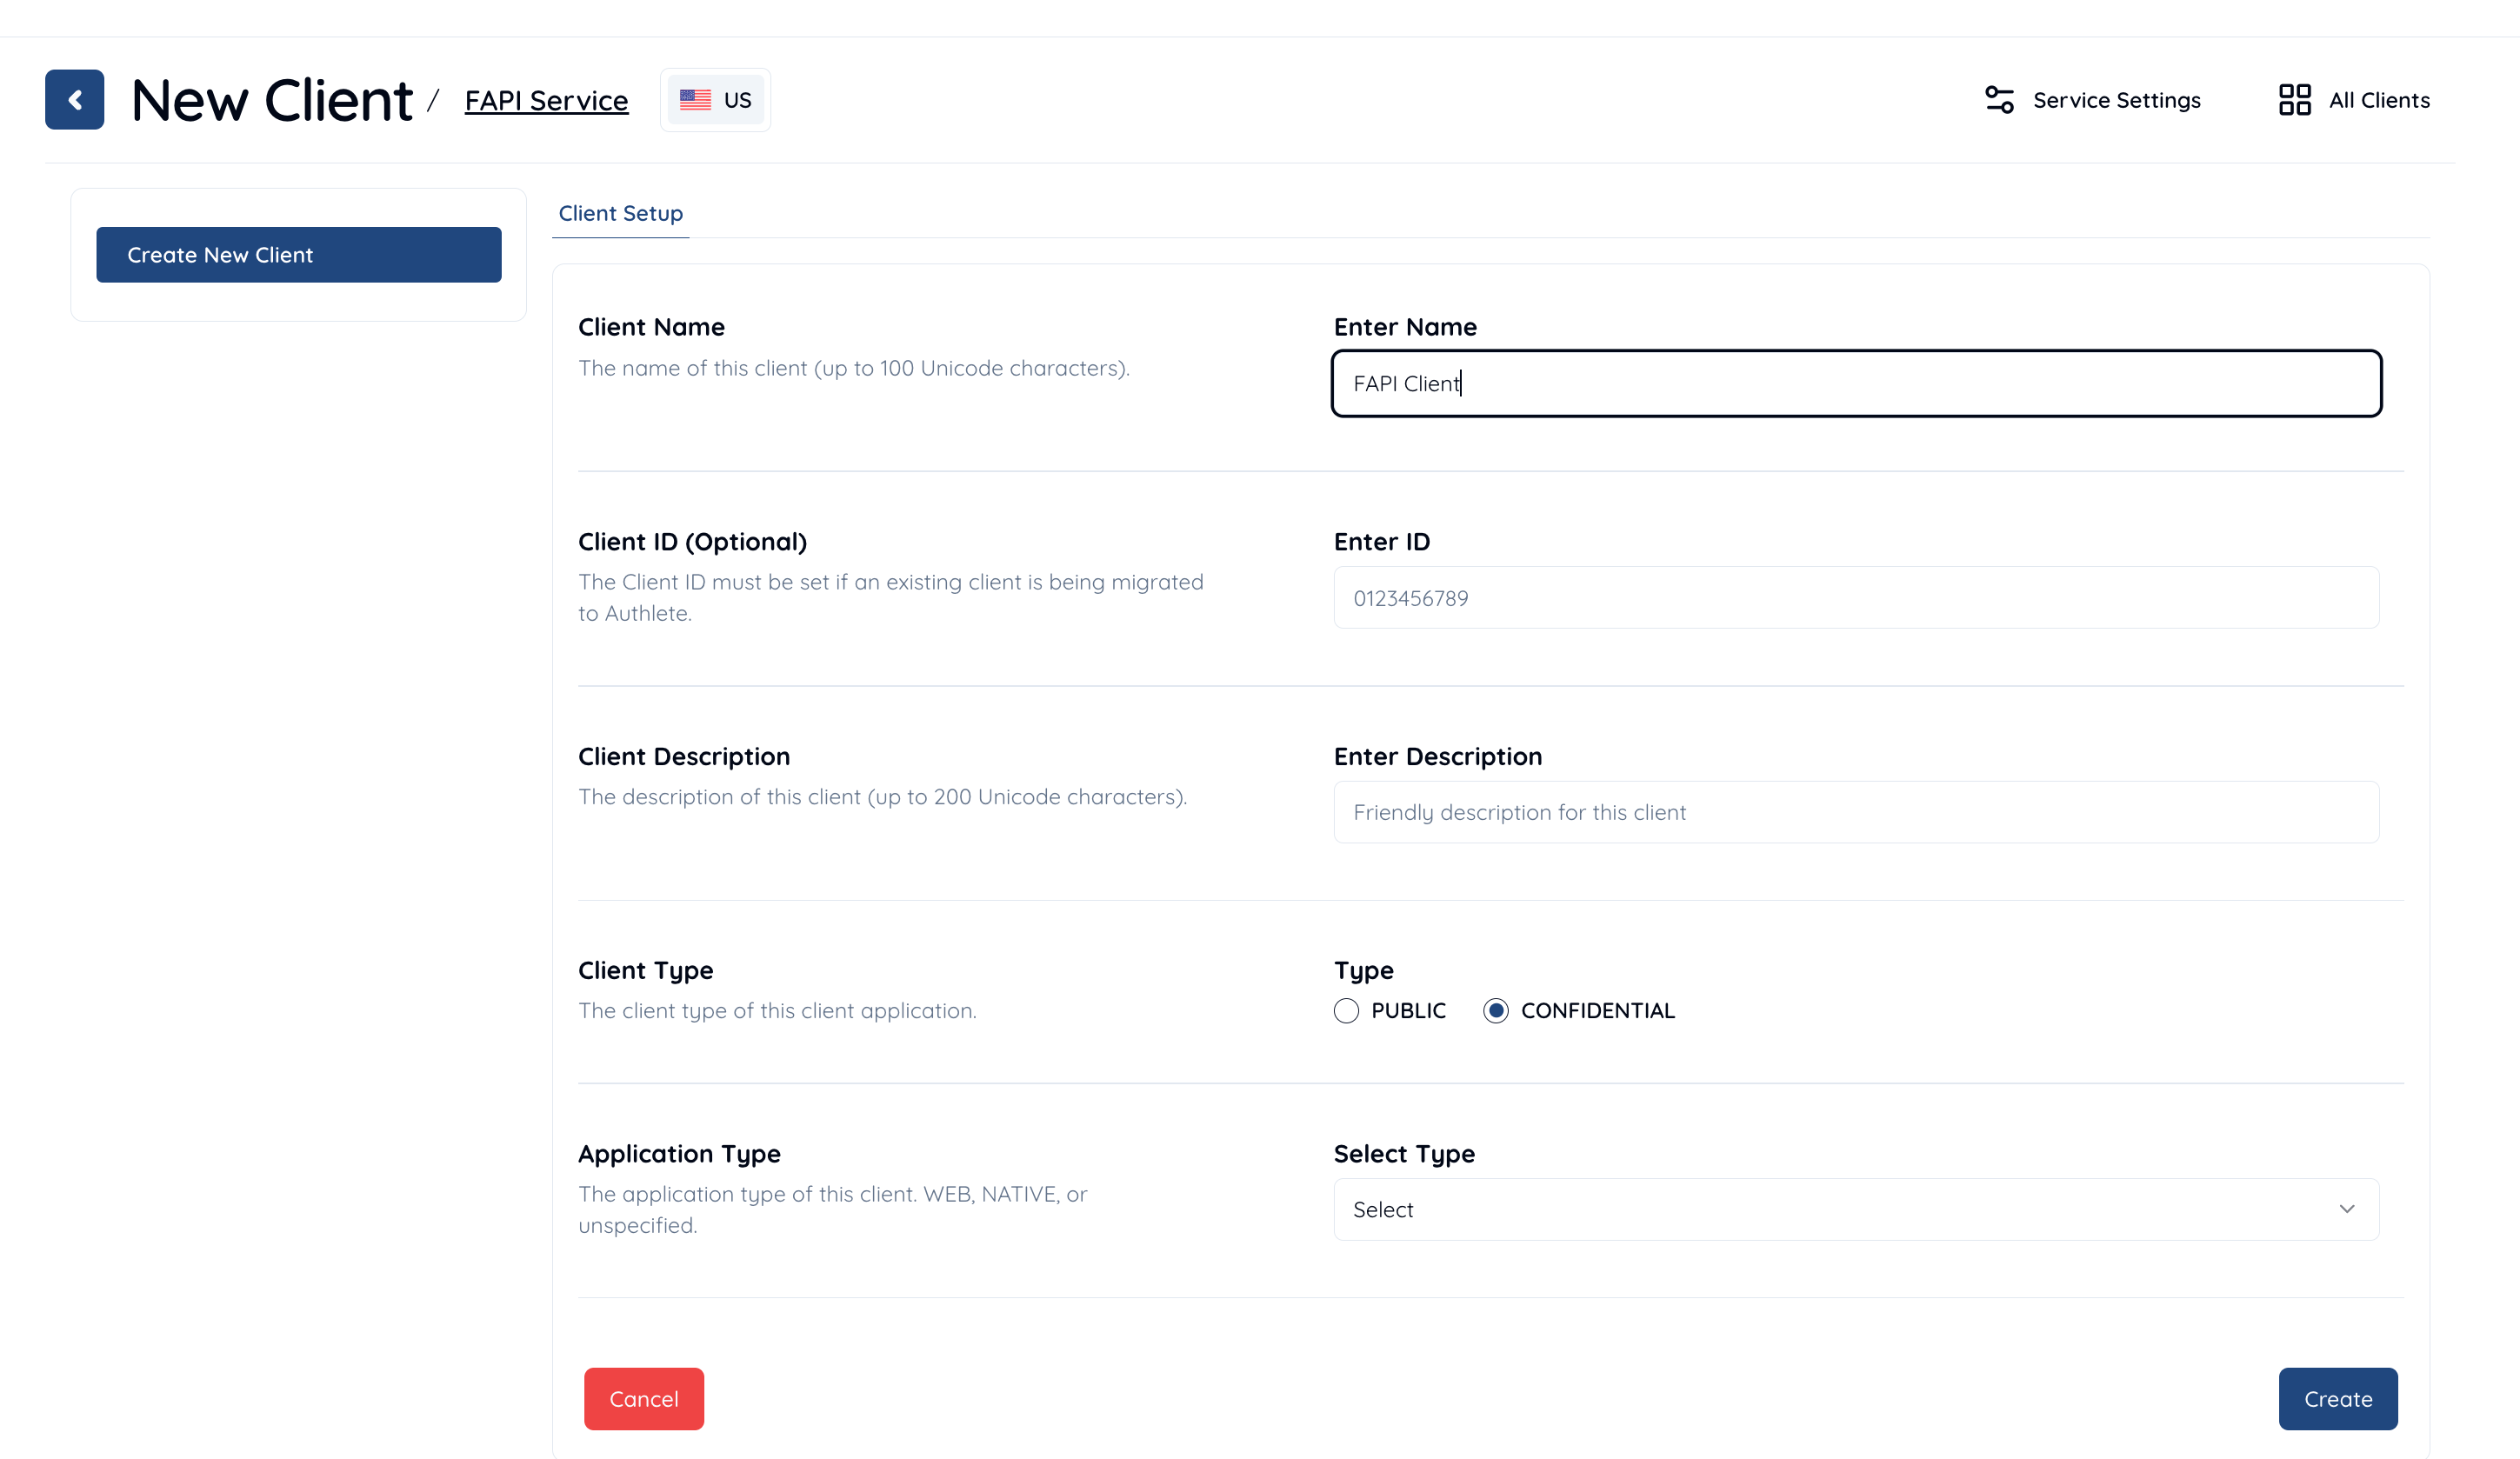
Example Configuration
Testing the initial configuration
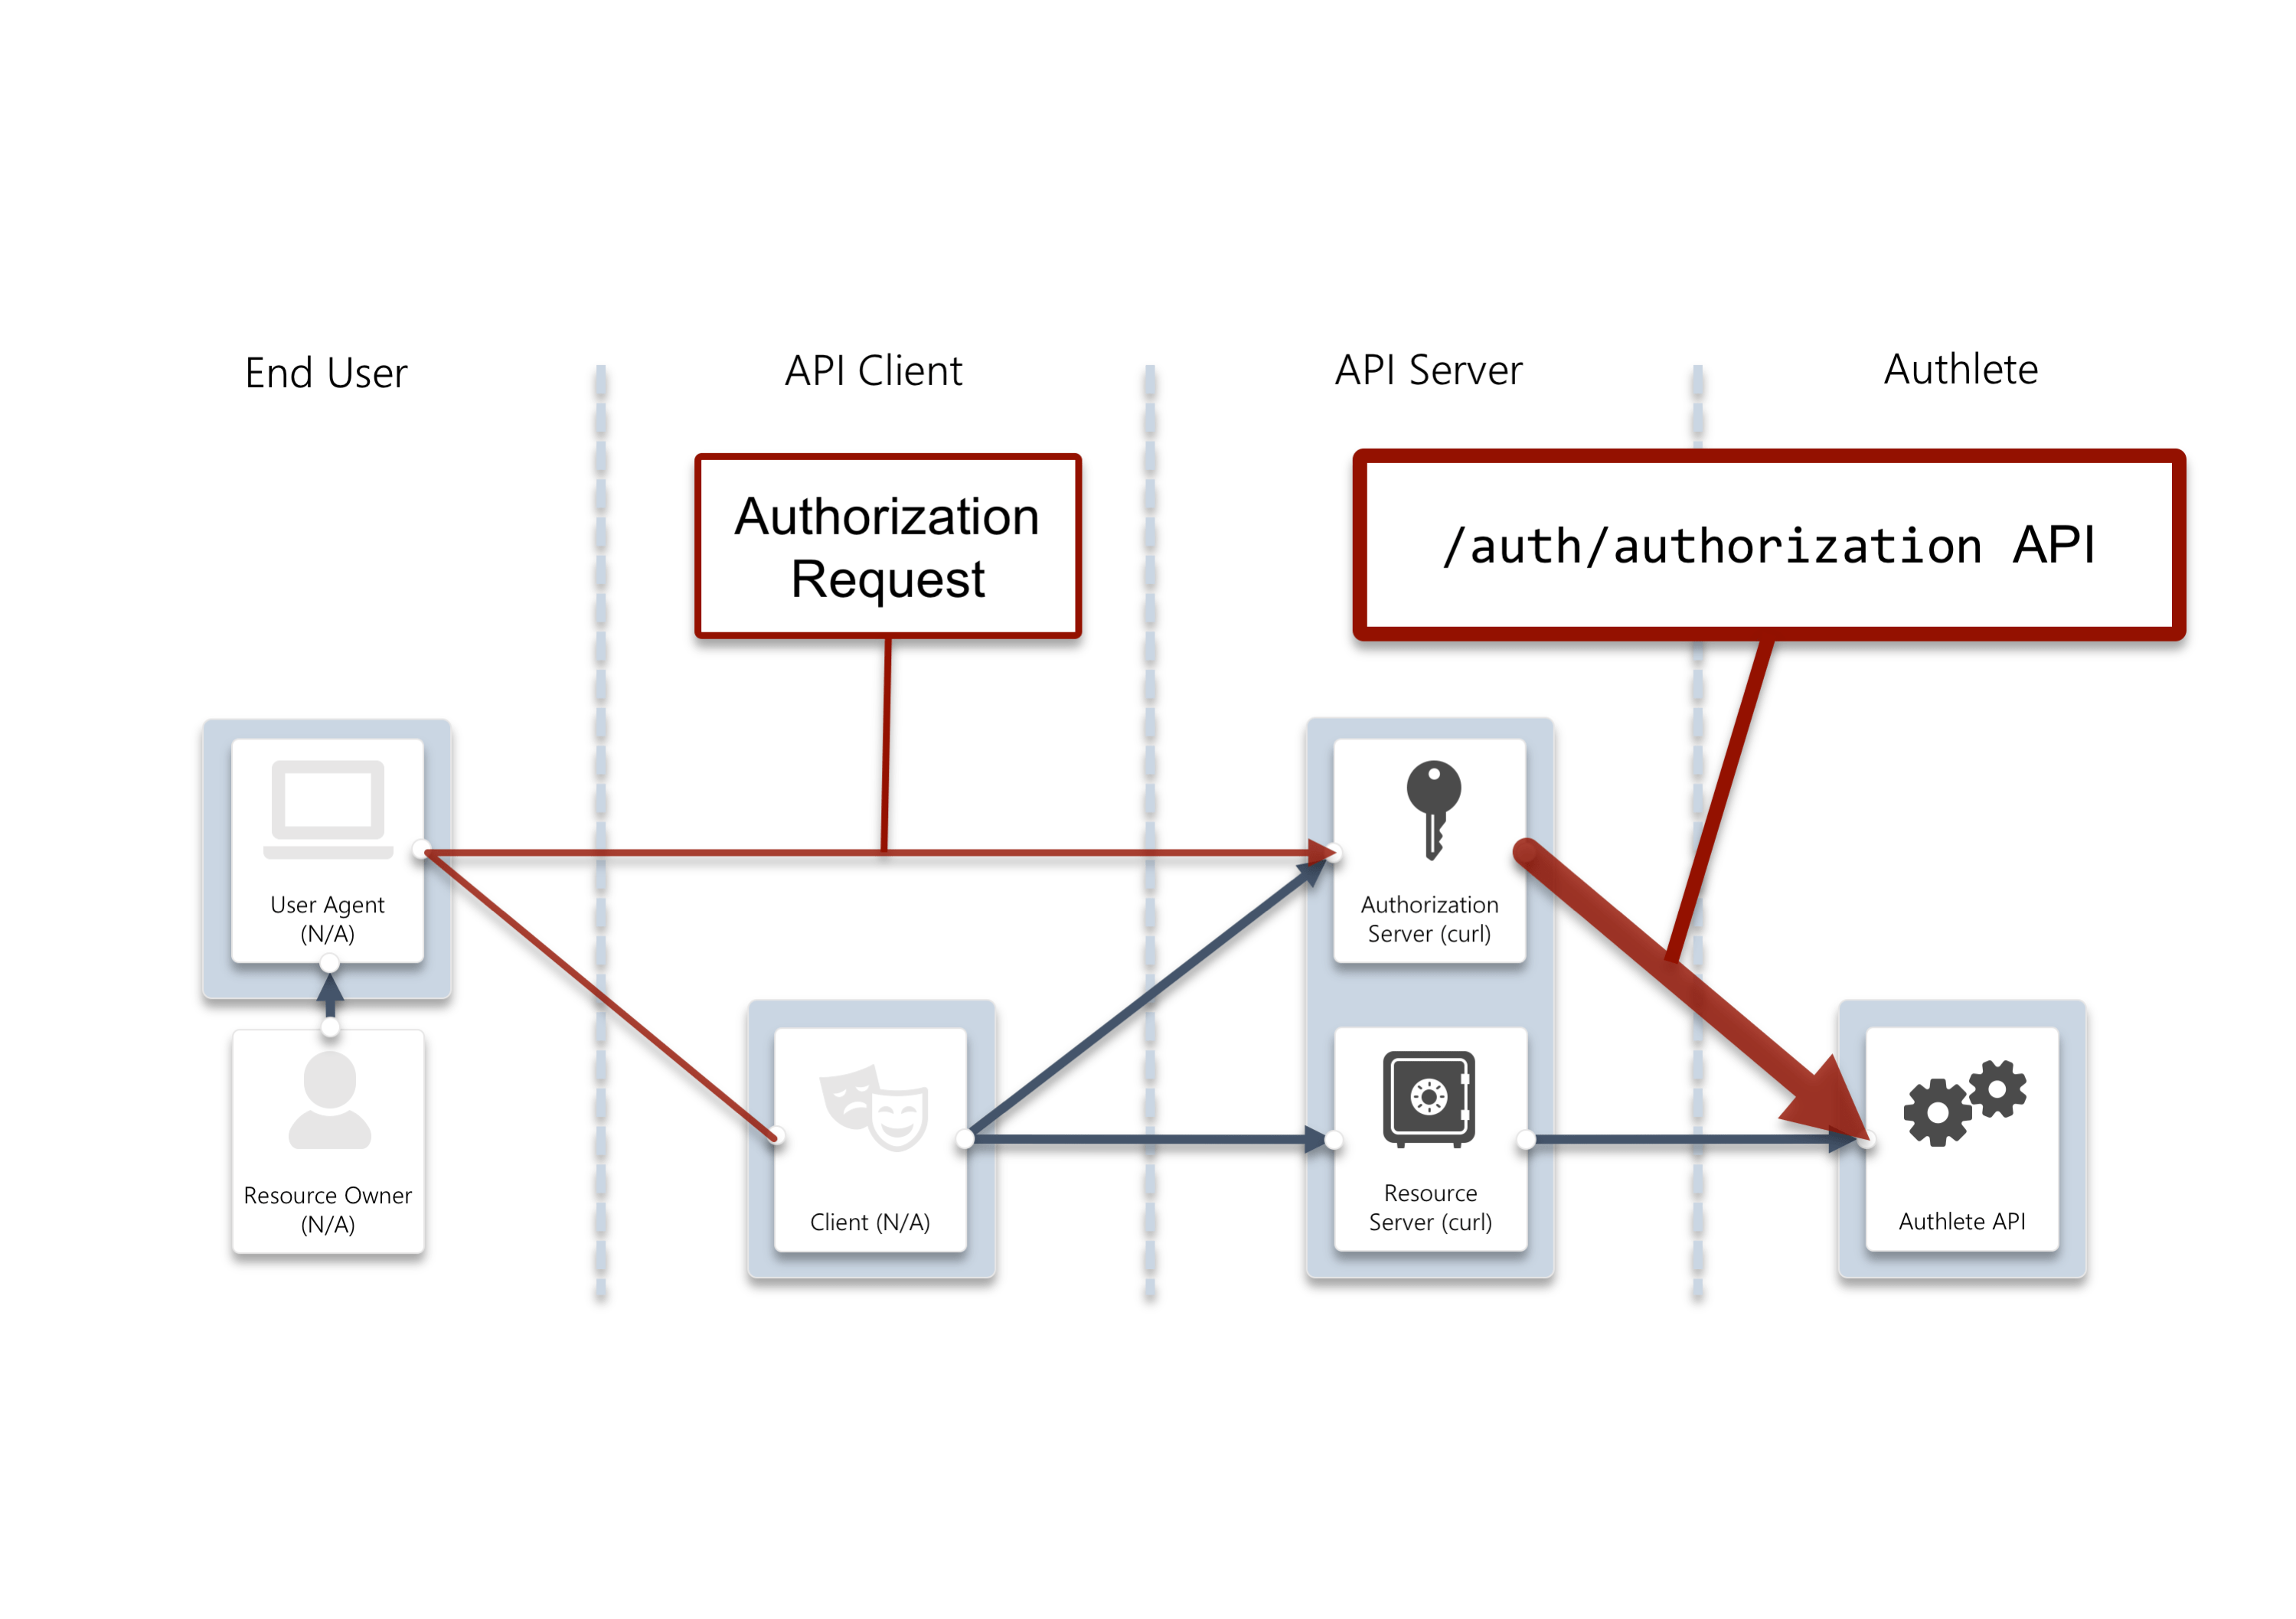
/auth/authorization API for that purpose.
Authorization request for non-FAPI scope
Let’s assume that the auhtorization server receives an authorization request (scope=openid) that doesn’t include any scopes subject to FAPI. The server will make a request to /auth/authorization API. Here’s a curl version of the request.
Make sure to replace {SERVICE ACCESS TOKEN} and {Client ID} with your own values generated in the previous step.
{SERVICE ACCESS TOKEN} and {Client ID} with your own values generated in the previous step.
If you are using Windows 10’s bundled curl.exe command via PowerShell, make sure the command is curl.exe instead of curl, escape " characters and use backticks (`) to break lines.
resultMessage, Authlete accepted the authorization request when its scopes are not FAPI-related. So what happens if the request includes FAPI scopes? Let’s try it in the next section.
Authorization request for FAPI scope (Part 1)
Let’s assume the authorization server receives an authorization request (scope=openid payment) that does include a scope (payment) subject to FAPI. The server will make a request to /auth/authorization API. Here’s a curl version of the request.
resultMessage, response_type=code is not allowed.
This is due to security provisions of FAPI. 5.2. Advanced security provisions / 5.2.2. Authorization server states as follows.
Thus you have to use either
- shall require
- the
response_typevaluecode id_token, or- the
response_typevaluecodein conjunction with theresponse_modevaluejwt;
response_type=code id_token, or response_type=code with response_mode=jwt in a FAPI-compliant environment. In other words, response_type=code without the response_mode=jwt parameter is prohibited i.e. an authorization server must not accept them.
Authorization request for FAPI scope (Part 2)
So, how about an authorization request that includesresponse_type=code id_token instead of response_type=code?
Let’s make a request to /auth/authorization API as follows.
resultMessage, a request object is required to proceed.
This is due to security provisions of FAPI. The same section, 5.2. Advanced security provisions / 5.2.2. Authorization server states as follows.
An authorization server has to mandate clients to pass a request object by value (
- shall only use the parameters included in the signed request object passed via the
requestorrequest_uriparameter;
request) or by reference (request_uri).
So let’s craft an authorization request with a request object in the next section to make the request FAPI-compliant.
Making a FAPI-compliant authorization request
In this section, we will create an authorization request using a a request object.Request object settings
Configuring a signing key used for a request object
We have to prepare a key for a client to sign to a request object. In this document, we will use mkjwk to create an ES256 key pair, and two types of key sets; One includes a private key and other one doesn’t. Parameters for mkjwk are as follows.
es256_keyset.txt(including a row of a private key"d")
es256_keyset_pub.txt(excluding a row of a private key"d"fromes256_keyset.txt)
Additional Client Settings
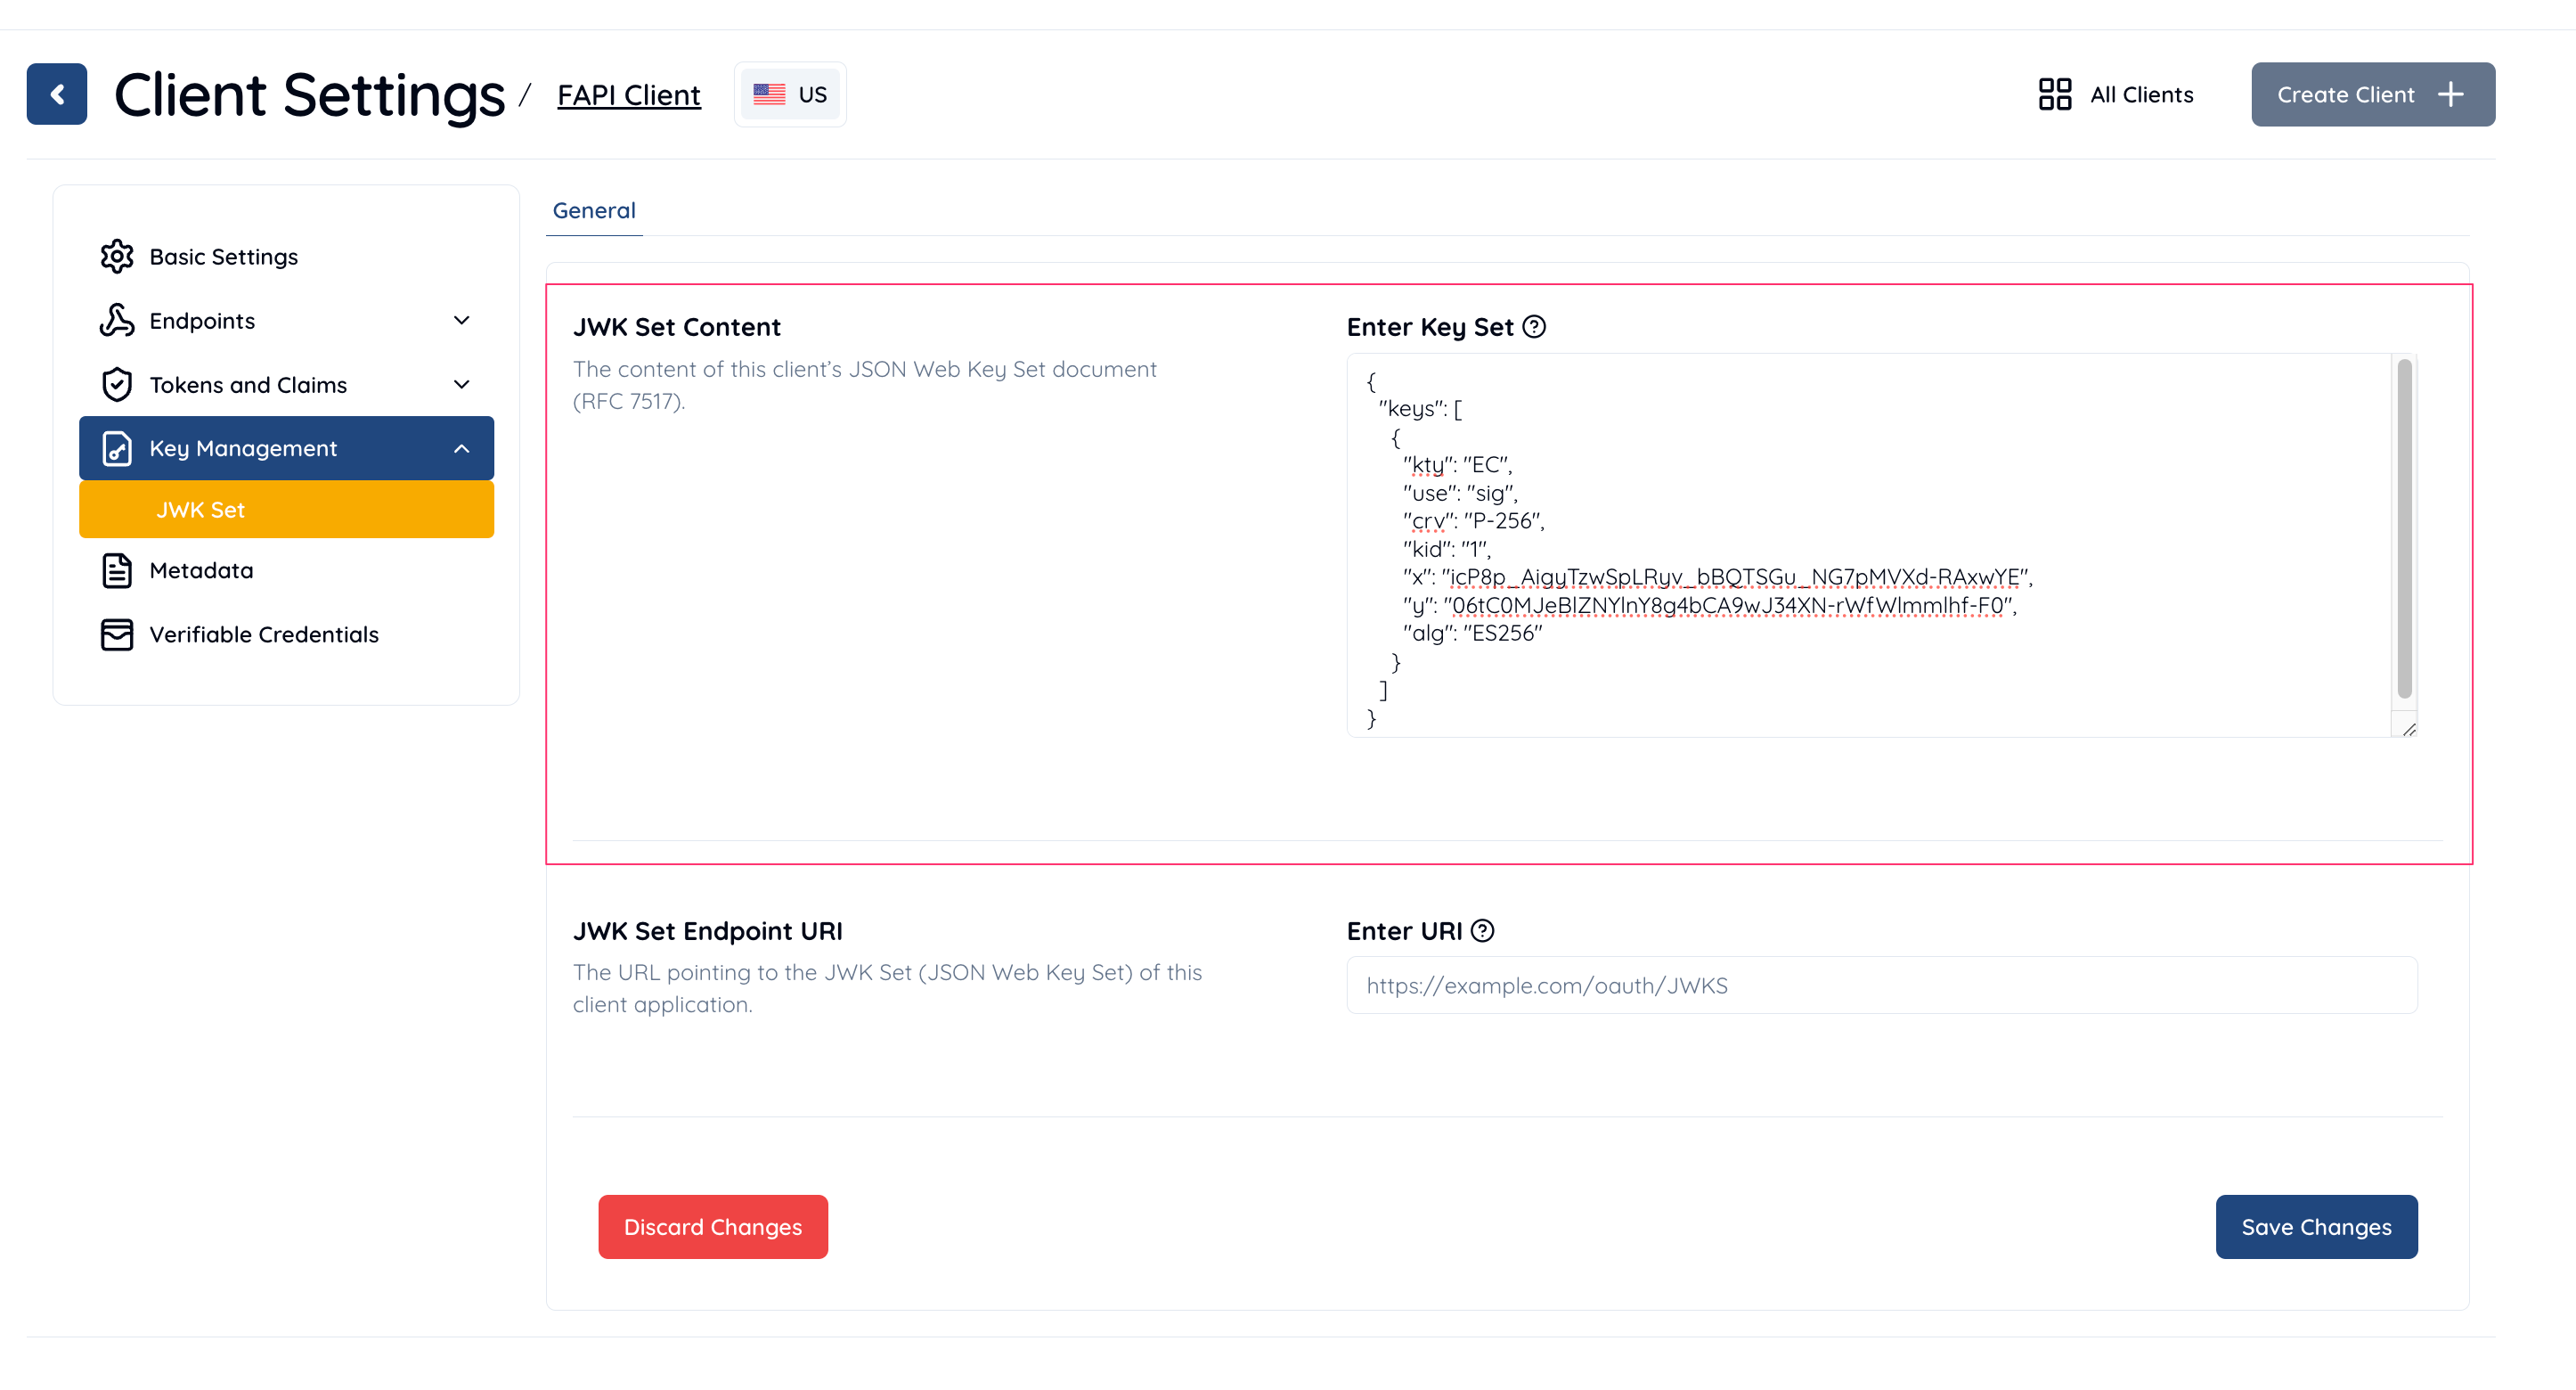
To allow Authlete to verify the signature of a request object from a client, you must register the client’s public key and specify the signing algorithm the client uses. Follow these steps in the Authlete Management Console:1. JWK Set
Navigate to Client Settings > Key Management > JWK Set and configure the following:
Paste the public key in JSON Web Key (JWK) format into the JWK Set Content field.

2. Request Signing Algorithm
Navigate to Client Settings > Endpoints > Authorization > Request Object and configure the following:
Select ES256 as the signature algorithm for the request object.
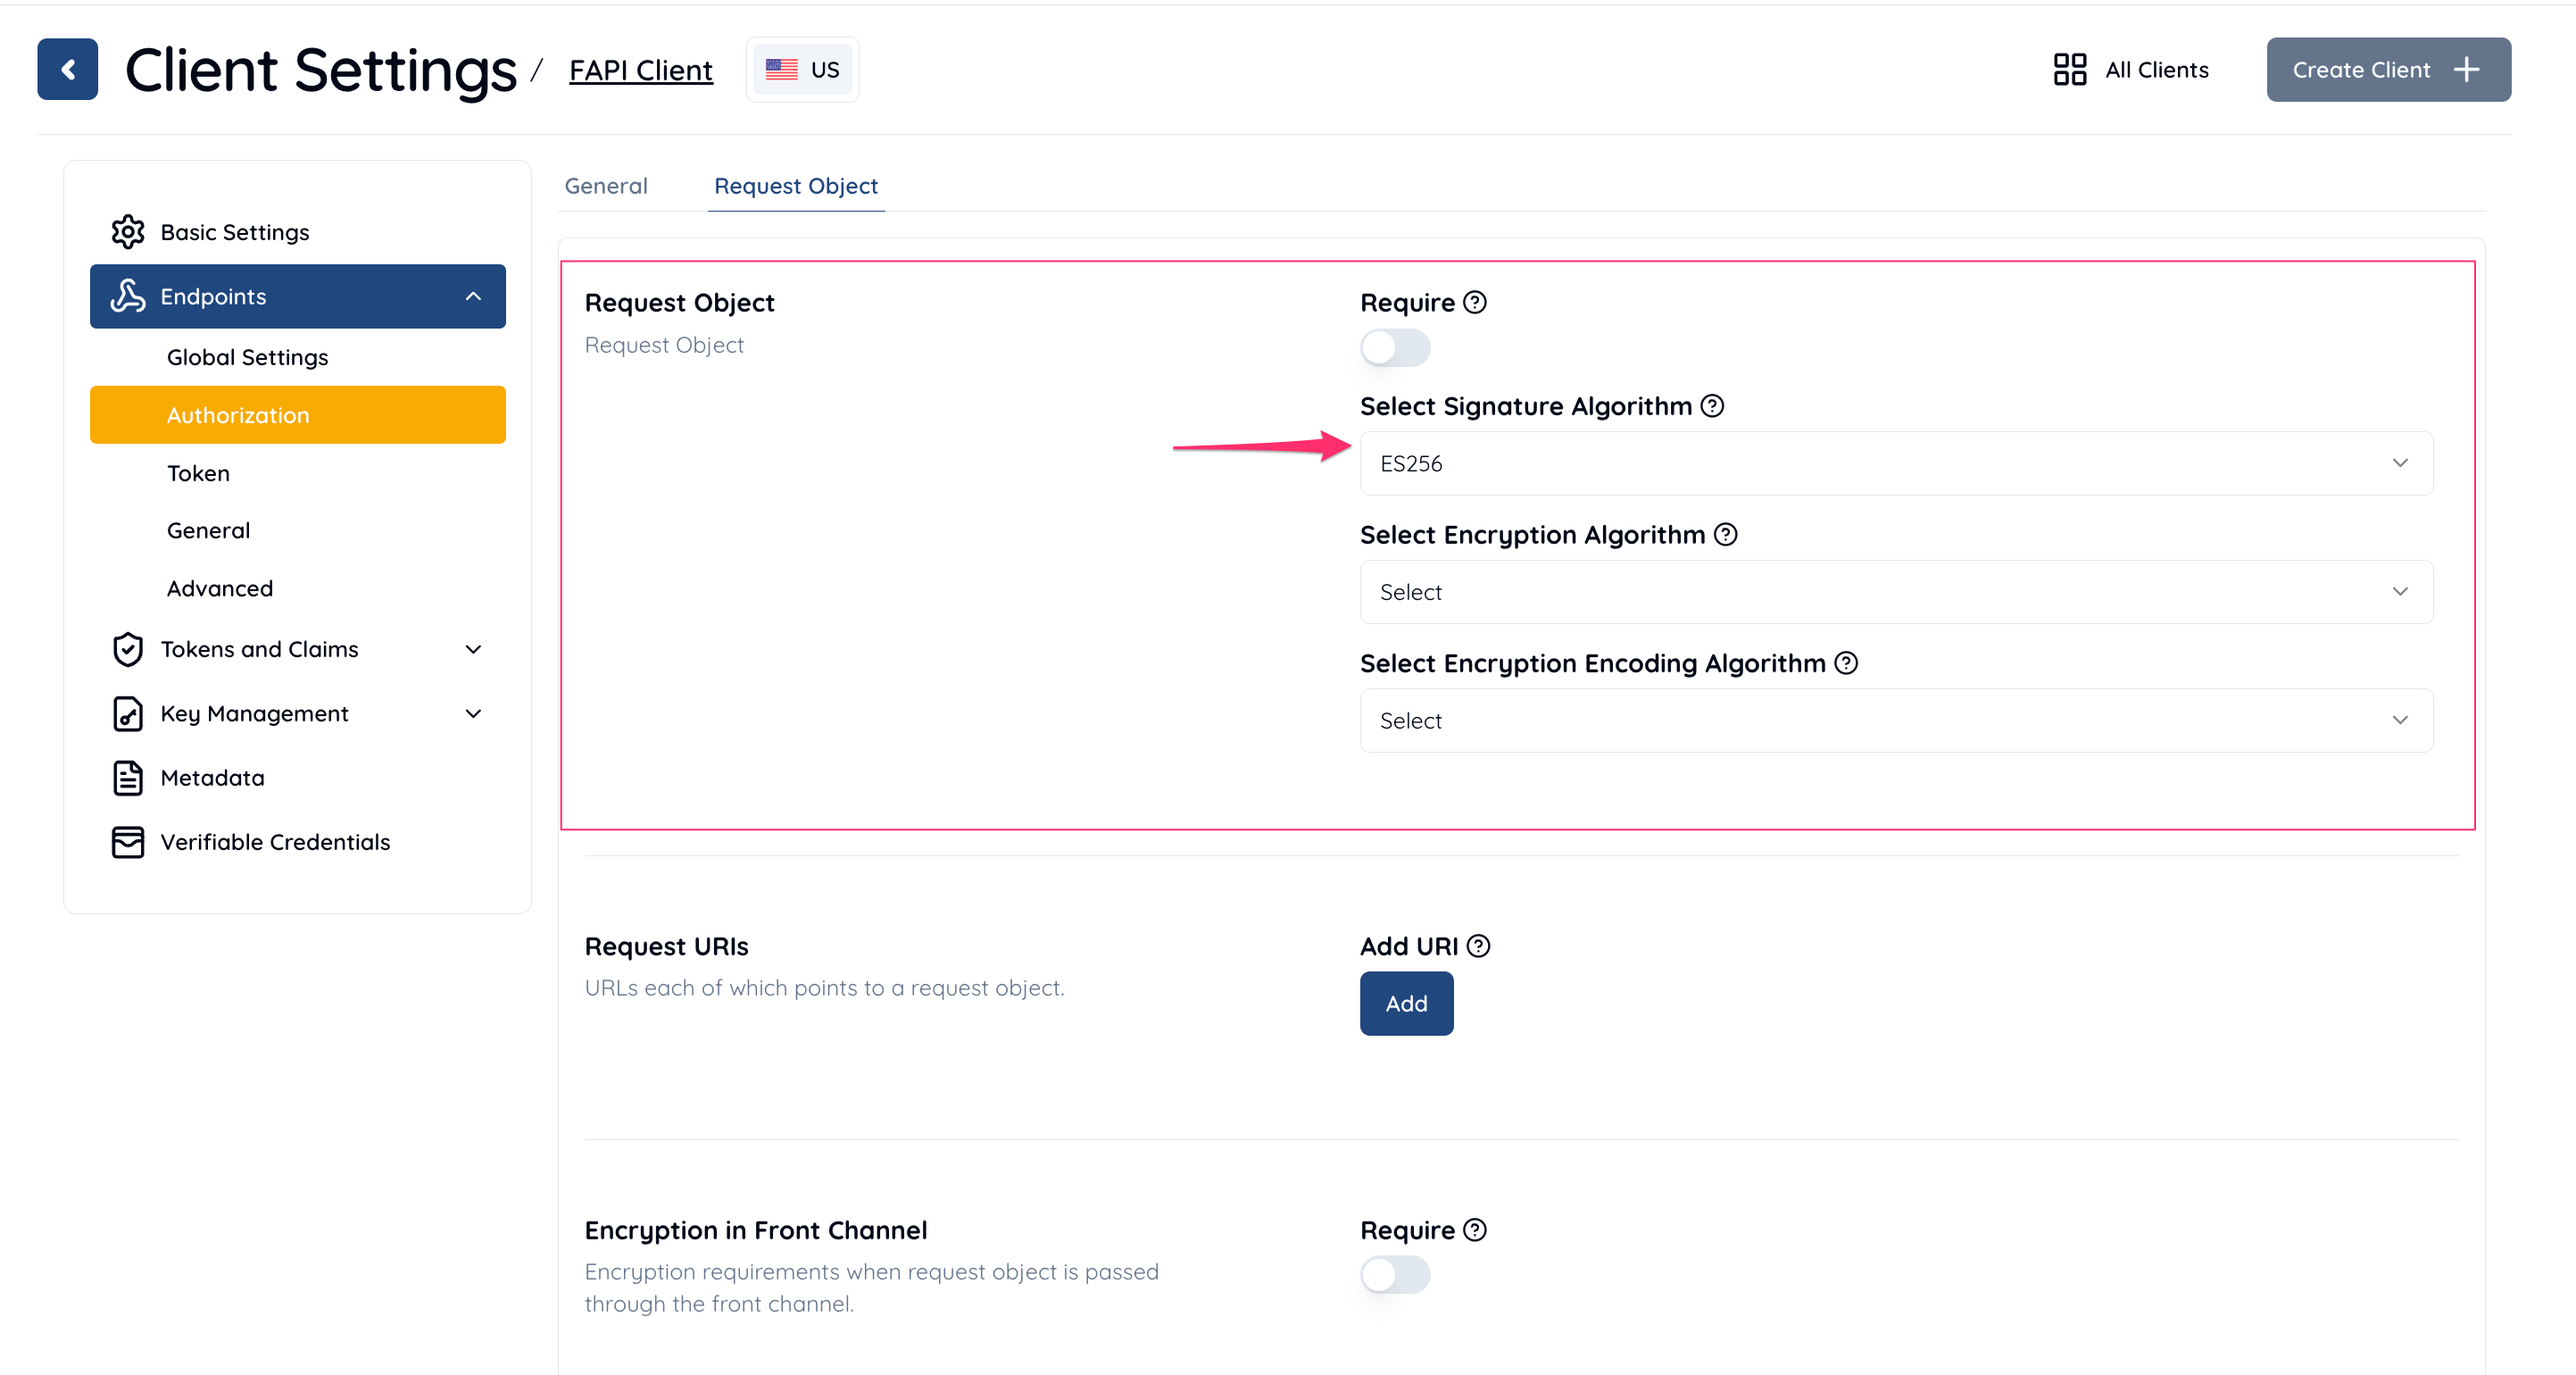 Now you’ve completed the configuration for Authlete to verify the signature of a request object.
Creating a request object
Let’s act as a client generating a request object and crafting an authorization request with the object. Here is a sample payload in this document. Enter the correct values ofclient_id, nbf and exp.
payload.txt
nbf and exp.
nbfclaim: get the current Unix time using some method (e.g.date +%s) and add it to the payload as a value ofnbfclaims. For example, if you would get a value1613373232as a result ofdate +%s, you would add the following line topayload.txt.
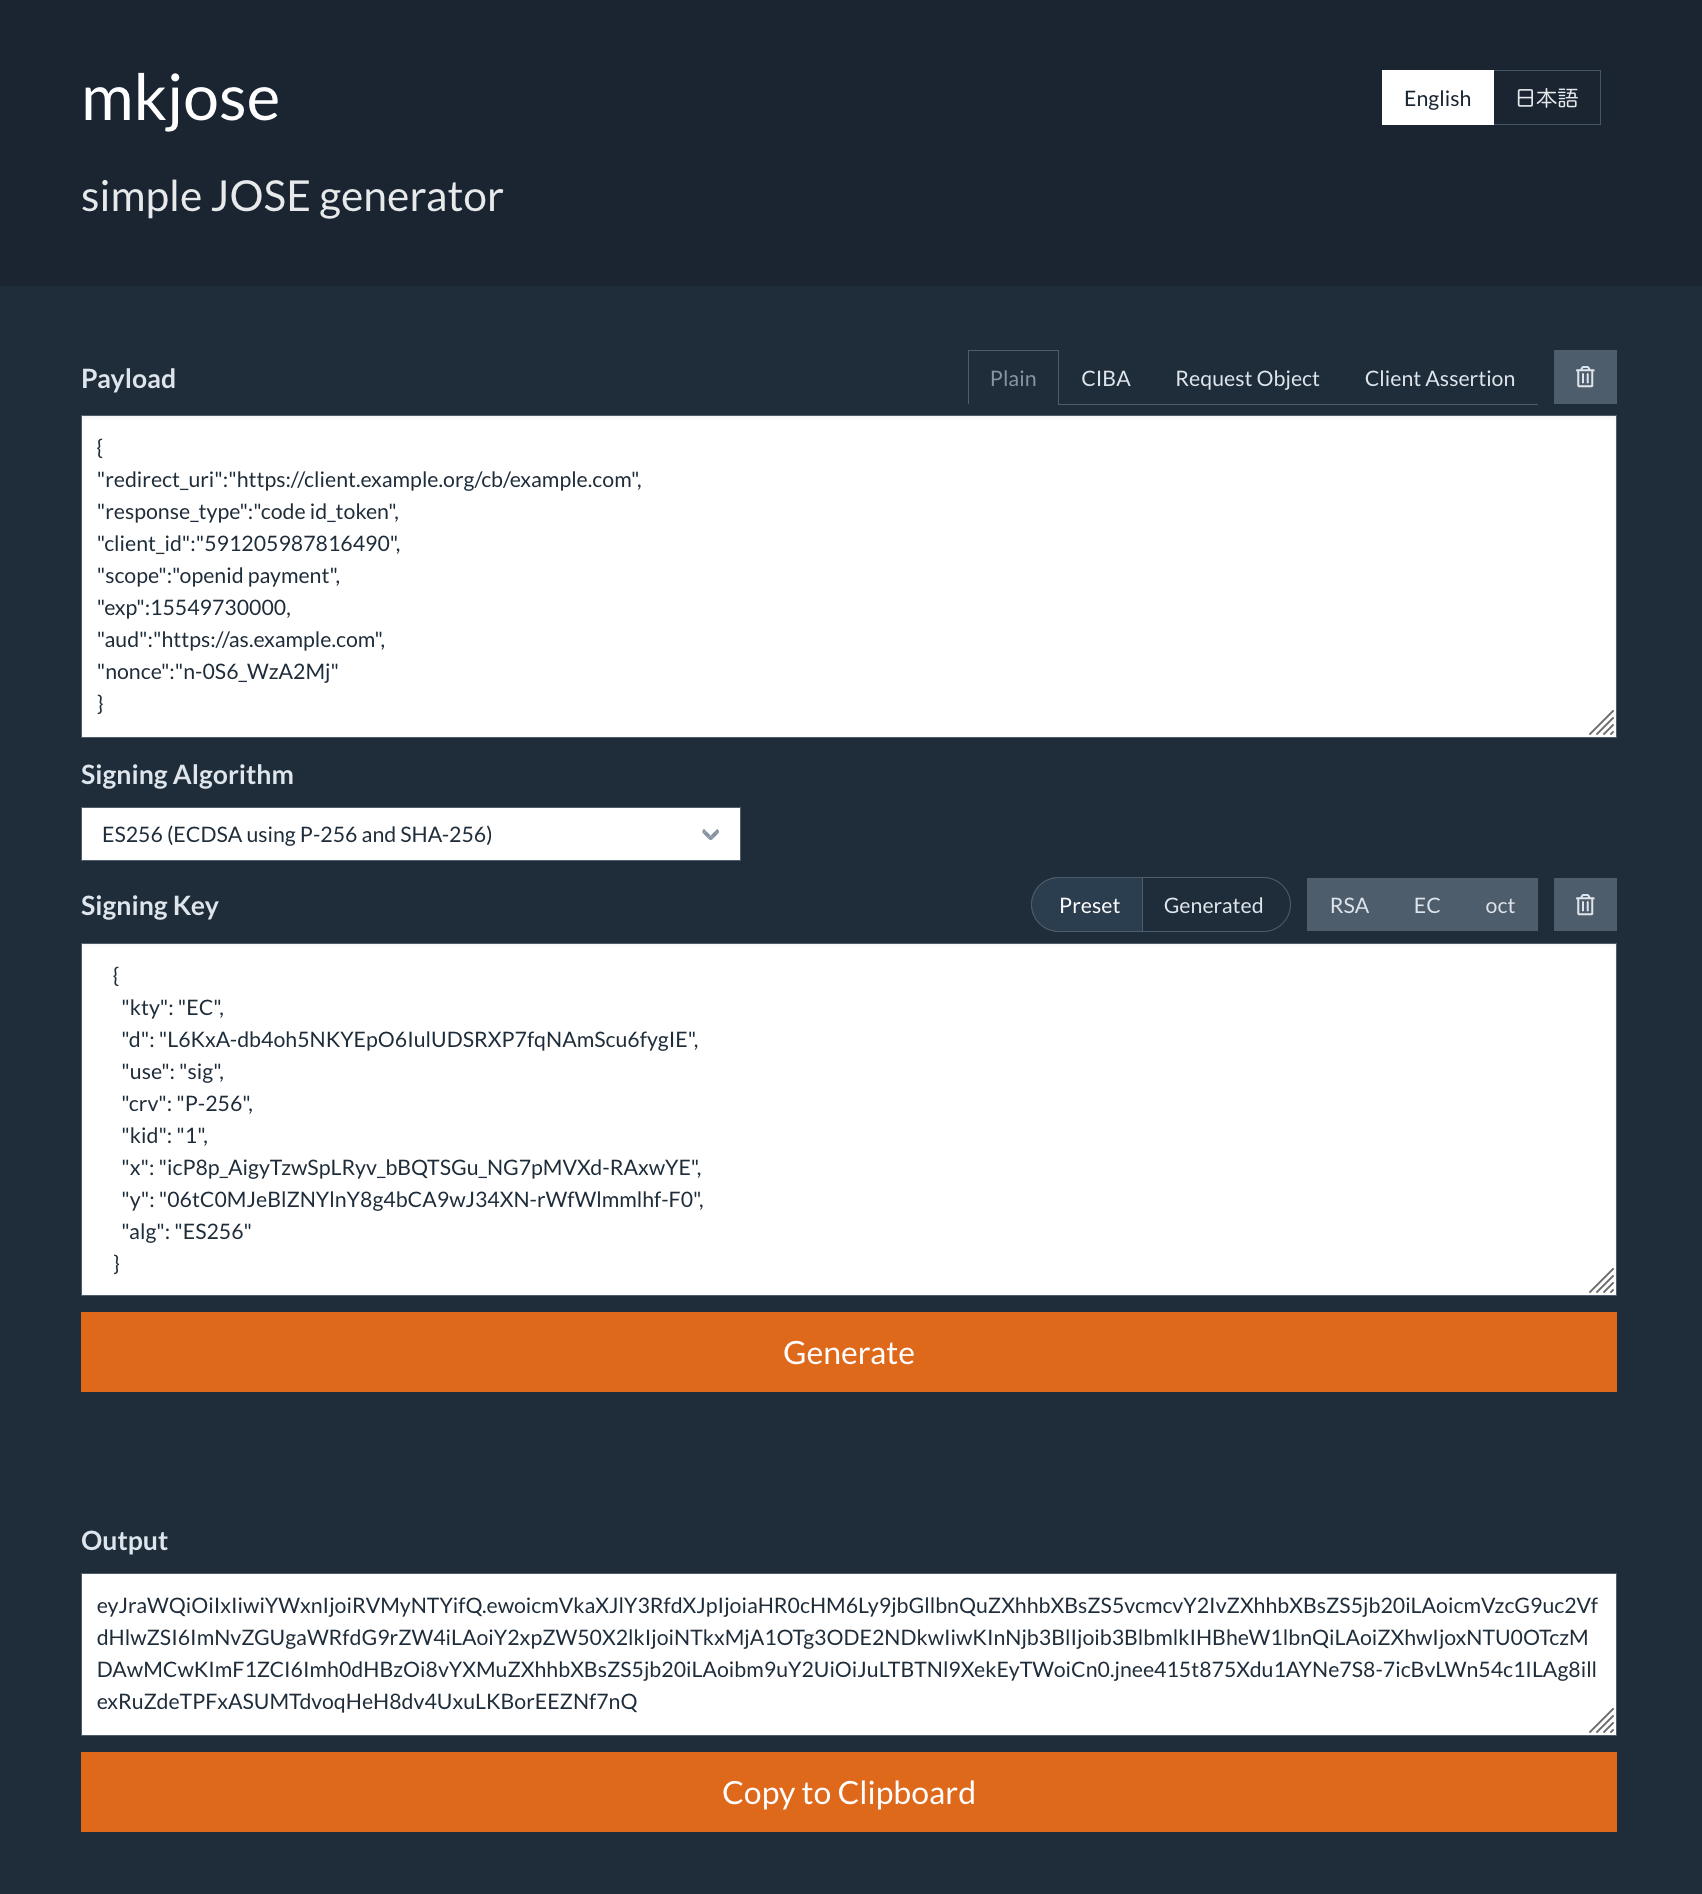
request parameter in an authorizaiton request.
Testing the configuration
Let’s assume that the auhtorization server receives an authorization request, including a request object, from a client. The server will make a request to/auth/authorization API. Here’s a curl version of the request.
resultMessage, Authlete accepted the authorization request. The response includes ticket as expected. An authorization server is to store the value of ticket into the user’s login session, and attempt to authenticate the user and obtain consent.
Once completed, the server will make a request to Authlete’s /auth/authorization/issue API to generate an authorization response.
In this document, the authorization request shown in the previous section included response_type=code id_token. So Authlete is expected to generate an authorization response that includes an authorization code code and an ID token id_token in fragment.
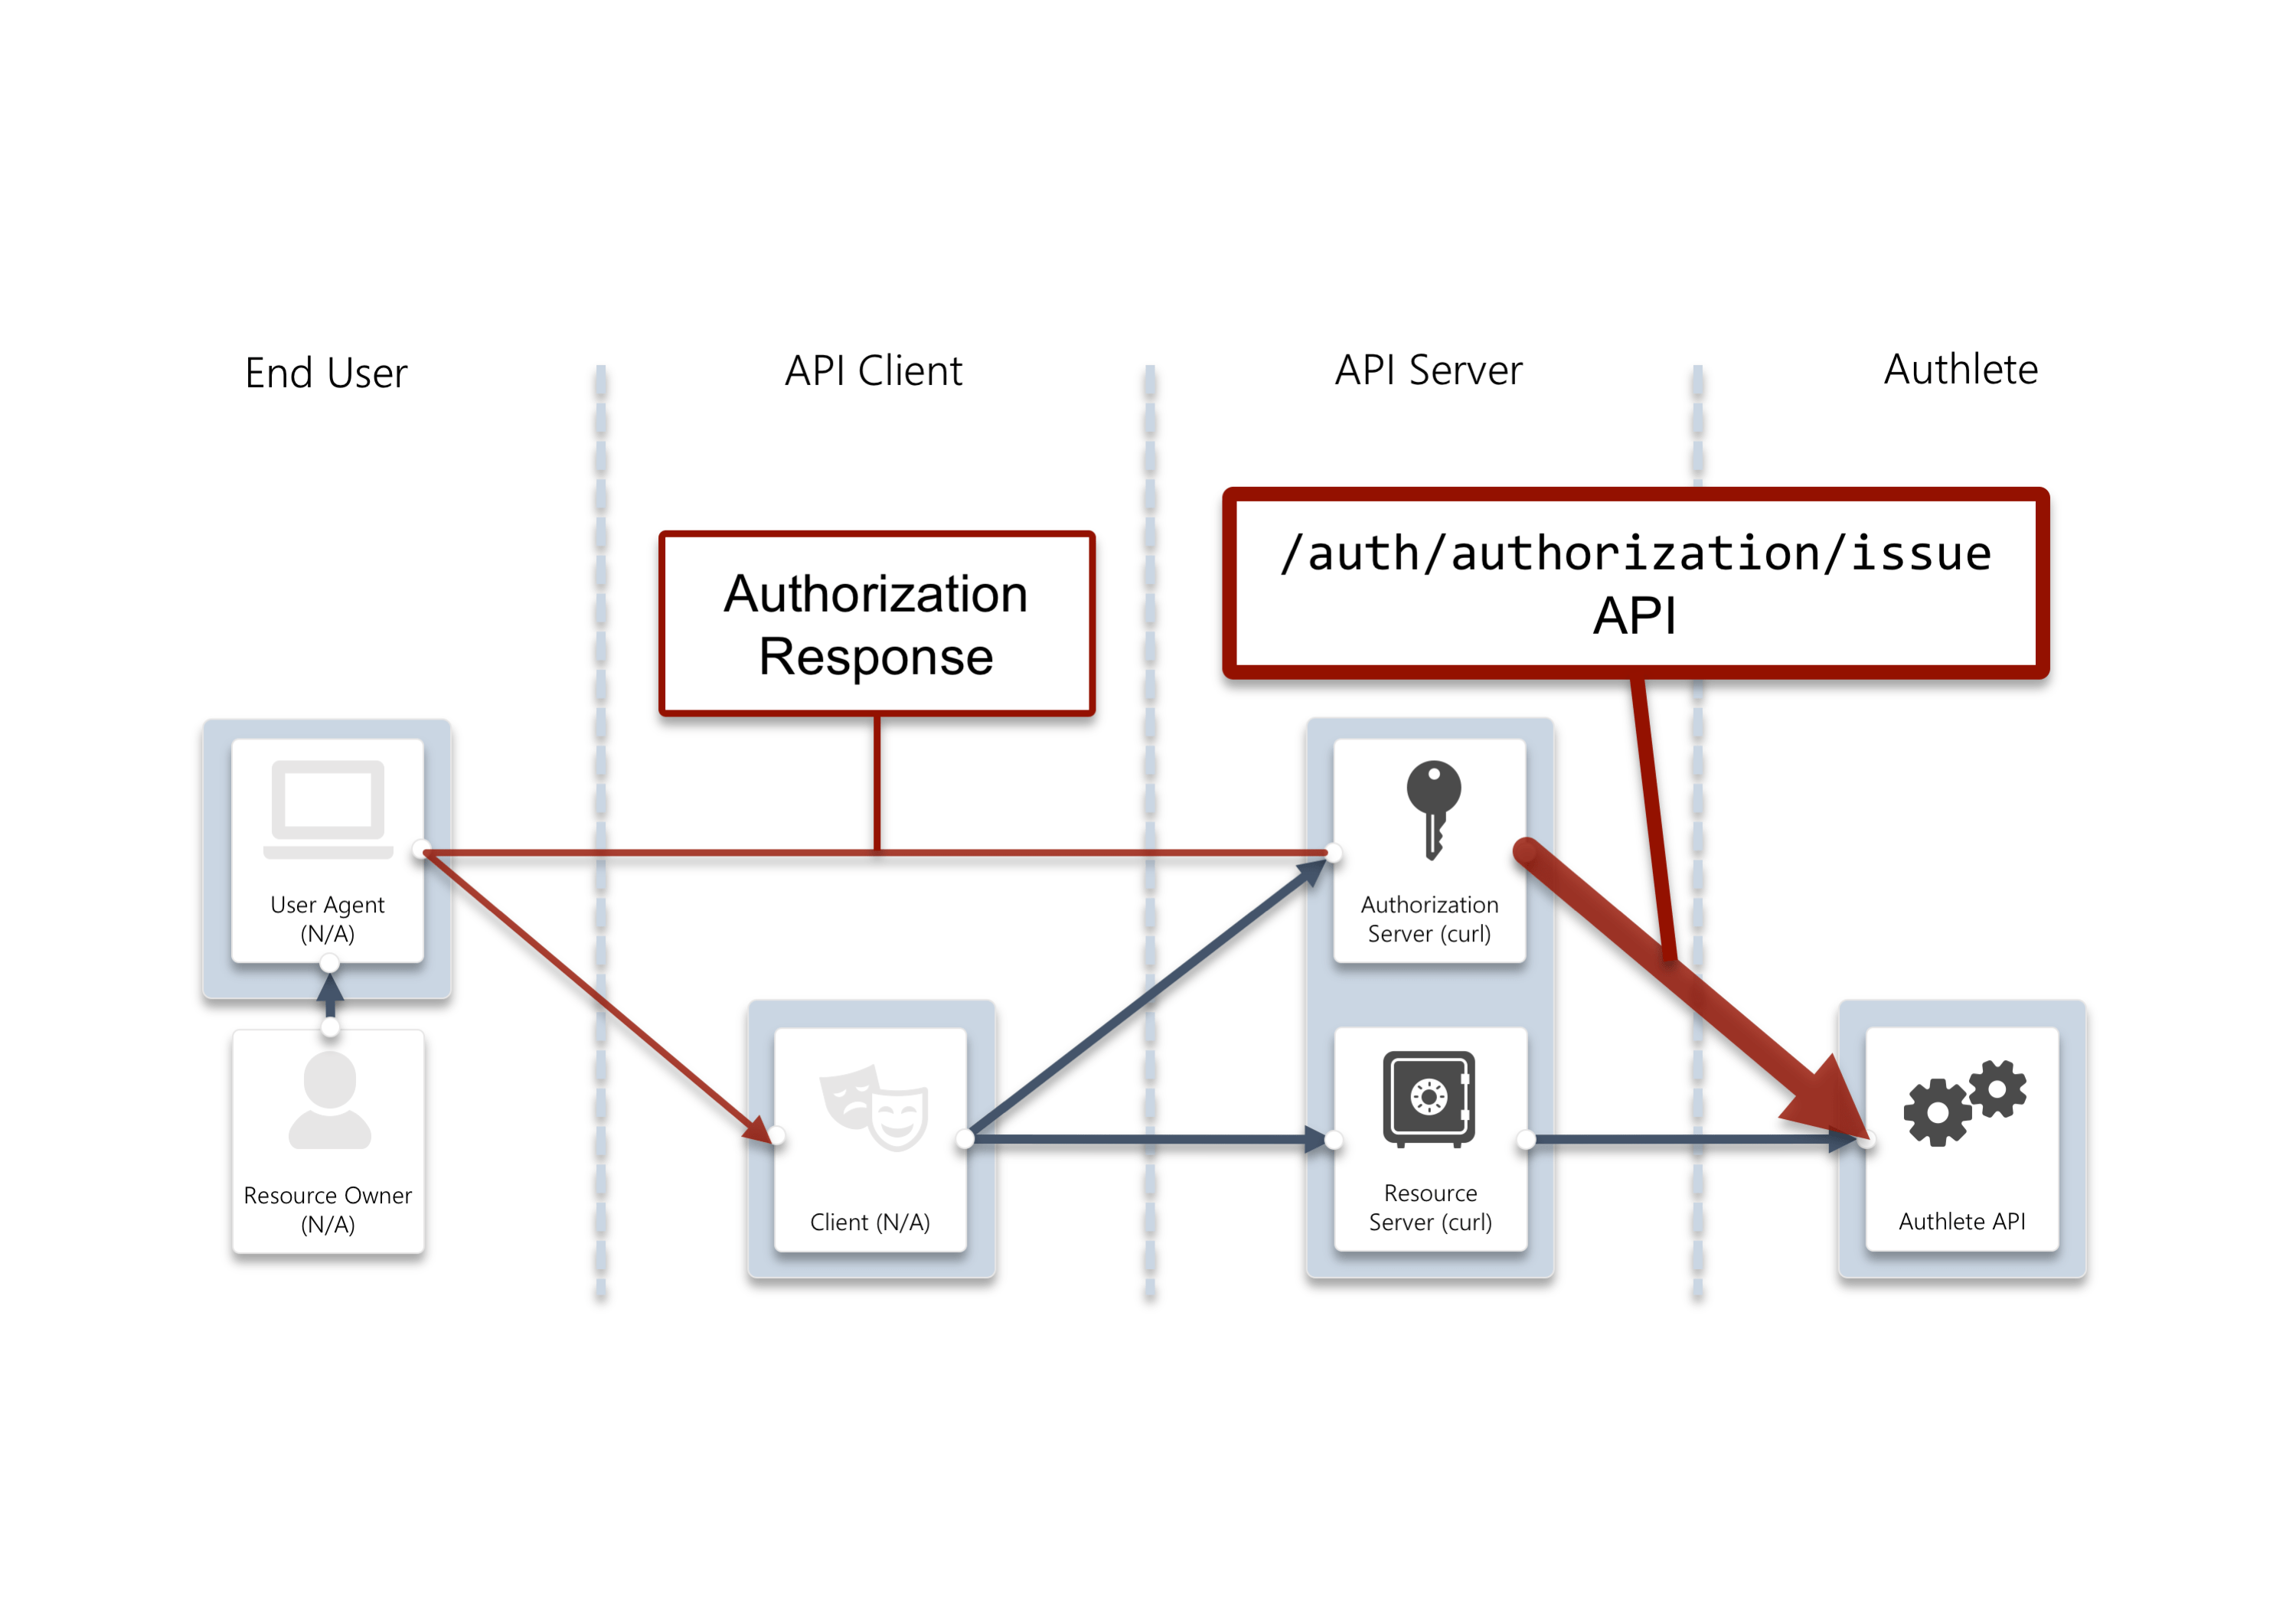
subject) is testuser01. The server will be making a request to Authlete’s /auth/authorization/issue API with the ticket and the subject. Here’s a curl version of the request.
resultMessage, Authlete doesn’t allow HS256 (Authlete’s default settings) as a signing algorithm for ID token.
This is due to security provisions of FAPI. 8.6. Algorithm considerations states as follows.
Thus a client and an authorization server have to employ either ES256 or PS256 as JWS algorithm. In this document, we will be configuring Authlete to use ES256 for ID token signing algorithm.
- shall use PS256 or ES256 algorithms;
Making a FAPI-compliant authorization response
Changing ID token signing algorithm
Adding a signing key for ID token
Now we are going to generate an ES256 key set and register it to Authlete as a signing key for ID token. We will be also updating the client settings to specify ES256 as a signing algorithm for the client.NoteThe key set being generated in this section is for an authorization server to sign ID tokens,
while the other key set generated and registered in the previous section “Configuring a signing key of a request object” is to verify a signature in a request object from a client to an authorization server. Please make sure those two key sets are different.
Navigate to Service Settings > Key Management > JWK Set, paste the generated keypair set into the JWK Set Content field, and use the ID Token Signature Key ID dropdown to select the Key ID (
kid) value of the keypair set (e.g., 1). Click Save Changes to apply the updates.
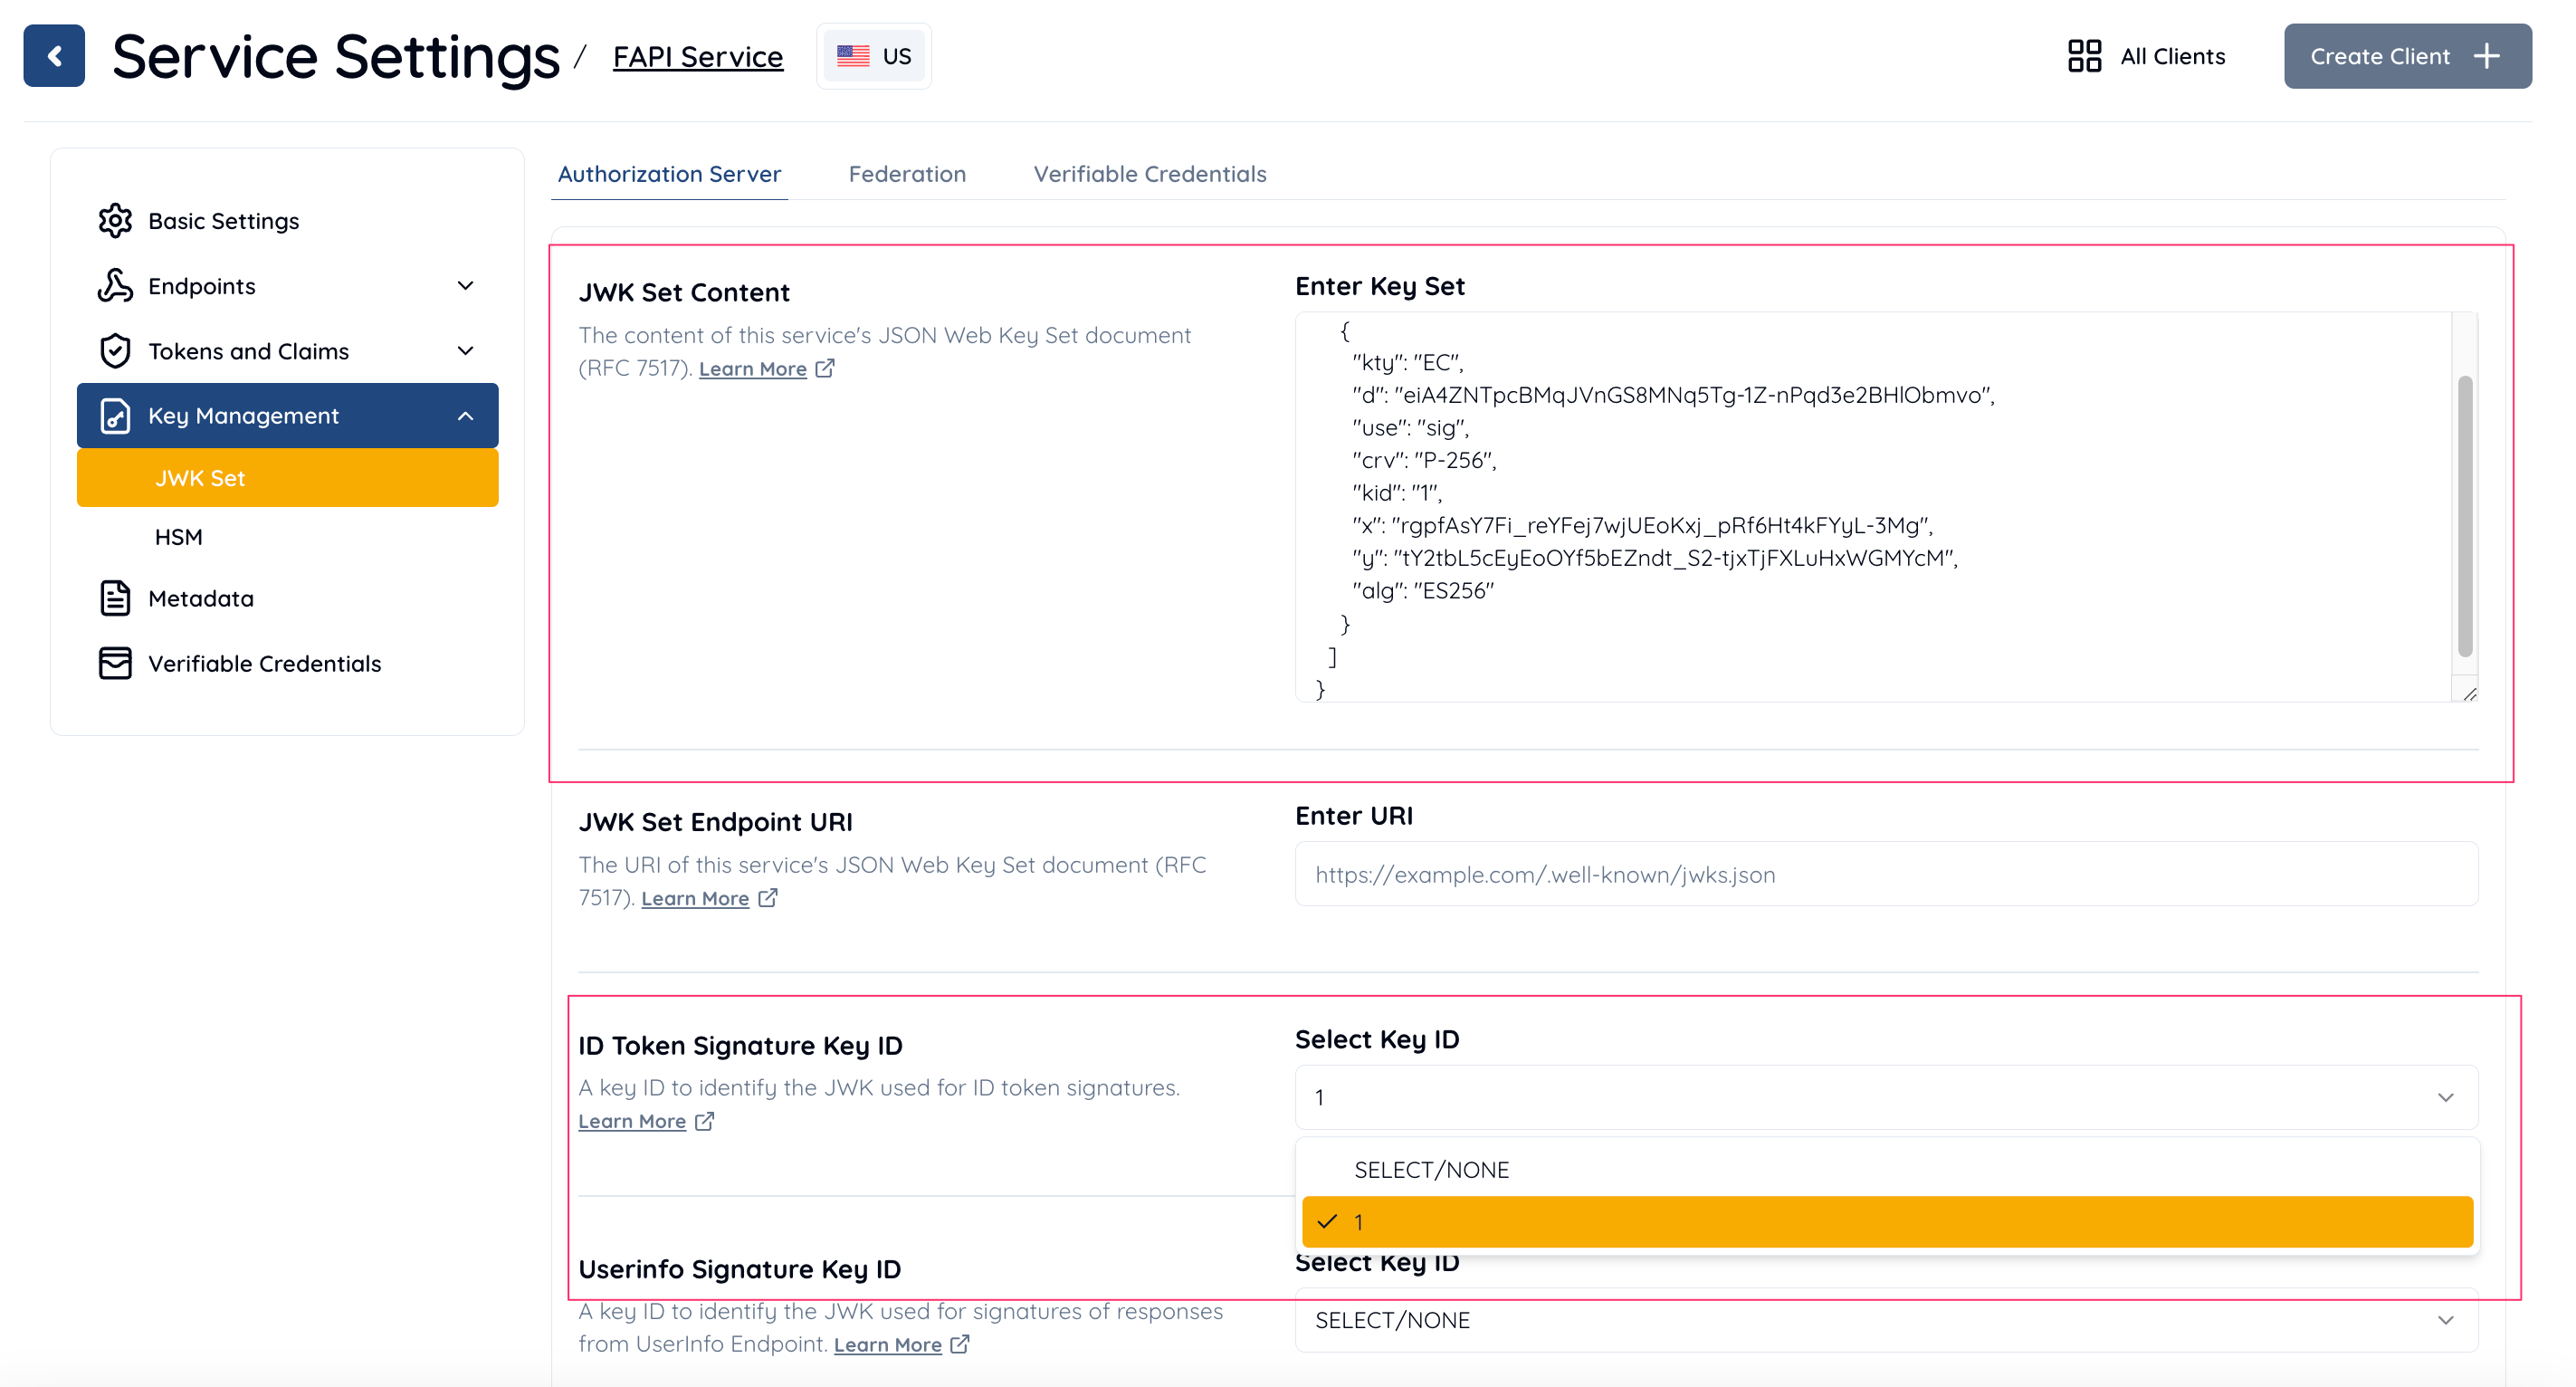 Navigate to Client Settings > Tokens and Claims > ID Token, locate the ID Token Algorithms section, and select ES256 from the Select Signature Algorithm dropdown. This configuration ensures that Authlete uses ES256 as the signing algorithm for issuing ID tokens for this client with the registered ES256 key. Click Save Changes to apply the updates.

Testing the configuration (ES256 for ID token)
Let’s check if Authlete works as expected. Make the same request again to/auth/authorization API to get a ticket at first.
ticket.
ticket and an arbitrary value of subject (testuser01 in this example) to /auth/authorization/issue API.
resultMessage, Authlete successfully processed the request. There are an issued ID token and an authorization code in idToken and authorizationCode respectively, and HTTP response content in responseContent. The content includes these token and code as fragment and is intended to be sent from an authorizartion server to a client as an authorization response.
Once the client received the response from the authorization server it will verify the ID token. If the verification is done successfully, it will extract c_hash from the ID token and use it to verify the authorization code. If the second verification is also done successfully, the client will make a token request with the code to the authorzation server.
The authorization server will make a request including the token request, to Authlete’s /auth/token API to have the API generate a token response which should include an access token.
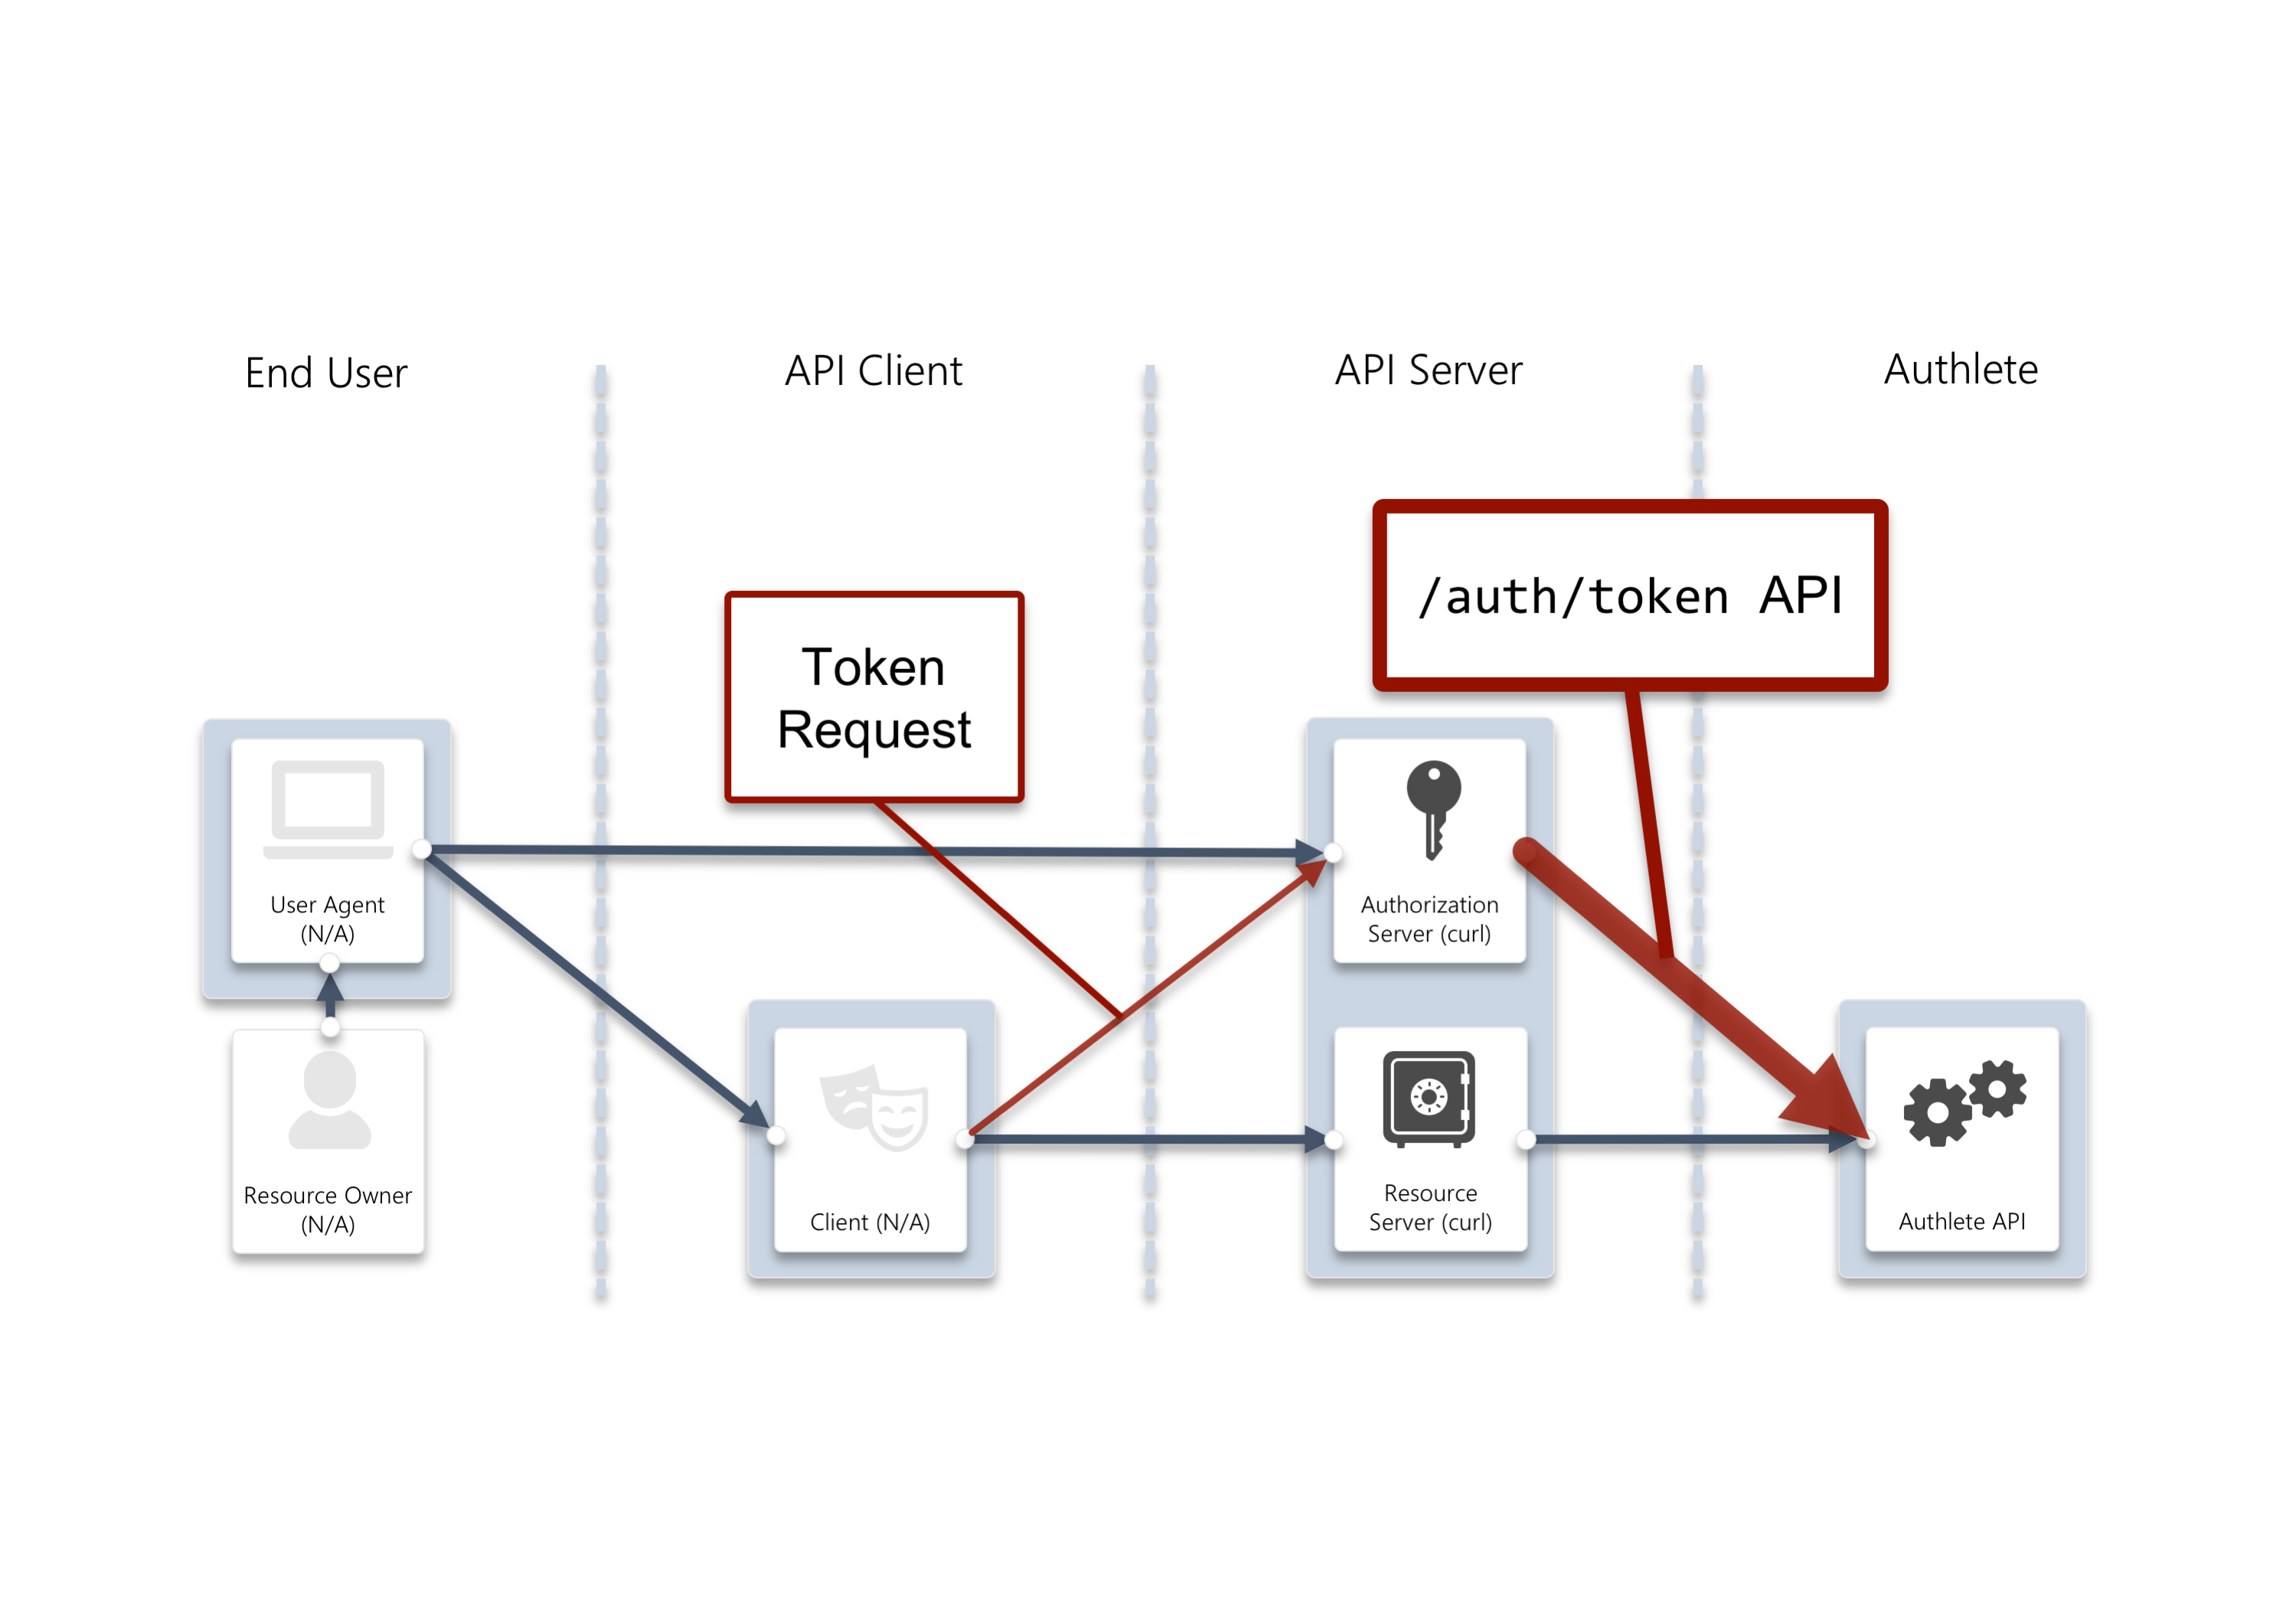
/auth/token API.
resultMessage, the client authentication method of none, which is the default value of Authlete, is not allowed for confidential clients.
This is due to security provisions of FAPI. 5.2 Read and write API security provisions / 5.2.2. Authorization server states as follows.
Thus you have to use either Mutual TLS for OAuth Client Authentication defined in RFC 8705 or private_key_jwt defined in OpenID Connect Core 1.0. That is, other methods such as
- shall authenticate the confidential client using one of the following methods (this overrides FAPI Security Profile 1.0 - Part 1: Baseline clause 5.2.2-4):
tls_client_authorself_signed_tls_client_authas specified in section 2 of MTLS, orprivate_key_jwtas specified in section 9 of OIDC;
none, client_secret_basic that is popular one for confidential clients, are prohibited i.e. an authorization server must not employ them to authenticate clients.
In this document, we will be having Authlete use the former one and PKI Mutual-TLS Method (tls_client_auth) defined in the method.
Read Client authentication using private_key_jwt method when using private_key_jwt.
Note that you have to configure mutual TLS to enable “Holder of Key,” even if the client authentication method is employed.
Making a FAPI-compliant token request
TLS client authentication configuration
Let’s configure both the service and the client settings to enable TLS client authentication.Service settings for TLS client authentication
- Navigate to Service Settings > Endpoints > Token in the Authlete Management Console.
- Locate the Supported Client Authentication Methods section.
- Check the box for TLS_CLIENT_AUTH to enable it.
- Click Save Changes to apply the configuration.

Client settings for Mutual TLS (mTLS) Authentication
- Navigate to Client Settings > Endpoints > Token > MTLS in the Authlete Management Console.
- Locate the Subject Distinguished Name section.
- Enter the Subject Distinguished Name (e.g.,
CN=client.example.org, O=Client, L=Chiyoda-ku, ST=Tokyo, C=JP). - Optionally, set Subject Alternative Name DNS, Subject Alternative Name IP Address, or Subject Alternative Name URI if required.
- Enter the Subject Distinguished Name (e.g.,
- Click Save Changes to apply these settings.
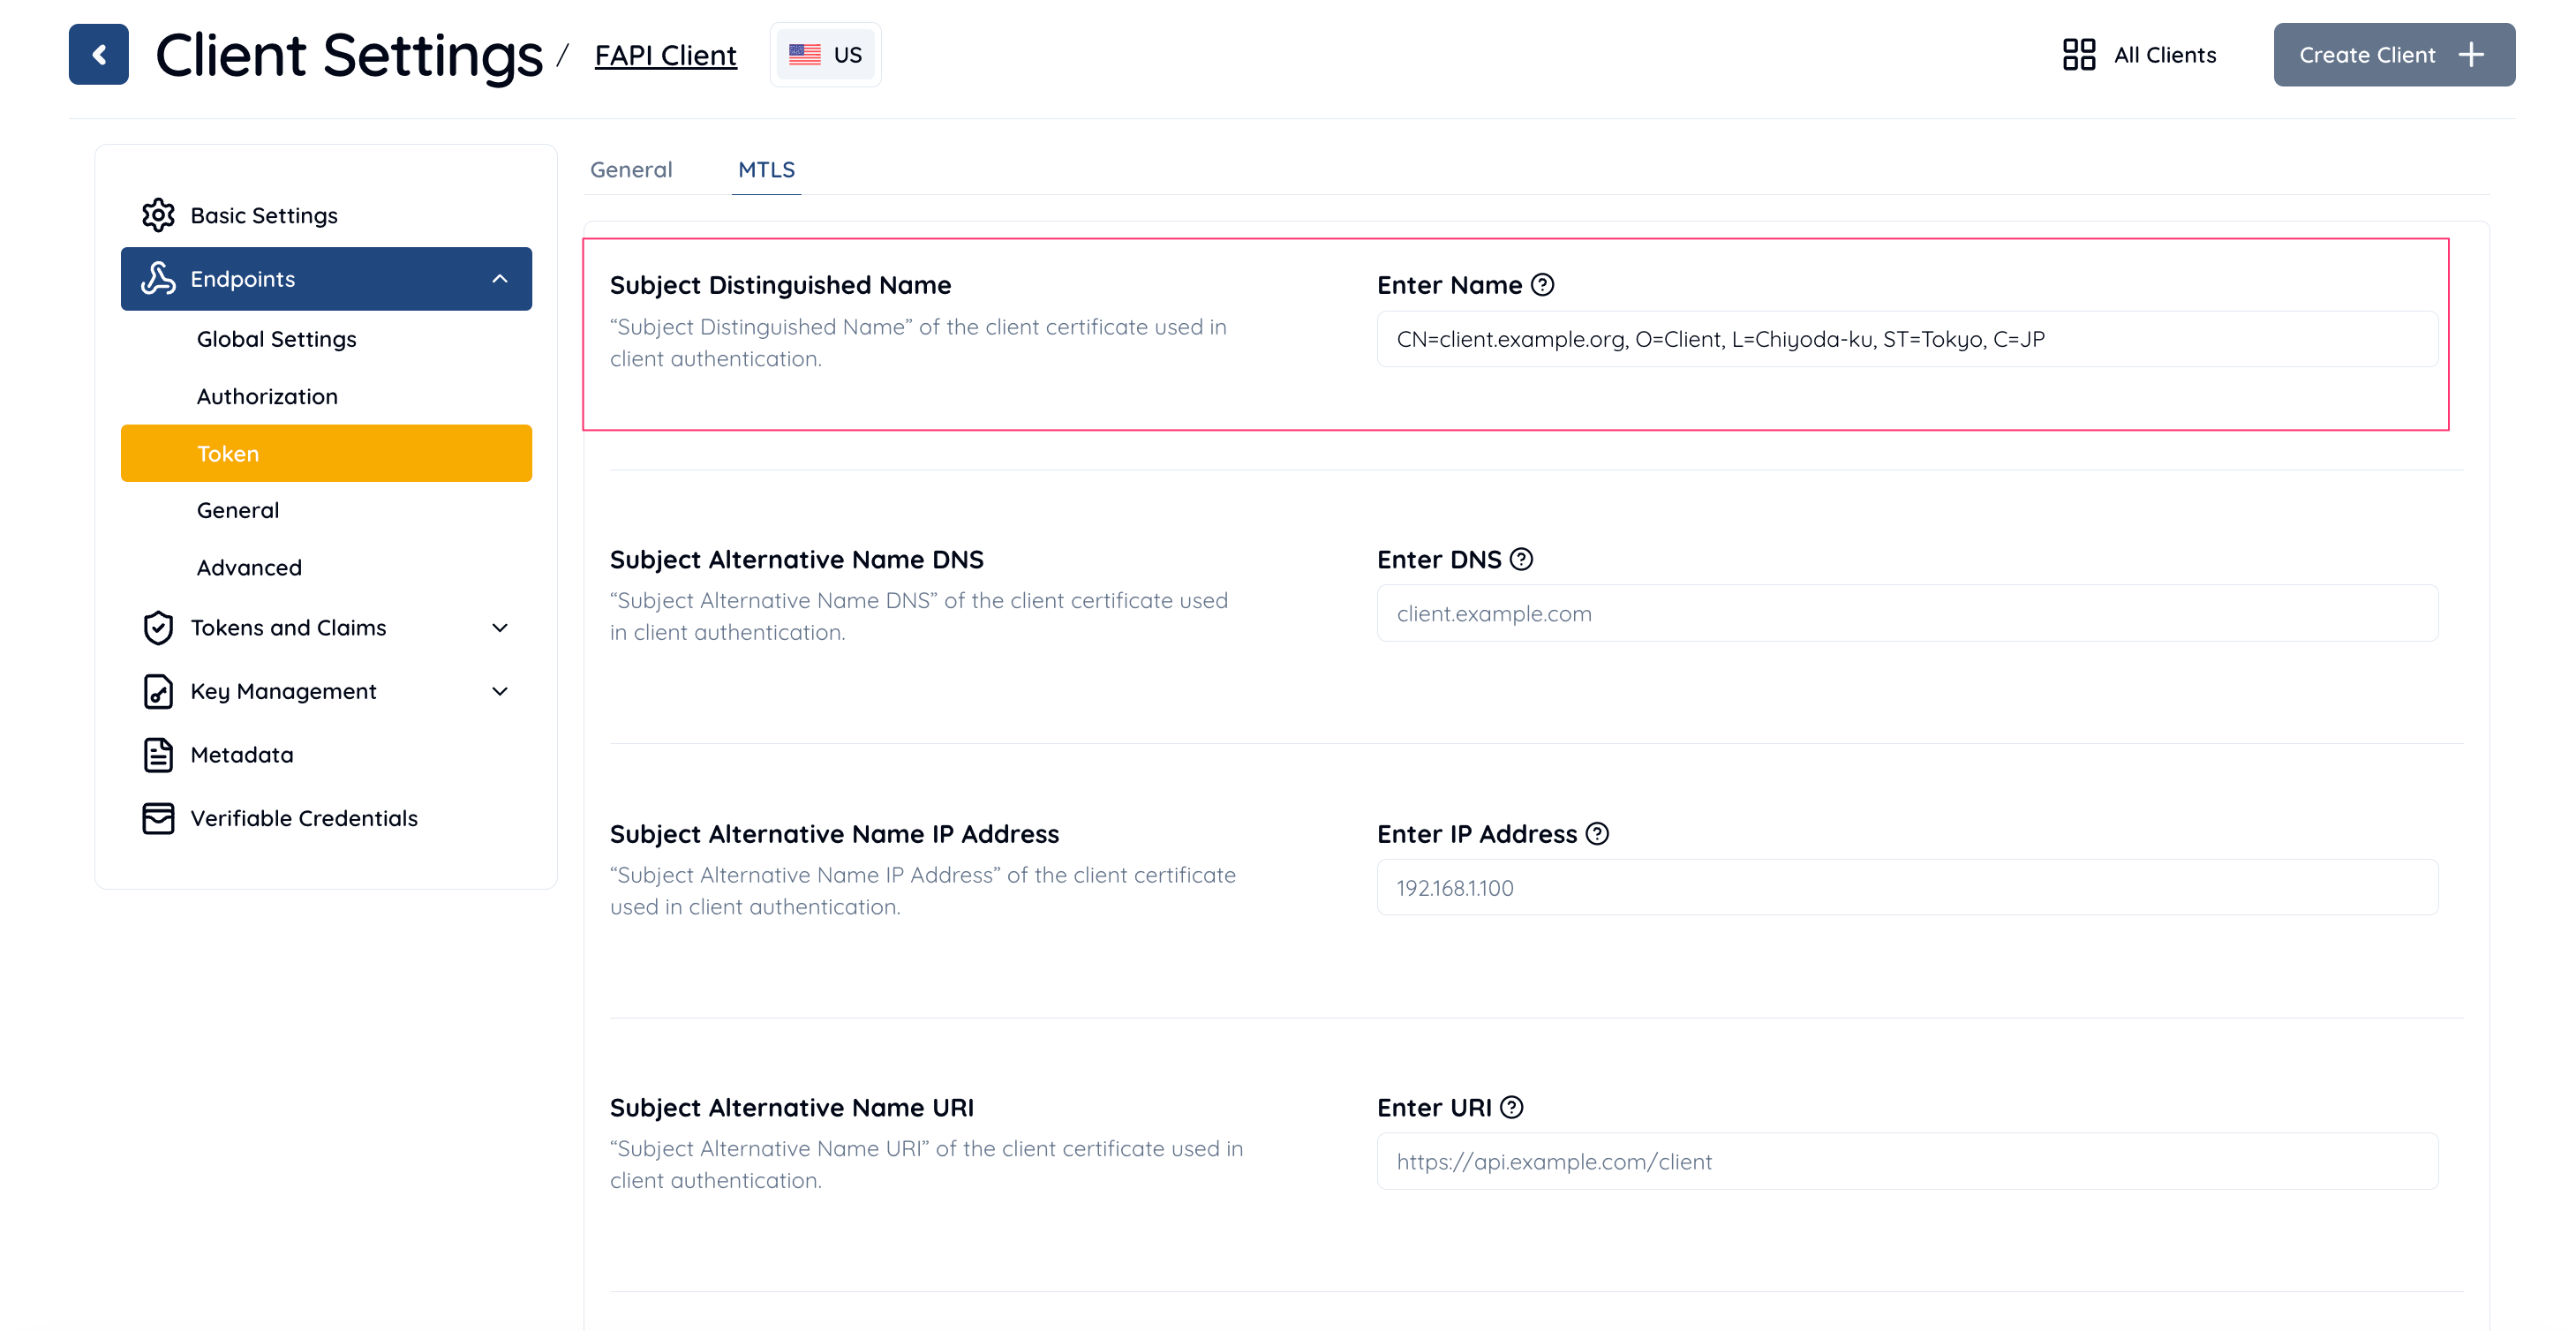
- Navigate back to Client Settings > Endpoints > Token.
- Locate the Client Authentication Method section.
- Select TLS_CLIENT_AUTH from the dropdown.
- Click Save Changes again to finalize the mTLS authentication setup.
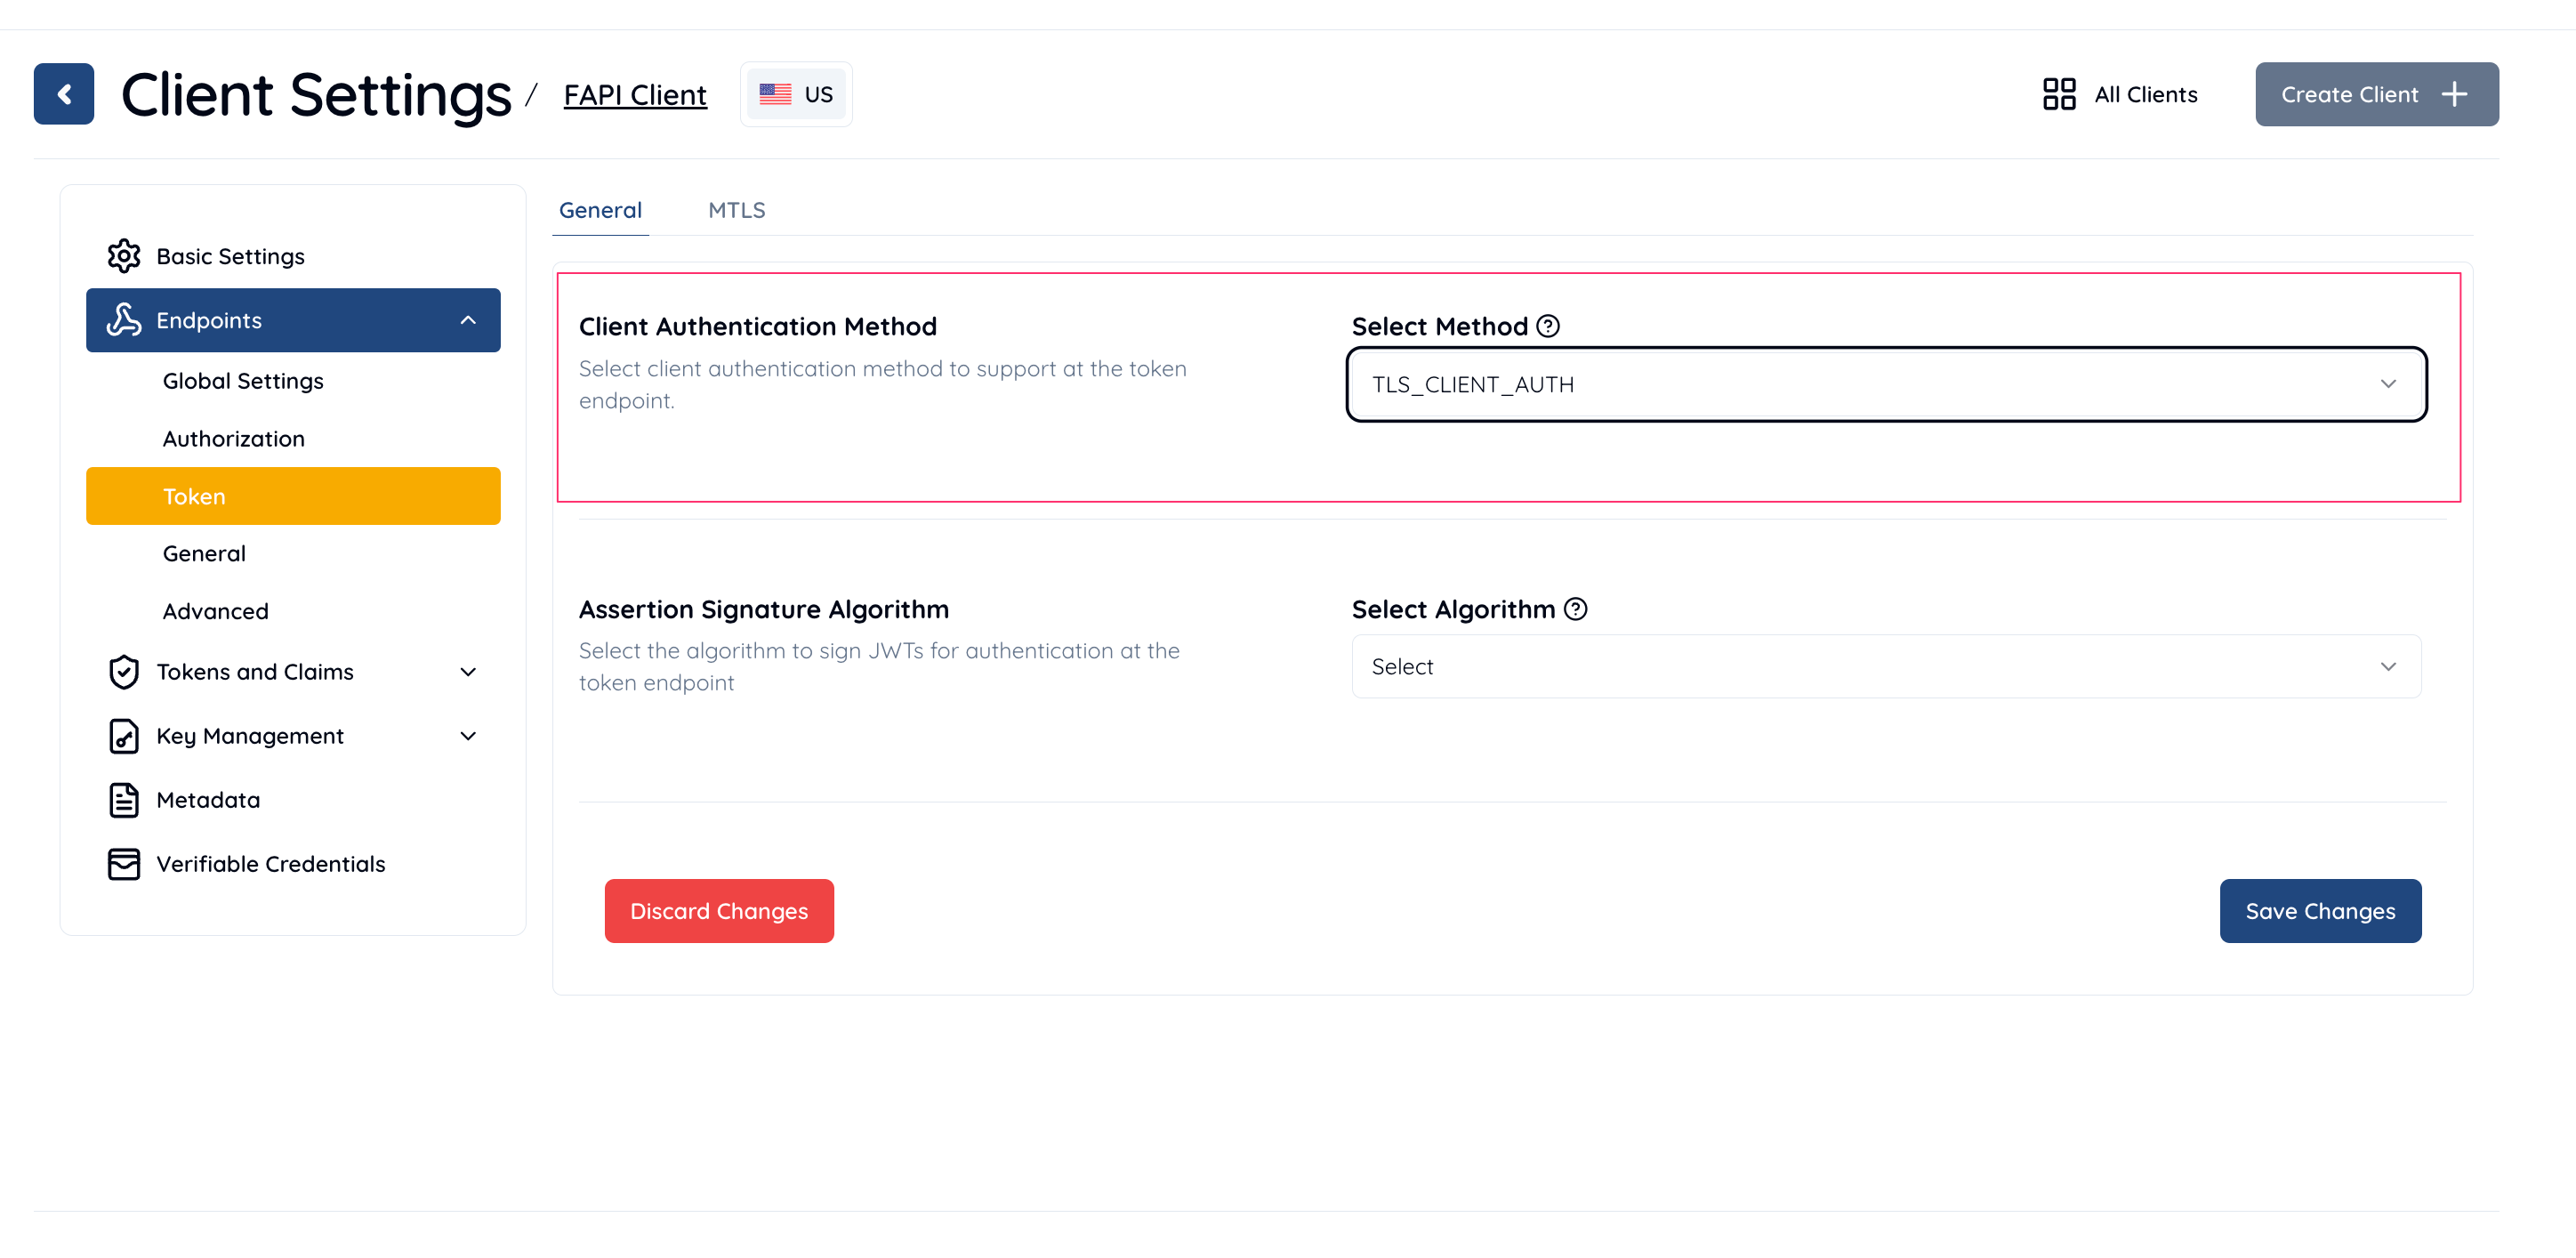
Generating a self-signed certificate
You have to prepare a digital certificate for the client to be authenticated by the authorization server. The subject DN of the certificate must be the same as one that has been specified in the previous section,CN=client.example.org, ... in this document.
The following example illustrates that generating a self-signed
certificate by using OpenSSL.
- Generating a private key
- Generating a CSR
- Using
CN=client.example.org, O=Client, L=Chiyoda-ku, ST=Tokyo, C=JPas Subject DN
- Using
- Generating a certificate
server.crt
Testing the configuration (Mutual TLS)
Let’s check if Authlete works as expected. Run the same procedure again.- Make a request to
/auth/authorizationAPI and obtain a value ofticketfrom a response - Make a request to
/auth/authorization/issueAPI and obtain a value ofauthorizationCodefrom a response - Make a request with the following modification to
/auth/tokenAPI
- Add
clientCertificateparameter with the client certificate as its value - Remove
clientSecretparameter (it is no longer required as mutual TLS authentication is effective)
/auth/token API.
resultMessage, Authlete didn’t perform “Holder of Key” method, which is mandatory to comply with the security provisions of FAPI, while an access token has been issued.
Thus the issued access token is not bound with the TLS client certificate of the client.
Making a FAPI-compliant token response
Holder of Key Configuration
Service Settings for Access Token Configuration
In the Authlete Management Console, navigate to Service Settings for your service. Under the Tokens and Claims section, go to Access Tokens. Enable TLS Client Certificate Binding by toggling the switch as shown in the screenshot below.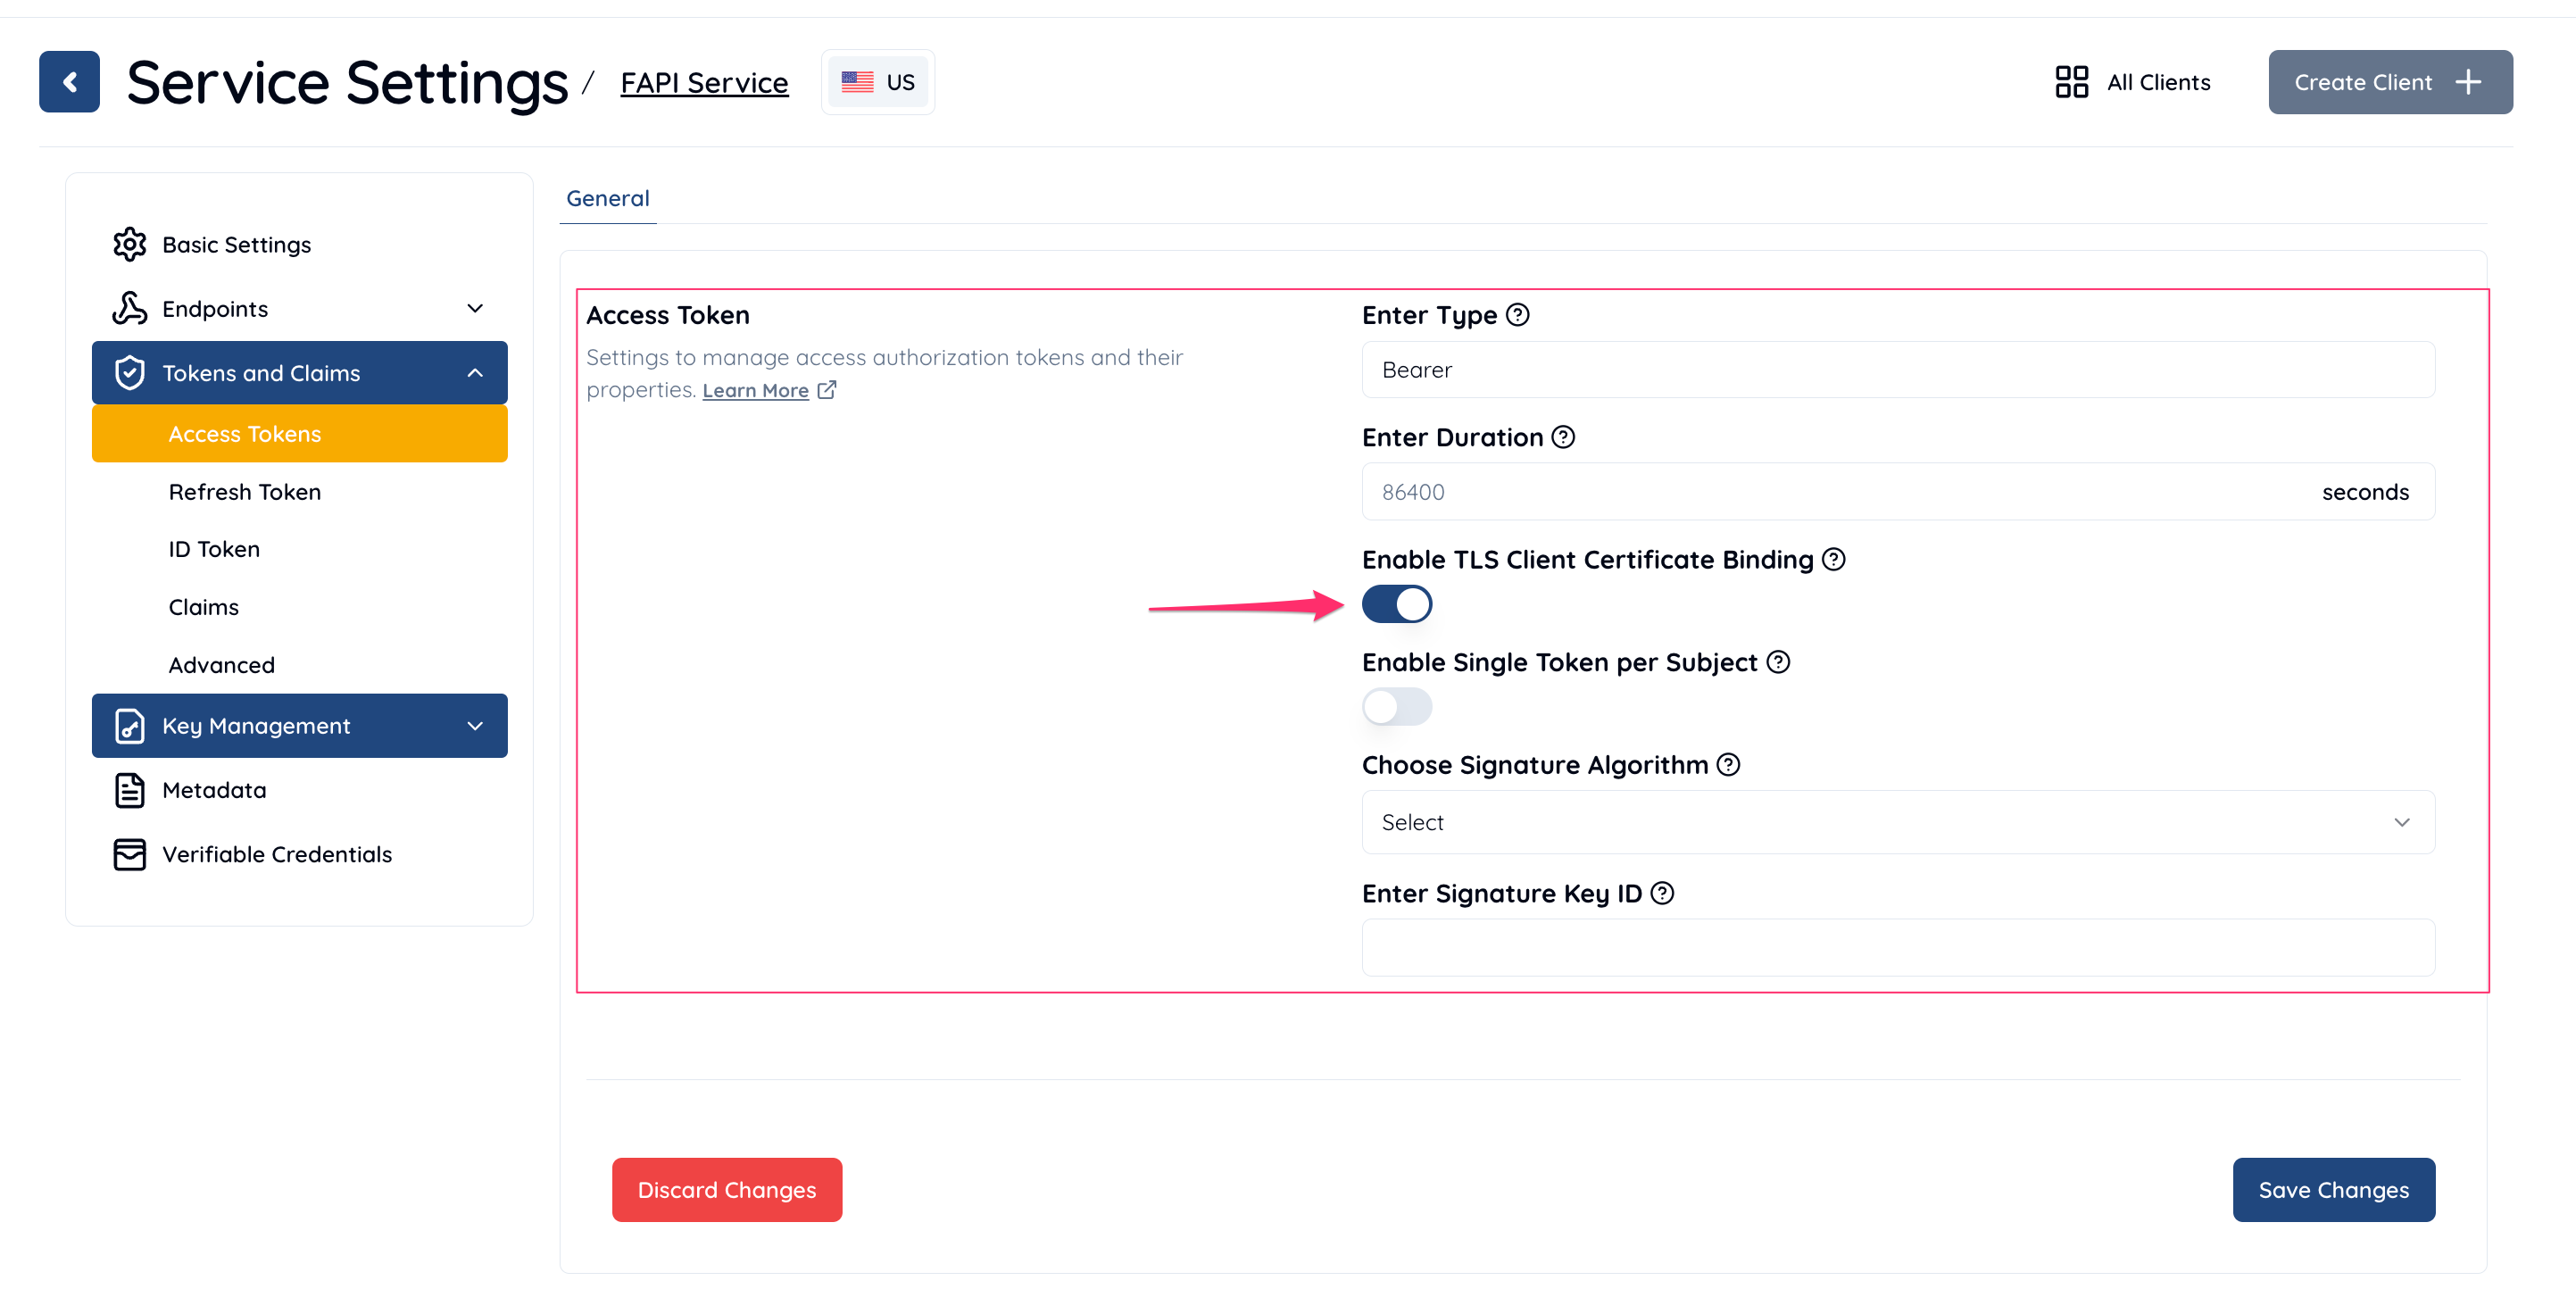
Client Settings for Access Token Configuration
In the Authlete Management Console, navigate to Client Settings for your client. Under the Tokens and Claims section, go to Access Token. Enable TLS Client Certificate Binding by toggling the switch as shown in the screenshot below. Congratulations! You have successfully configured Authlete to support a FAPI-compliant authorization server.
A complete example walk through
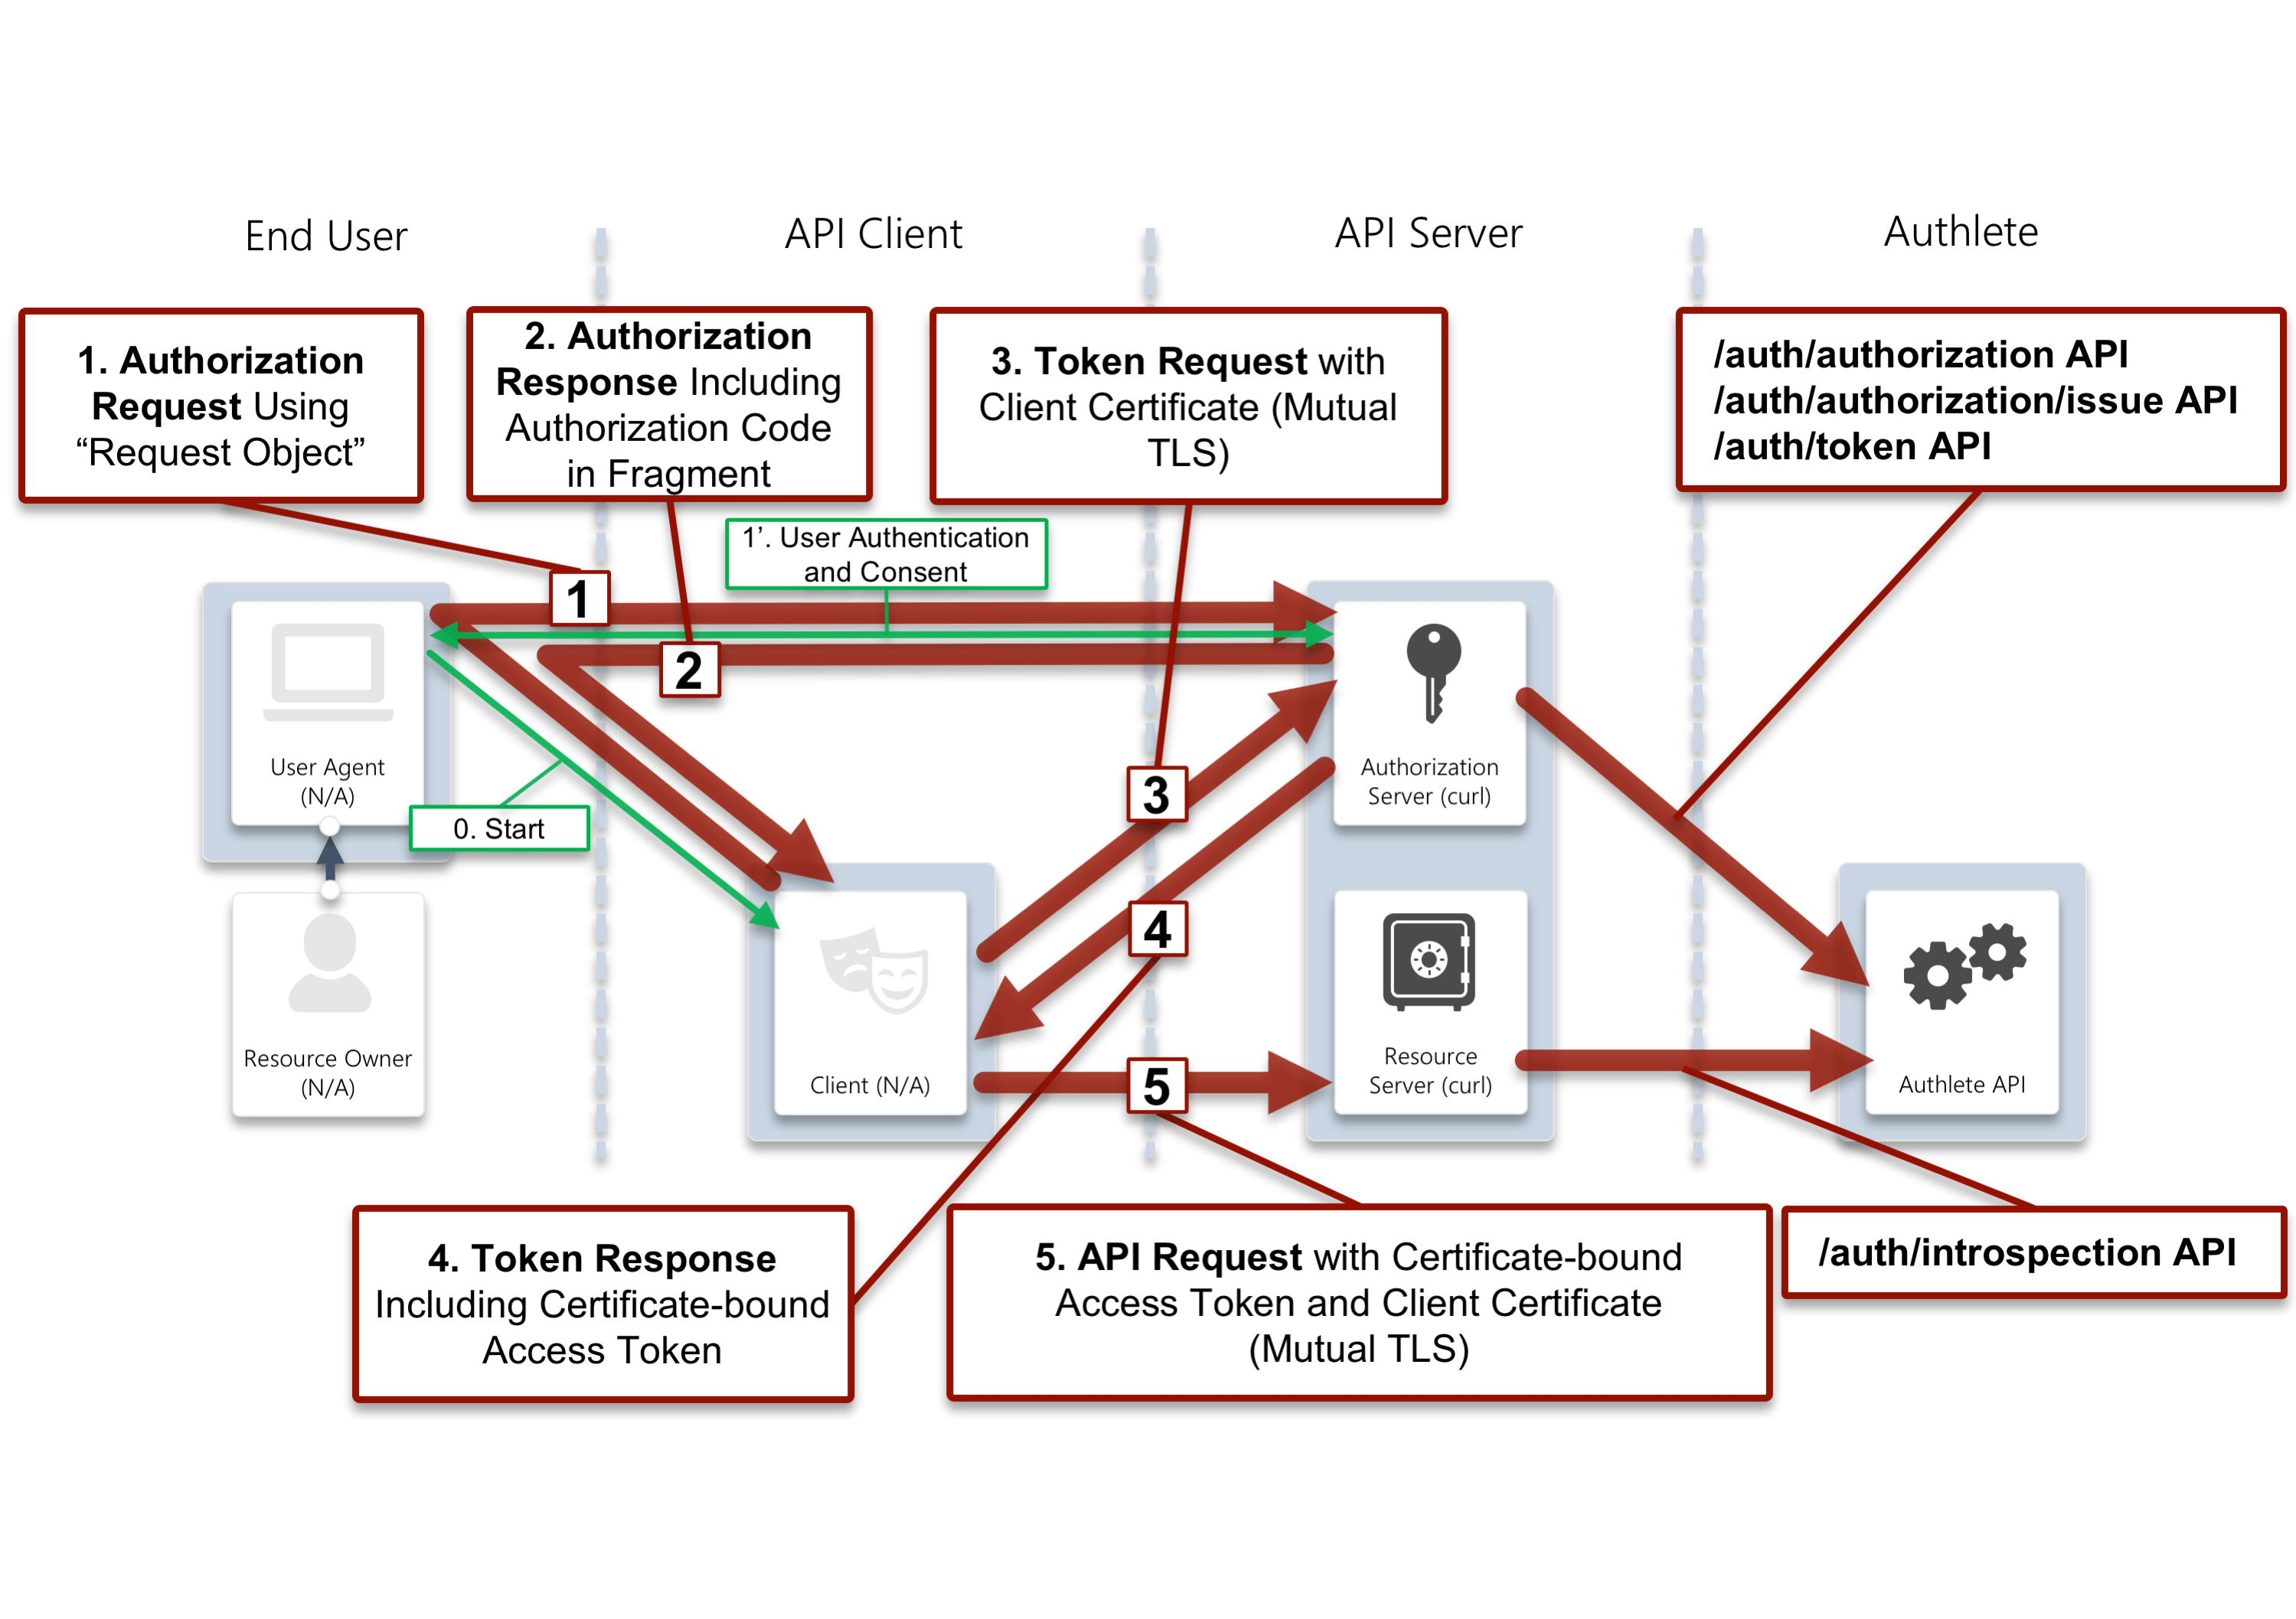
/auth/authorization API, /auth/authorization/issue API and /auth/token API.
In addition to these three requests, make another request to /auth/introspection API to see if the access token used for API requests to a resource server is bound with the TLS client certificate of the client.
Authorization request
- Request to
/auth/authorizationAPI
- Response (folded for readability)
Authorization response
- Request to
/auth/authorization/issueAPI
- Response (folded for readability)
Token request and token response
- Request to
/auth/tokenAPI
- Response (folded for readability)
API request
After the procedure above, we have got an access token whose value isSUtEVc3Tj3D3xOdysQtssQxe9egAhI4fimexNVMjRyU in this example.
Let’s assume that the resource server receives an API request, including
the value as the access token, from the client. The token in the request would be in Authorization: Bearer header.
The resource server is to
verify the token and obtain related information with it, by making a
request to /auth/introspection API. The resource server will also include
the client certificate, which should be able to obtained from mutual TLS
communication for the API request, into the request to Authlete.
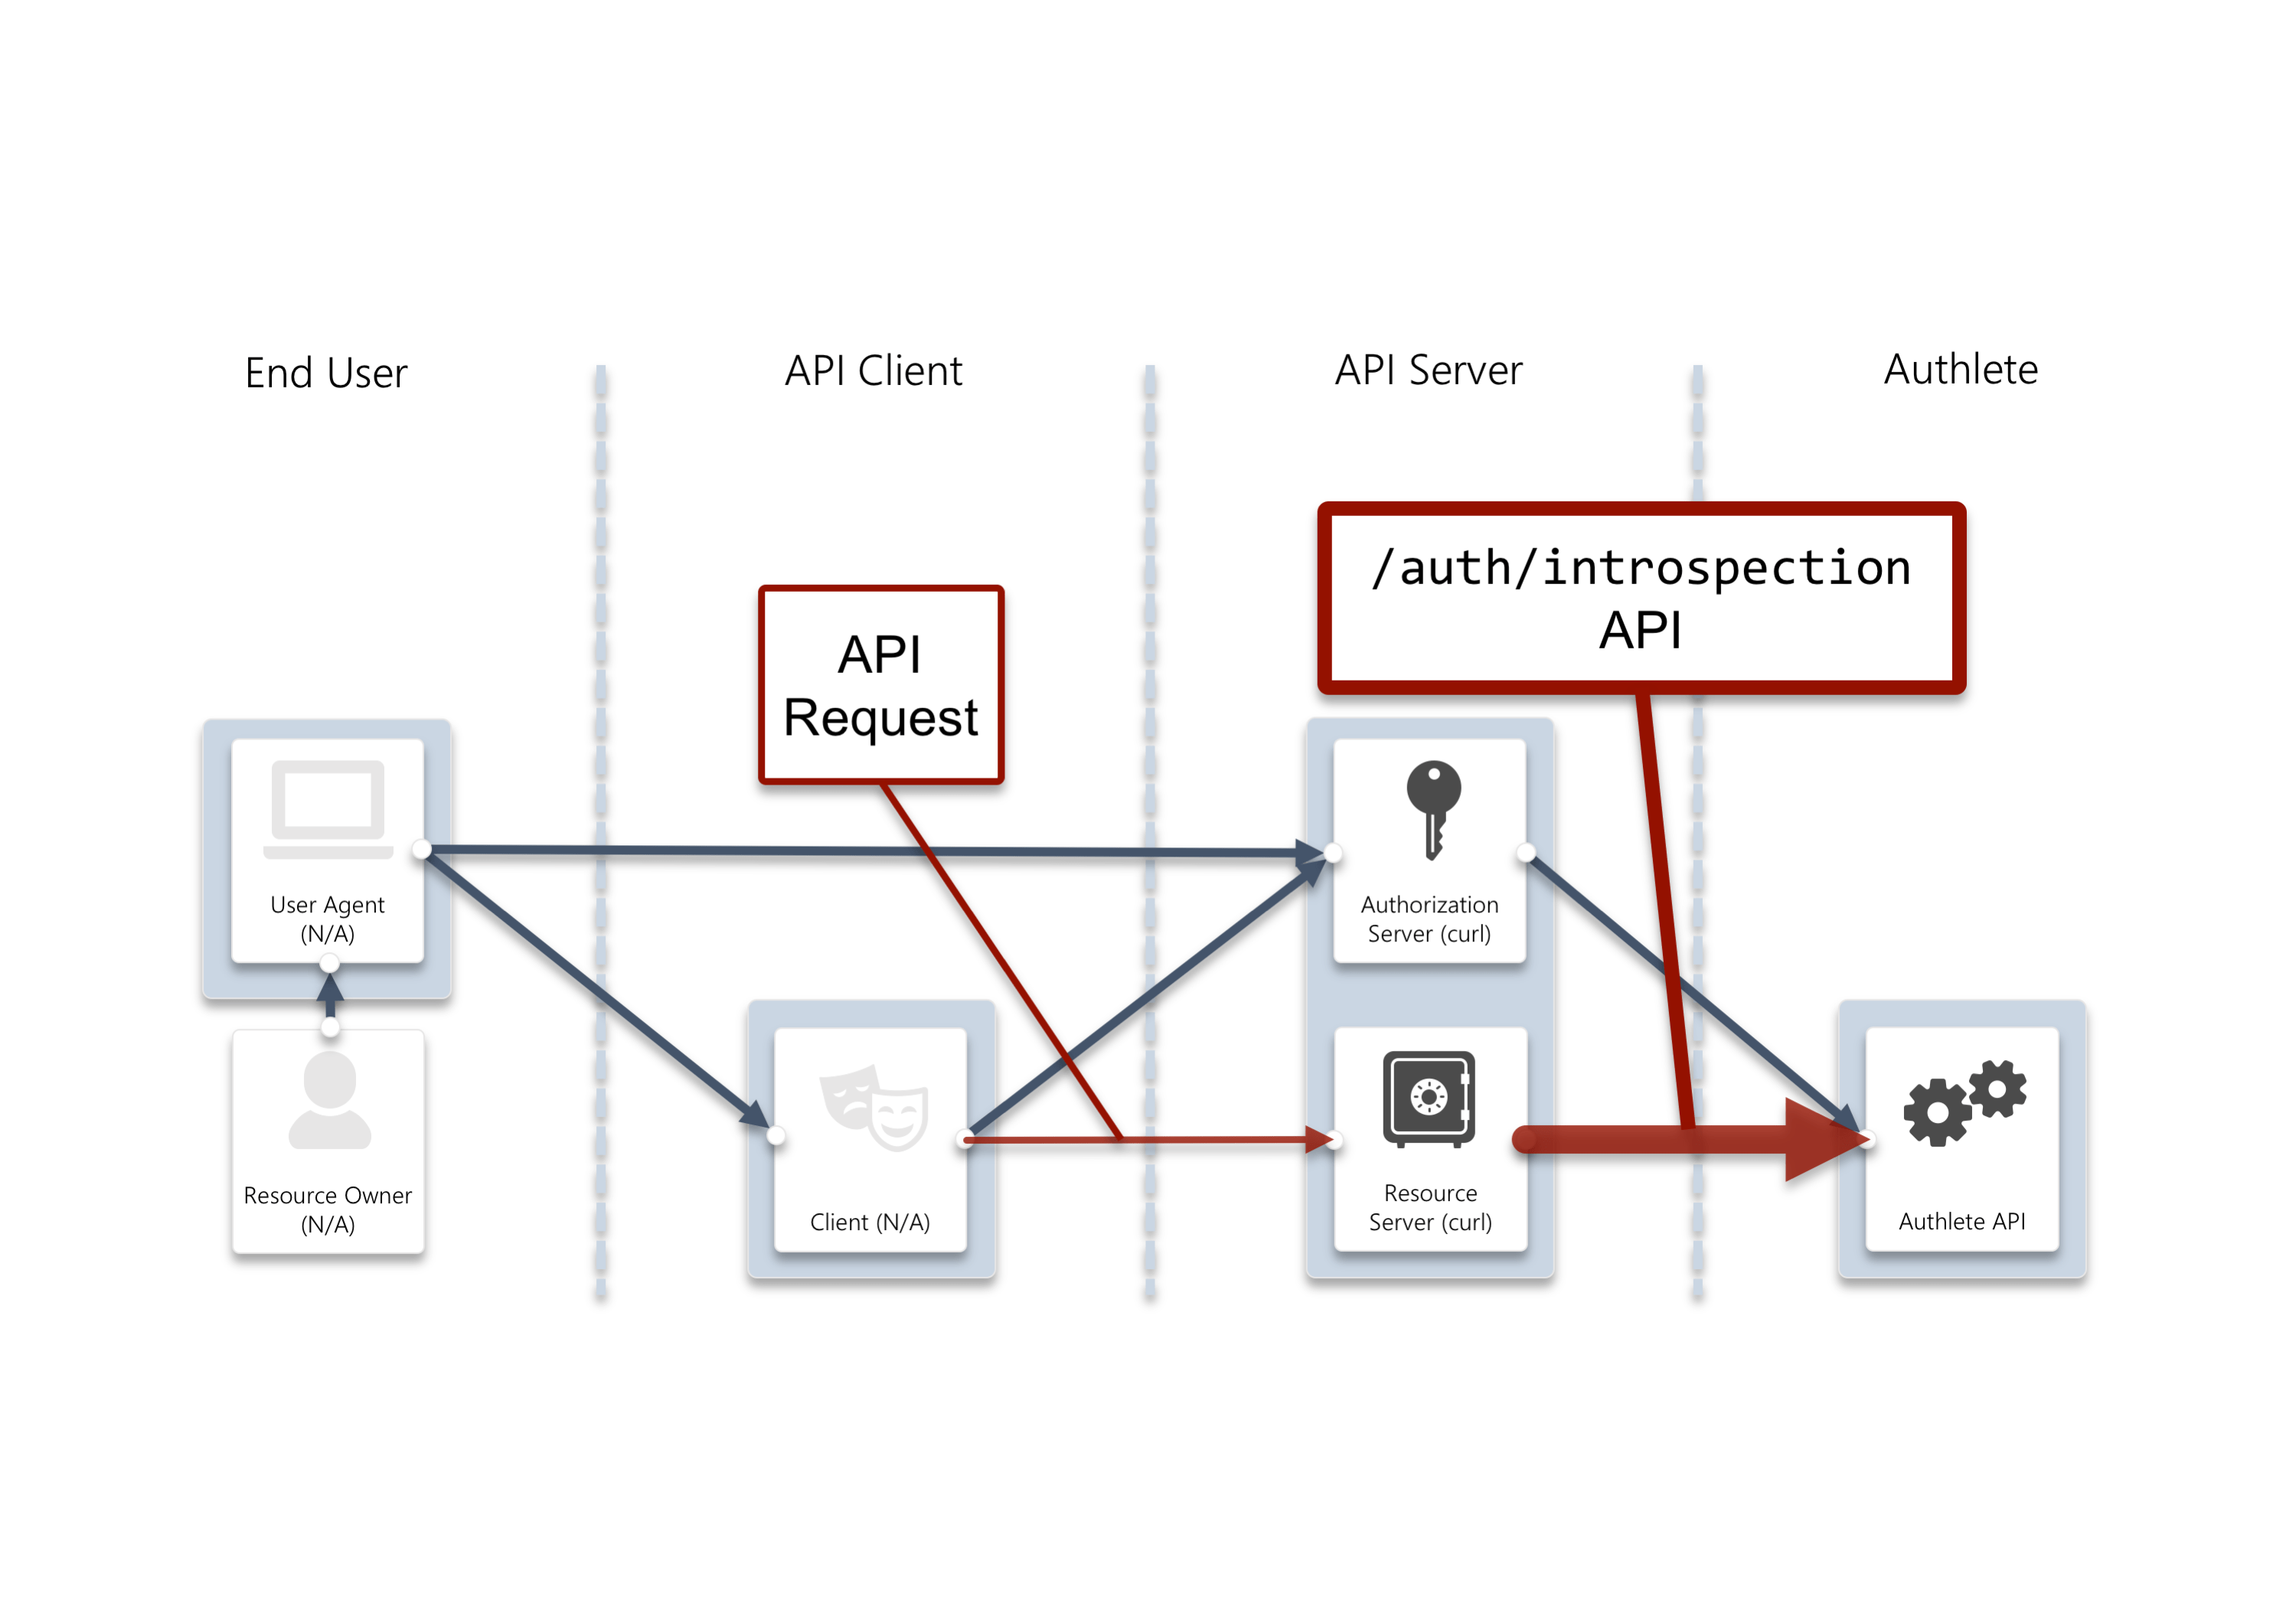
- A request to
/auth/introspectionAPI
- Response (folded for readability)