1. Overview
This document describes how to build an authorization server that supports CIBA (Client initiated Backchannel Authentication).1.1. Preface
It is essential to have an overview of CIBA in advance. Please refer to the following documents as necessary.- “CIBA”, a new authentication/authorization technology in 2019, explained by an implementer
- OpenID Connect Client Initiated Backchannel Authentication Flow - Core 1.0
- OAuth 2.0
- OpenID Connect
- Authlete
1.2. System Architecture
We will build an authorization server backed by Authlete as is shown in the diagram below.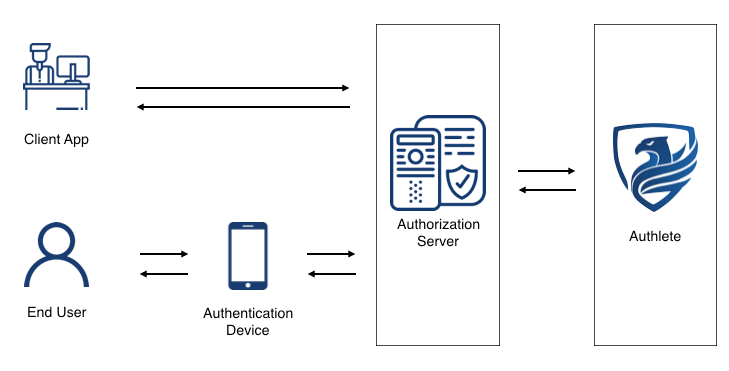
1.3. Sample Implementation
The sample implementation introduced in this article is only for grasping how to implement CIBA using Authlete. Some examples are not optimized intentionally to help you understand the processing flows. For example, the sample implementation in this article has the following restrictions:- The authorization server in the sample implementation only supports CIBA flow, not OAuth 2.0 or OpenID Connect.
-
The backchannel authentication endpoint in this sample implementation does not support optional parameters, such as
login_hint_token,id_token_hint, andacrs. -
The backchannel authentication endpoint and token endpoint in this sample implementation only support
client_secret_basicas the client authentication method.
1.4. Note
- The “specification” and “spec” in this article refer to OpenID Connect Client Initiated Backchannel Authentication Flow - Core 1.0 unless noted.
- The CIBA support is now available for Enterprise plan only. Please contact us if you are intereseted in testing CIBA functions of Authlete.
2. Implementation
In the CIBA flow, backchannel authentication endpoint and token endpoint play essential roles. Here, we explain how to implement the endpoints.2.1. CIBA flow using Authlete
2.1.1 Backchannel Authentication Endpoint
The diagram below explains the processing flow in each endpoint when implementing CIBA with Authlete. Please note that the diagram omits error handlings.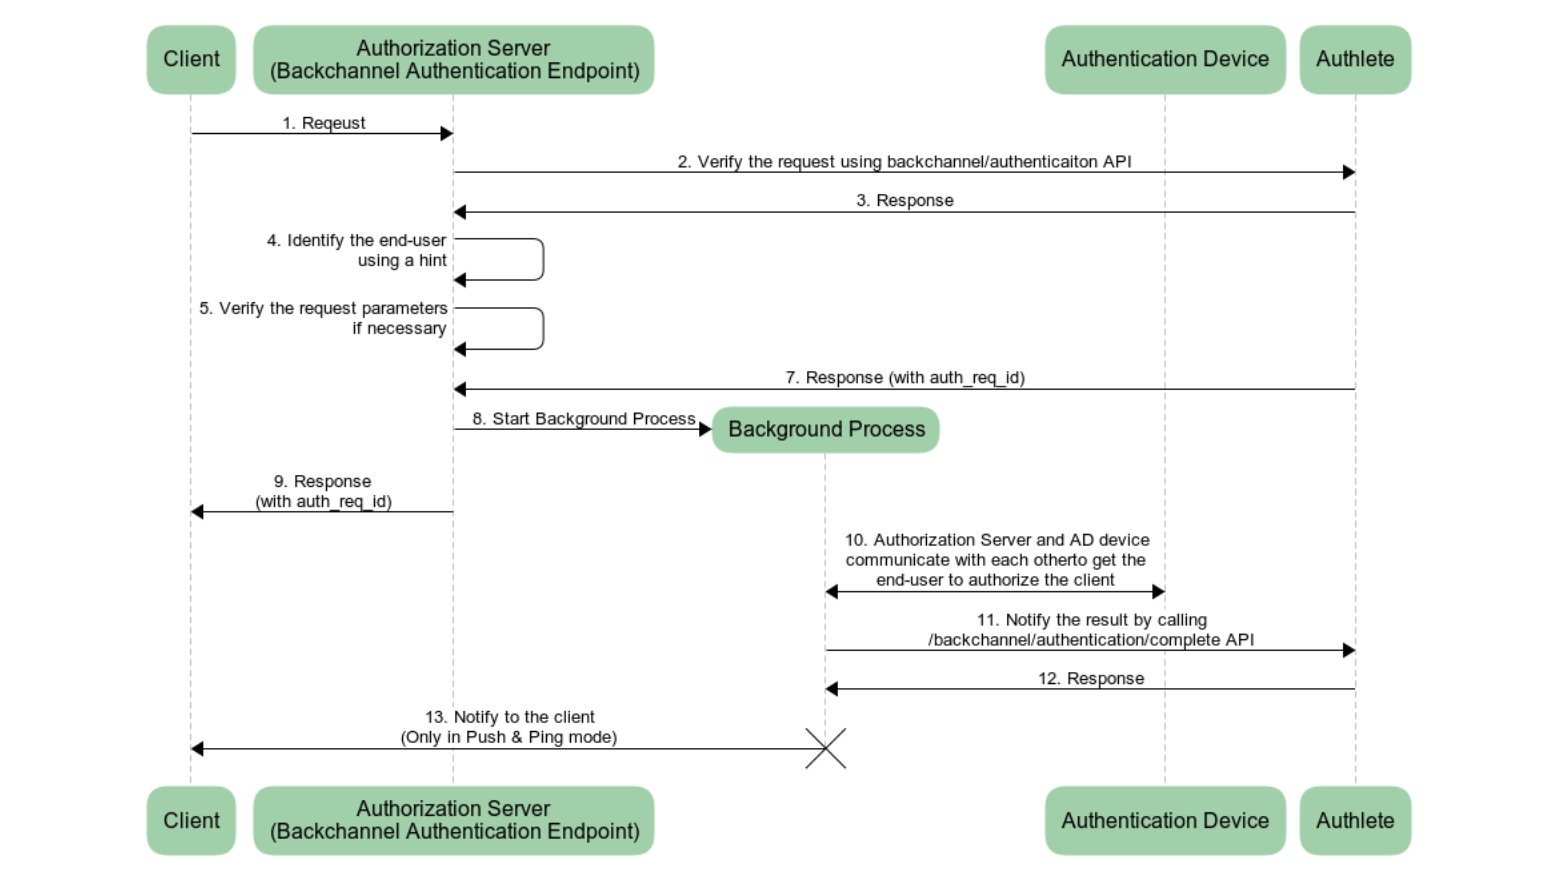
/api/backchannel/authenticationAPI/api/backchannel/authentication/issueAPI/api/backchannel/authentication/completeAPI
/api/backchannel/authentication/fail API for error handling. Please refer to Identifying an end-user using hint for details.
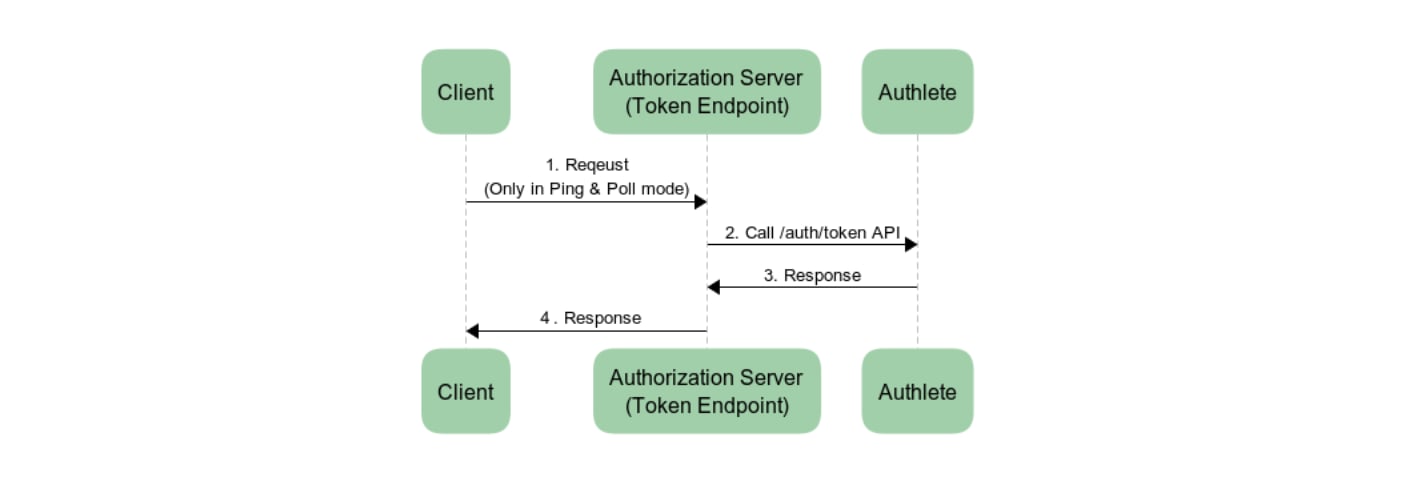
2.1.2. Token Endpoint
The processing flow of the token endpoint is simple, as is the case with OAuth 2.0. The authorization server sends a token request from a client to/api/auth/token API and sends back a token response from Authlete API to the client.
2.2. Implementing a Backchannel Authentication Endpoint
The backchannel authentication endpoint handles several requests and responses. To implement the endpoint, you must understand the basics of the endpoint first. ✔︎ Authentication Request The request that is sent to the backchannel authentication endpoint is called an “authentication request.” The spec requires that the HTTP method andContent-Type be POST and application/x-www-form-urlencoded respectively.
✔︎ Client Authentication
The backchannel authentication endpoint must authenticate a client. As is explained in this article, CIBA allows several client authentication methods; however, the sample implementation here supports only client_secret_basic for simplification. Please note that the client authentication method at the backchannel authentication endpoint must be the same as that at the token endpoint.
We use the following code as a template to implement the backchannel authentication endpoint in the authorization server using Java (JAX-RS).
2.2.1. Verifying an authentication request
The first thing that the backchannel authentication endpoint must do is to verify the authentication request. The steps will be as follows:- Extract information related to client authentication from the
authorizationparameter. - Call
/backchannel/authenticationAPI with the extracted information andparametersparameter, and delegate the verification process to Authlete. - Follow the
actionparameter’s value in a response from/backchannel/authenticationAPI.
/backchannel/authentication API sends a response with action=USER_IDENTIFICATION. In this case of USER_IDENTIFICATION, the authorization server will call the handleUserIdentification() method to handle the aunthentication request. Other values in the action parameter indicate an error, so the authorization server generates an error response and sends it to the client.
2.2.2. Identifying an end-user using a hint
When the/backchannel/authentication API returns a response with action=USER_IDENTIFICATION, the authorization server must identify the end-user using a hint in the response. The hint is either login_hint, login_hint_token, or id_token_hint. For simplification, the authorization server in this sample impementation supports login_hint only. The value can be either an end-user subject, email address or telephone number in the following sample.
In identifying the end-user successfully using the login_hint, the authorization server will do the following processes. Otherwise, the authorization server calls /backchannel/authentication/fail API, generates an error response, and returns it to the client.
The following codes include processes taking the discussion above into account.
2.2.3. Verifying Request Parameters
On top of the end-user identification, the authorization server must verify request parameters in thehandleUserIdentification() method, as is described in the following sections.
2.2.3.1. login_hint_token
When using login_hint_token as a hint, the authorization server must verify its expiration; however, in this article, we will not implement the verification for simplification. Please check the java-oauth-server and authlete-java-jaxrs for details.
2.2.3.2. user_code
In the sample implementation above, the authorization server expects an end-user subject, email address, and telephone number to identify the end-user. However, a third person may be able to guess these values.
The user_code is a parameter to avoid malicious third parties from sending fraud authentication requests. The spec defines the user_code as follows:
user_code OPTIONAL. A secret code, such as password or pin, known only to the user but verifiable by the OP. The code is used to authorize sending an authentication request to user’s authentication device. This parameter should only be present if client registration parameter backchannel_user_code_parameter indicates support for user code.The malicious clients cannot guess the
user_code and thus send a valid authentication request. In other words, an authorization server that verifies user_code can reject the malicious requests.
Let’s check the verification of a user_code.
Authlete API server will do the following process when an authorization server calls the /backchannel/authentication API.
backchannelUserCodeParameterSupported metadata of the service that corresponds to the authorization server and the bcUserCodeRequired metadata of the client are true, Authlete will check whether an authentication request contains user_code. Authlete API returns an error response with action=BAD_REQUEST to the authorization server if the authorization server sends an authentication request that does not contain user_code. In this case, the authorization server does the process for the case of BAD_REQUEST in the sample implementation above.
In this article, we will implement a handleUserIdentification() method, which handles the case for USER_IDENTIFICATION. For USER_IDENTIFICATION scenario, we have to implement the method anticipating one of the cases listed below.
✔︎ Case 1
A user_code was found in the authentication request. (= In the case of the pseudo code above, the conditions of service.isBackchannelUserCodeParameterSupported() && client.isBcUserCodeRequired() and isUserCodeContainedInRequestParameters() were satisified.)
✔︎ Case 2
The Authlete API does not check the user_code. (= In the case of the pseudo code above, the condition of service.isBackchannelUserCodeParameterSupported() && client.isBcUserCodeRequired() was not satisified.)
In the case 1, Authlete API guarantees that the authentication request contains a user_code. Thus, the authorization server must check whether the value of user_code is valid. We can skip the check for the case 2 because an authentication request does not have to contain the user_code parameters.
Here is a sample implementation of handleUserIdentification().
2.2.3.3. Binding Message
When a client starts the CIBA flow, an end-user will be asked to authorize on their authentication device. When authorizing, how does the end-user confirm that the client asking authorization via the device is the one the end-user is willing to authorize? Thebinding_message parameter is introduced to solve the issue above. The diagram below is a use case of using the binding_message parameter.
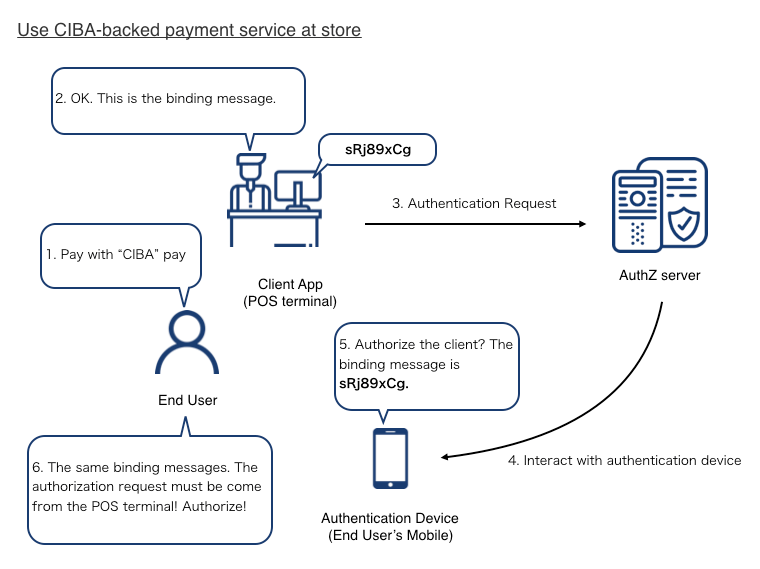
- An end-user asks a store to pay using a CIBA-backed payment service.
- The store shows a binding message, sRj89xCg, in the POS terminal (= client app).
- The POS terminal sends an authentication request, including the binding message, to the authorization server of the payment service.
- The authorization server starts to interact with an authentication device of the end-user and sends the binding message to the device.
- The authentication device asks the end-user to authorize the client, showing the binding message of sRj89xCg.
- The end-user confirms the client using the binding message and authorize the transaction.
binding_message value SHOULD be relatively short and use a limited set of plain text characters.
binding_message OPTIONAL. A human readable identifier or message intended to be displayed on both the consumption device and the authentication device to interlock them together for the transaction by way of a visual cue for the end-user. This interlocking message enables the end-user to ensure that the action taken on the authentication device is related to the request initiated by the consumption device. The value SHOULD contain something that enables the end-user to reliably discern that the transaction is related across the consumption device and the authentication device, such as a random value of reasonable entropy (e.g. a transactional approval code). Because the various devices involved may have limited display abilities and the message is intending for visual inspection by the end-user, the binding_message value SHOULD be relatively short and use a limited set of plain text characters. The invalid_binding_message defined in Section 13 is used in the case that it is necessary to inform the Client that the provided binding_message is unacceptable.Here, we add a
handleUserIdentification() method to check the length of the binding message.
auth_req_id
After the authorization server finished all necessary verifications, it issues an auth_req_id using /backchannel/authentication/issue API.
action=OK, the server starts a background process by calling the startCommunicationWithAuthenticationDevice() method, and sends a 200 OK response to the client. Please note that the response to the client contains the auth_req_id issued by the Authlete API.
###2.2.5. Background Processes
The authorization server starts the background process by calling the startCommunicationWithAuthenticationDevice() method before sending the auth_req_id to the client. In this background process, the authorization server will do the following tasks.
- Communicates with an authentication device to ask the end-user whether to authorize the request from the client.
- Calls
/backchannel/authentication/completeAPI and tells Authlete the result of the communication between the authorization server and the authentication device. - Follows the action in the response from the
/backchannel/authentication/completeAPI.
/backchannel/authentication/complete API varies based on the backchannel token delivery mode. To be concrete, in successful cases, the API returns action=OK in the POLL mode while it returns action=NOTIFICATION in the PING and PUSH modes. When the action in the response from the API is NOTIFICATION, the authorization server must send a notification to the notification endpoint of the client.
Here is the sample implementation of the background processes.
2.3. Implementing a Token Endpoint
The implementation of the token endpoint using Authlete is very simple, as is shown in Token Endpoint. The authorization server extracts the content of a token request from a client and sends the extracted information to/auth/token API of Authlete. A point which should be noted is that the client authentication method used at the token endpoint must be the same as has been used at the backchannel authentication endpoint.
The sample implementation in this article focuses on only client_secret_basic, so the following implementation implements the client authentication method only.
3. Simulation
We have finished implementing the authorization server that supports the CIBA flow. Now, let’s test it. The following explanation uses java-oauth-server as an authorization server and CIBA Simulator as an authentication device (AD) and consumption device (CD).3.1. Configuration
3.1.1. Authlete Configuration
3.1.1.1. Service Configuration
Please change the settings of a service as follows.3.1.1.2. Client Configuration
Please change the settings of a client as follows.3.1.2. CIBA Simulator Configuration
3.1.2.1. Create a project
Input any values in Namespace and Project and push Create button in the top page of CIBA Simulator. You will be redirected to the project top page with the URL of
 https://cibasim.authlete.com/{namespace}/{project}. You can configure both AD and CD simulators.

Authentication Device Simulator
To ask the end-user to authorize the request from the client, java-oauth-server with the default configuration sends a request, which includes a user identifier as is shown below, to the simulator’s/api/authenticate/sync API.
/api/authenticate/sync API receives the request from the authorization server, the user authorizes or rejects the request from the client in the AD simulator, and the result is sent to the authorization server.
To launch the AD simulator, enter the end-user identifier in the User ID field and push the Launch AD simulator button. java-oauth-server with the default configuration uses dummy users defined in UserEntity.java. In this article, let’s use subject=1001 as an end-user. Please enter 1001 in the User ID field.
 You will see the page like this. Please note that you must keep this page open while testing the CIBA flow.

3.1.2.3. CD Simulator Configuration
In the top page of the project, please configure as follows and press Save button to store the change. And Launch the CD simulator by pressing the Launch CD simulator button.

3.1.3. java-oauth-server Configuration
Please refer to this article for the detail of the java-oauth-server. Download the source code of the java-oauth-server and configure it atauthlete.properties as follows.
3.2. Testing each delivery mode
Please configure the delivery mode in the following settings- Token delivery mode in the Developer Console
- Token Delivery Mode in the CD simulator
3.2.1. Testing the PUSH mode
Step 1. Launch the CD simulator and input values as follows. Please note that the value of hint and User Code are defined in UserEntity.java in this case. Step 2. Send a backchannel authentication request by pressing the Send button.
Step 3. The
Step 2. Send a backchannel authentication request by pressing the Send button.
Step 3. The auth_req_id will be sent to the CD simulater after the authorization server processes the request.
 Step 4. You will see the authorization page in the AD simulator.
 Step 5. Press Allow button and authorize the client.
Step 6. The authorization server will push a response that includes tokens to the CD simulator.
Step 5. Press Allow button and authorize the client.
Step 6. The authorization server will push a response that includes tokens to the CD simulator.

3.2.2. Testing the PING mode
Steps 1 to 3 are the same as those in the PUSH mode. The authorization server sendsauth_req_id to the CD simulator after it processed the backchannel authentication request.
Step 4. The CD simulator will wait for a notificatoin from the authorization server at the notification endpoint.
 Step 5. After authorizing the client in the AD simulator, the authorization server sends a notification to the client notification endpoint and receives the tokens.

3.2.3. Testing the POLL mode
Steps 1 to 3 are the same as those in the PUSH mode. The authorization server sendsauth_req_id to the CD simulator after it processed the backchannel authentication request.
Step 4. The CD simulator starts polling to the token endpoint. Please note that the token endpoint returns authorization_pending errors until the client is authorized in the AD simulator.
 After the client is authorized in the AD simulator, the token endpoint sends a response that includes tokens.
