
This page is for Authlete 2.x. For 3.0 content, see OIDC Basics (3.0).
Preface
This document is a tutorial to describe basic usage of Authlete APIs in order to implement OpenID Connect (OIDC) identity provider server that supports authorization code flow.Components
In this tutorial, we assume the following components. Note that only Authlete’s consoles and APIs are up and running, while an authorization server (OIDC identity provider) and a resource server don’t actually exist. Instead you will use curl command to simulate how these servers make API requests to Authlete on receiving authorization requests, token requests and token introspection requests from clients (OIDC relying party).In this tutorial, OIDC identity provider and relying party are described as authorization server and client respectively for convenience.

Environment setup
Settings in this section are the same as described in OAuth 2.0 Basics (2.x). You can skip this section if you have already done.
Let’s try OIDC authorization code flow using this environment, in the next section.
Walk-through
Here is a sequence diagram in this tutorial. Message numbers in the diagram might help you understand the following steps.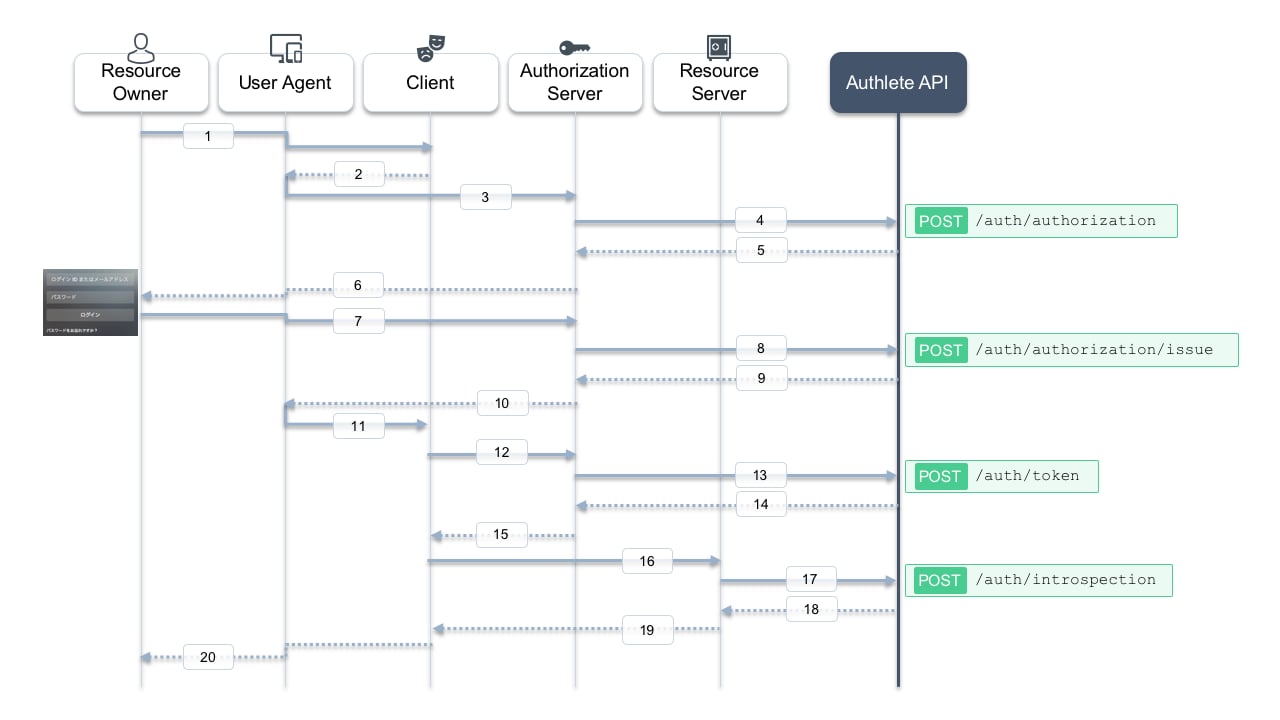
Authorization request from the client to the authorization server
The client makes an OIDC authentication request (authorization request) to the authorization server via user agent (message #2, #3). In this tutorial, let’s suppose the following values are specified as paramters in the request.
The authorization server is to receive the following content (folded for readability) as HTTP GET query string from the user agent.
scope and response_type are openid and code respectively.
- Whether a client associated with the client ID
12898884596863has been registered to the authorization server. It must be an OIDC relying party because ofscope=openid. - Whether the value of the redirect URI
https://client.example.org/cb/example.commatches with one of URIs registered to the client - Whether values of other parameters such as
response_type,scopeare applicable for the client, i.e. permitted for the client to specify in its request
<API Key>, <API Secret> and <Client ID> by your own values generated in the previous step.
curl.exe instead of curl, escape " characters and use ` to break lines.
resultMessage, action and ticket.
resultMessageprovides human-readable result of the request processing (See also Interpreting Authlete’s result codes).openid=trueindicates the request is to be processed in accordance with the OIDC protocol.actionindicates what the authorization server should do next.ticketis required for the authorization server to make a request to another API in the next step.
User authentication and confirmation of sharing authentication result
Actual interaction between the resource owner and the authorization server is out of scope in this tutorial. In most cases, authorization server would authenticate user with some credentials (e.g. ID/password), determine roles and privileges for the user, and ask the user if he or she authorizes to share the authentication result with the client (message #6, #7).Issuing an authorization code
Let’s assume the auhtorization server reaches the following state after completion of the previous process:- The authorization server has authenticated the resource owner, and determined that an identifier for the resource owner, to be shared with Authlete as a value of
subjectparameter, istestuser01. - The authorization server has got consent from the resource owner.
subject and ticket that were a part of the response from /auth/authorization API, as request parameters.
Execute curl command as follows (message #8).
Make sure to replace <API Key>, <API Secret> and <Ticket> by your own values generated in the previous step.
resultMessage, action and responseContent.
resultMessageprovides human-readable result of the request processing. (See also Interpreting Authlete’s result codes)actionindicates what the authorization server should do next. The value in this response isLOCATION, which means the authorization server should make a redirection response back to the user agent.responseContentis supposed to be content of the response from the authorization server.issinresponseContentis the issuer identifier defined by RFC 9207. Authlete includes it unless the service’sissSuppressedproperty is enabled.
/auth/authorization/fail API supports the termination process in terms of messages to be sent to the client, and transfer method for the response.
To summarize, an authentication server usually makes a request to either /auth/authorization/issue or /auth/authorization/fail API depending on result of user authentication and consent.
Token request
Here we assume that the user agent receives the redirection response form the authorization server. It would send the following request (folded for readability) to the client (message #11).code parameter, craft a token request with the value and send it to the authorization server as follows (folded for readability). https://as.example.com/token is the token endpoint URI in this tutorial (message #12).
<API Key>, <API Secret>, <Client ID>, <Client Secret> and <Code> by your own values generated in the previous step.
resultMessage, action and responseContent.
resultMessageprovides human-readable result of the request processing. (See also Interpreting Authlete’s result codes)actionindicates what the authorization server should do next. The value in this response isOK, which means the authorization server should make a token response back to the client.responseContentis supposed to be content of the response from the authorization server.
Decoding ID token
In most cases, the client would decode the value ofid_token in the response and verify it.
Let’s try to decode the token with Online JWT Verfier.
Online JWT Verfier (https://kjur.github.io/jsrsasign/tool/tool_jwtveri.html)
Open the link above, and paste the value of the id_token to textarea in Step 1. In this tutorial, the value is: eyJhbGciOiJIUzI1NiJ9.eyJzdWIiOiJ0ZXN0dXNlcjAxIiwiYXVkIjpbIjEyODk4ODg0NTk2ODYzIl0sImlzcyI6Imh0dHBzOi8vYXV0aGxldGUuY29tIiwiZXhwIjoxNTU5MTA2ODE1LCJpYXQiOjE1NTkwMjA0MTUsIm5vbmNlIjoibi0wUzZfV3pBMk1qIn0.5uSFMTGnubyvtiExHc9l7HT9UsF8a_Qb0STtWzyclBk
Click Just Decode JWT button in Step 3 and see decoded content in Parsed JWT section.
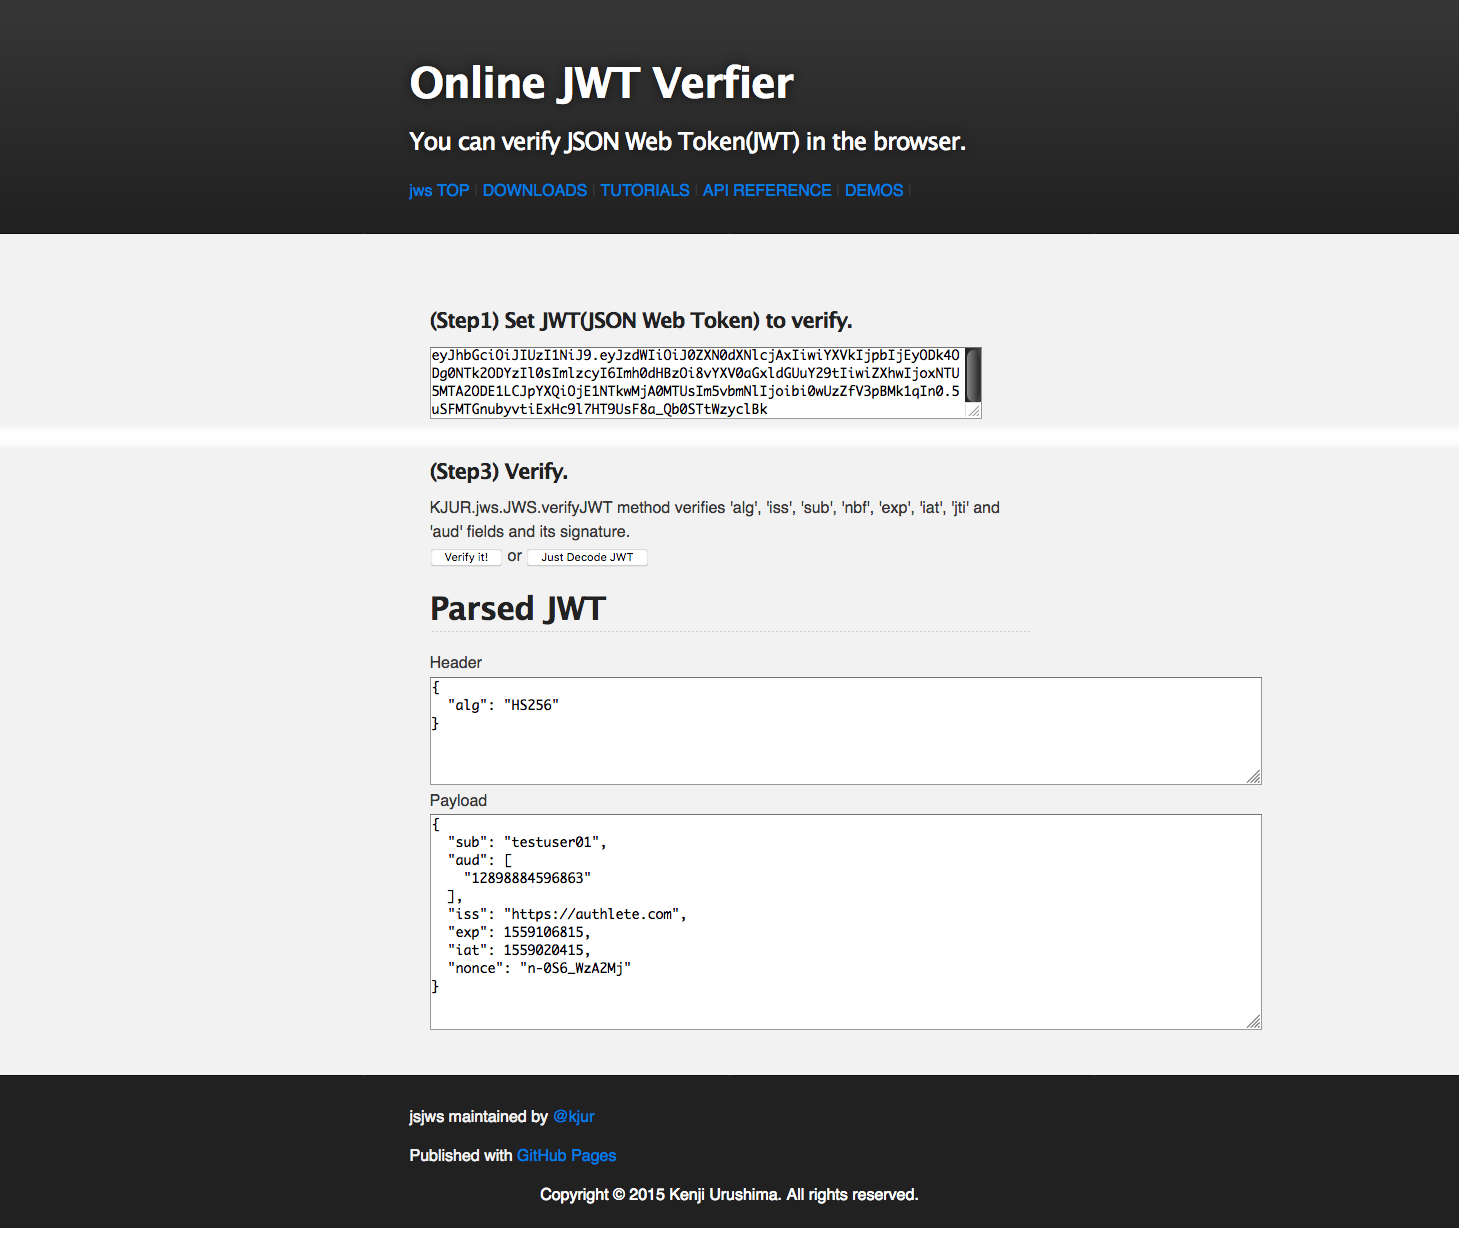
- Header
- Payload
issishttps://authlete.com, which is the default value of Authlete. It must behttps://as.example.com, that is the identifier of the authorization server in this tutorial.subis the only attribute related to the user’s identity. It may be better to include other user attributes for the client’s convenience.
iss value and add other claims in the next section.
Modifying ID token
Issuer identifier
Log in to Service Owner Console https://so.authlete.com/accounts/login and select the service previously created during this tutorial. Click “Edit” button in the bottom of the page to make settings editable.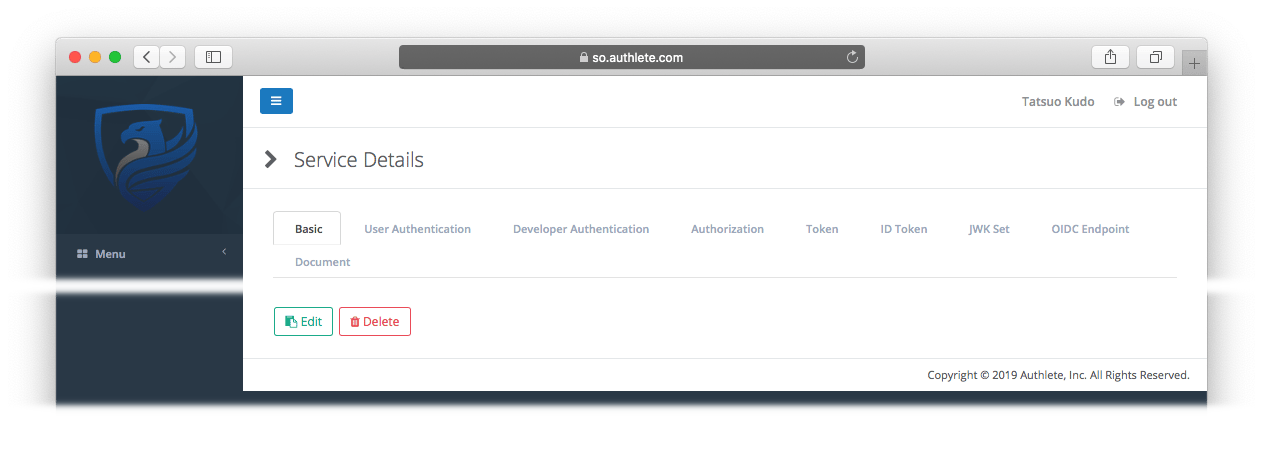
https://authlete.com. Change it to https://as.example.com and click “Update” button in the bottom of the page. Press “OK” in a dialog for confirmation.
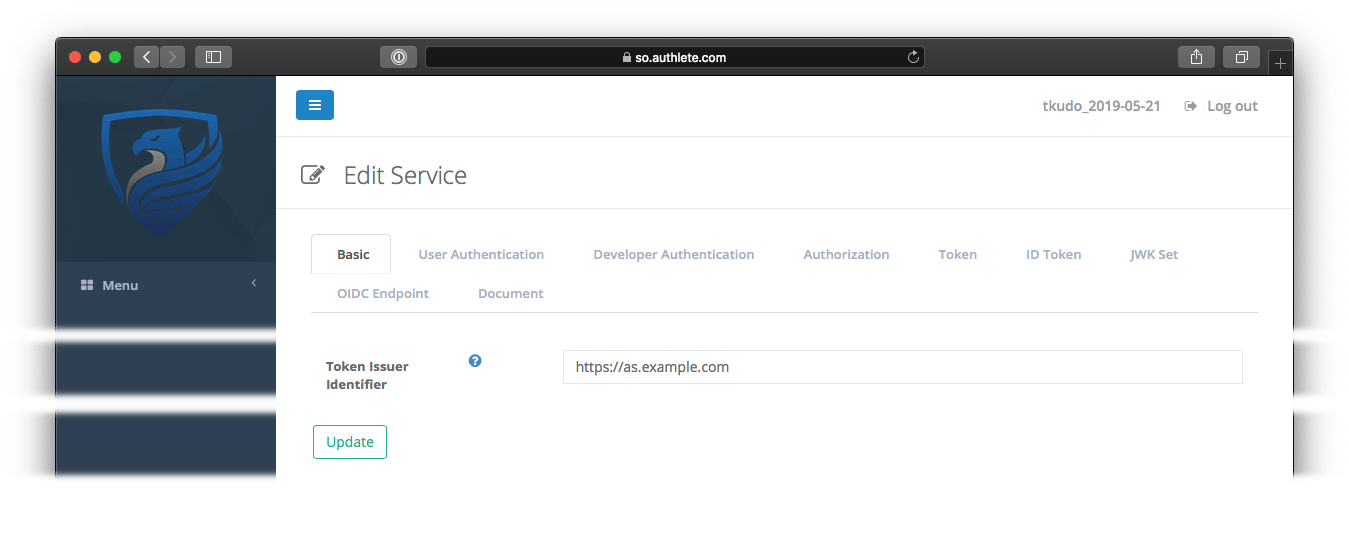
iss has been fixed.
Authorization Request
Let’s make the same authorization request as the previous one (using the samenonce value for convenience) to Authlete’s POST /auth/authorization API (message #4).
Make sure to replace <API Key>, <API Secret> and <Client ID> by your own values generated in the previous step.
Additional claims
Let’s make a request to Authlete’s POST /auth/authorization/issue for issurance of an authorization code. Make sure to replace<API Key>, <API Secret> and <Ticket> by your own values generated in the previous step.
This time the following additional claims are included on making the request to the API.
claims is the paramater to add claims. The request will be constructed as follows.
Token request
The client makes a token request (folded for readability) to the authorization server.<API Key>, <API Secret>, <Client ID>, <Client Secret> and <Code> by your own values generated in the previous step.
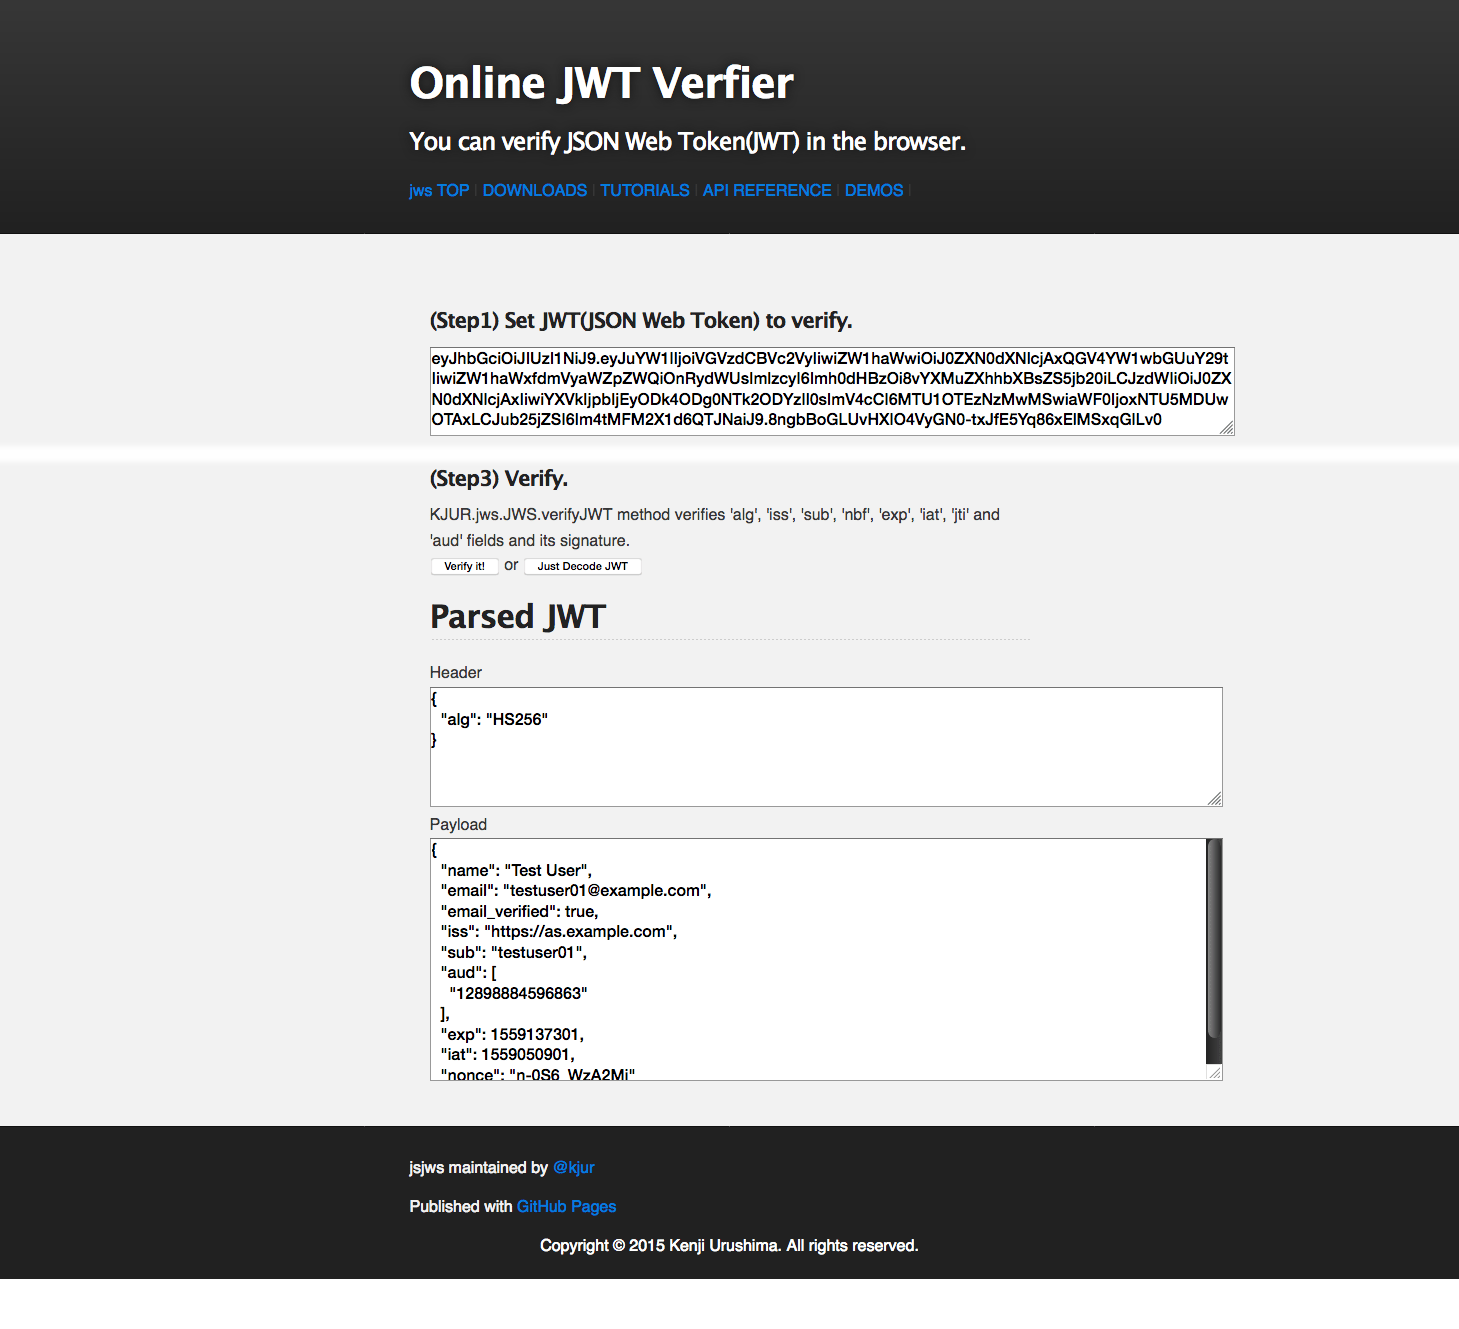
id_token to textarea in Step 1. In this tutorial, the value is:
eyJhbGciOiJIUzI1NiJ9.eyJuYW1lIjoiVGVzdCBVc2VyIiwiZW1haWwiOiJ0ZXN0dXNlcjAxQGV4YW1wbGUuY29tIiwiZW1haWxfdmVyaWZpZWQiOnRydWUsImlzcyI6Imh0dHBzOi8vYXMuZXhhbXBsZS5jb20iLCJzdWIiOiJ0ZXN0dXNlcjAxIiwiYXVkIjpbIjEyODk4ODg0NTk2ODYzIl0sImV4cCI6MTU1OTEzNzMwMSwiaWF0IjoxNTU5MDUwOTAxLCJub25jZSI6Im4tMFM2X1d6QTJNaiJ9.8ngbBoGLUvHXIO4VyGN0-txJfE5Yq86xElMSxqGlLv0
Click Just Decode JWT button in Step 3 and see decoded content in Parsed JWT section.
- Header
- Payload
iss value exists, and find the additional claims, name, email and email_verified are included as expected.
Conclusion
In this tutorial, we were able to confirm the following two operations using Authlete APIs.- How to use Authlete APIs to implement authorization code flow into authoriazation server (OIDC identity provider)
- Fixing issuer identifier and including additional claims
Next steps
Let’s dig deeper on Authlete by playing with the following features.- OAuth 2.0 Basics (2.x) — Authorization code flow without OIDC.
- PKCE (2.x) — Require PKCE for the authorization code flow.
- POST /auth/authorization/fail API (See Generating error response with “fail” API)
/auth/userinfoAPI (See Access token verification in Userinfo API)- Token Management API (See Token Lifecycle & Policies)
- Authorization server implementations (See Using Demo Authorization Server (2.x))
- Signing an ID token with public key cryptography (See Changing signing key for ID token)