
This page is for Authlete 2.x. For 3.0 content, see OAuth 2.0 Basics (3.0).
Preface
This document is a tutorial to describe basic usage of Authlete 2.x APIs (api.authlete.com) in order to implement an OAuth 2.0 authorization server that supports the authorization code grant flow.Components
In this tutorial, we assume the following components. Only Authlete’s consoles and APIs are up and running, while an authorization server and a resource server don’t actually exist. Instead, you will usecurl to simulate how these servers make API requests to Authlete when they receive authorization requests, token requests, and token introspection requests from clients.
The authorization server and the client don’t exist as stated above, but their FQDNs are at least needed to explain the OAuth flow.

Environment setup
Consult instructions “Sign-up to Authlete and Creating a Service“ to create a new Authlete API service and register a client to the service. In this tutorial, we assume the following properties are generated or specified.
Let’s try authorization code grant flow using this environment, in the next section.
Walk-through
Here is a sequence diagram for this tutorial. Message numbers in the diagram help you follow the steps below.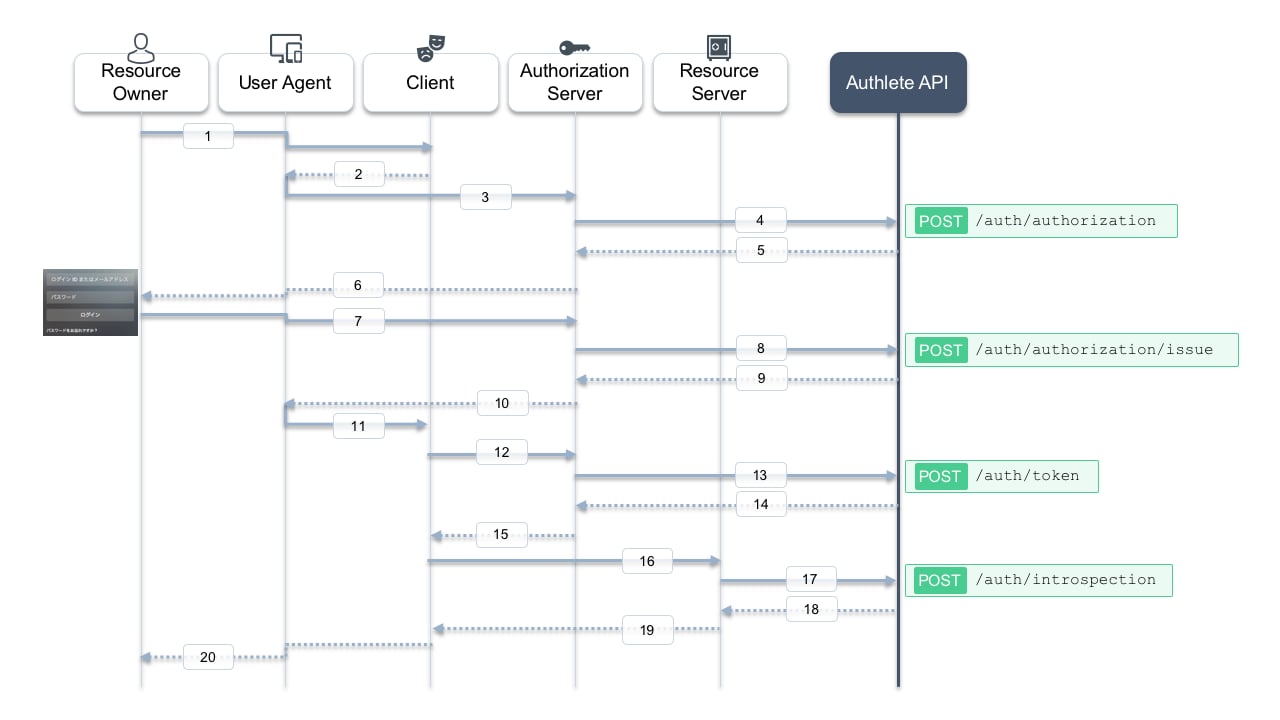
1. Authorization request from the client to the authorization server
The client makes an authorization request to the authorization server via a user agent (messages #2 and #3). In this tutorial, suppose the following parameters are used:
The authorization server receives the following HTTP GET query string from the user agent (folded for readability):
- Whether a client associated with
client_id = 12818600553323has been registered. - Whether the
redirect_urimatches one of the client’s registered redirect URIs. - Whether other parameters such as
response_typeandscopeare allowed for this client.
Linux/Mac
Windows (PowerShell)
resultMessage: Human-readable result.action: What the authorization server should do next (INTERACTIONhere).ticket: Used in the next step when issuing an authorization code.
2. User authentication and confirmation of granting access
Actual interaction between the resource owner and the authorization server is out of scope here. Typically, the authorization server:- Authenticates the user (e.g., ID/password).
- Determines the user’s roles and privileges.
- Asks whether the user authorizes the client to access resources.
testuser01.
3. Issuing an authorization code
After successful authentication and consent, the authorization server issues an authorization code by calling POST /auth/authorization/issue, passing theticket from step 1 and the subject (testuser01).
Linux/Mac
Windows (PowerShell)
resultMessage: Human-readable result.action:LOCATION, meaning the authorization server should redirect the user agent.responseContent: The redirect URI with thecodeandissparameters.issinresponseContentis the issuer identifier defined by RFC 9207. Authlete includes it unless the service’sissSuppressedproperty is enabled.
4. Token request
After receiving the authorization code via the redirect, the client sends a token request to the authorization server (message #12). For example:Linux/Mac
Windows (PowerShell)
resultMessage: Human-readable result.action:OK, meaning the authorization server should return a normal token response.responseContent: JSON body of the token response to send back to the client.
5. API request (access token introspection)
Typically, the client then calls APIs on a resource server using the access token (message #16). The resource server must:- Check whether the token is valid and not expired.
- Retrieve information about the user (
subject) and client (clientId). - Decide how to handle the API request.
/auth/introspection API for this purpose.
Make sure to replace <API Key>, <API Secret>, and <Token> with your own values.
Linux/Mac
Windows (PowerShell)
- Whether the token is valid (
usable,sufficient,expiresAt). - Which user (
subject) and client (clientId) it belongs to.
Conclusion
In this tutorial, we have seen how to use Authlete 2.x APIs to implement the OAuth 2.0 authorization code grant flow in an authorization server, using/auth/authorization, /auth/authorization/issue, /auth/token, and /auth/introspection.
Next steps
- Require PKCE for authorization code flow: PKCE (2.x).
- Add OpenID Connect on top of OAuth 2.0: OIDC Basics (2.x).
- Learn how to handle error responses: Generating error response with “fail” API.
- Manage and revoke tokens: Token Lifecycle & Policies.
- Explore reference authorization server implementations: Authorization server implementations (See Using Demo Authorization Server (2.x)).