> ## Documentation Index
> Fetch the complete documentation index at: https://developers.authlete.com/llms.txt
> Use this file to discover all available pages before exploring further.
# Using Demo Authorization Server
> Sign up to Authlete, create a 2.x service, register a client, and connect to the Authlete API.
This page is for **Authlete 2.x**. For 3.0, see [Using Demo Authorization Server (3.0)](/get-started/quickstarts/using-demo-authorization-server).
# Sign-up to Authlete and Creating a Service (2.x)
## Preface
These instructions describe how to sign up to Authlete, create a new 2.x service and register an OAuth/OIDC client to the service, then verify the setup by calling the Authlete `/api/auth/authorization` endpoint.
## Instruction Steps
We will cover the following steps:
1. Sign up to Authlete
2. Create an API service instance
3. Log in to Developer Console
4. Register an OAuth/OIDC Client
5. Connect to the API
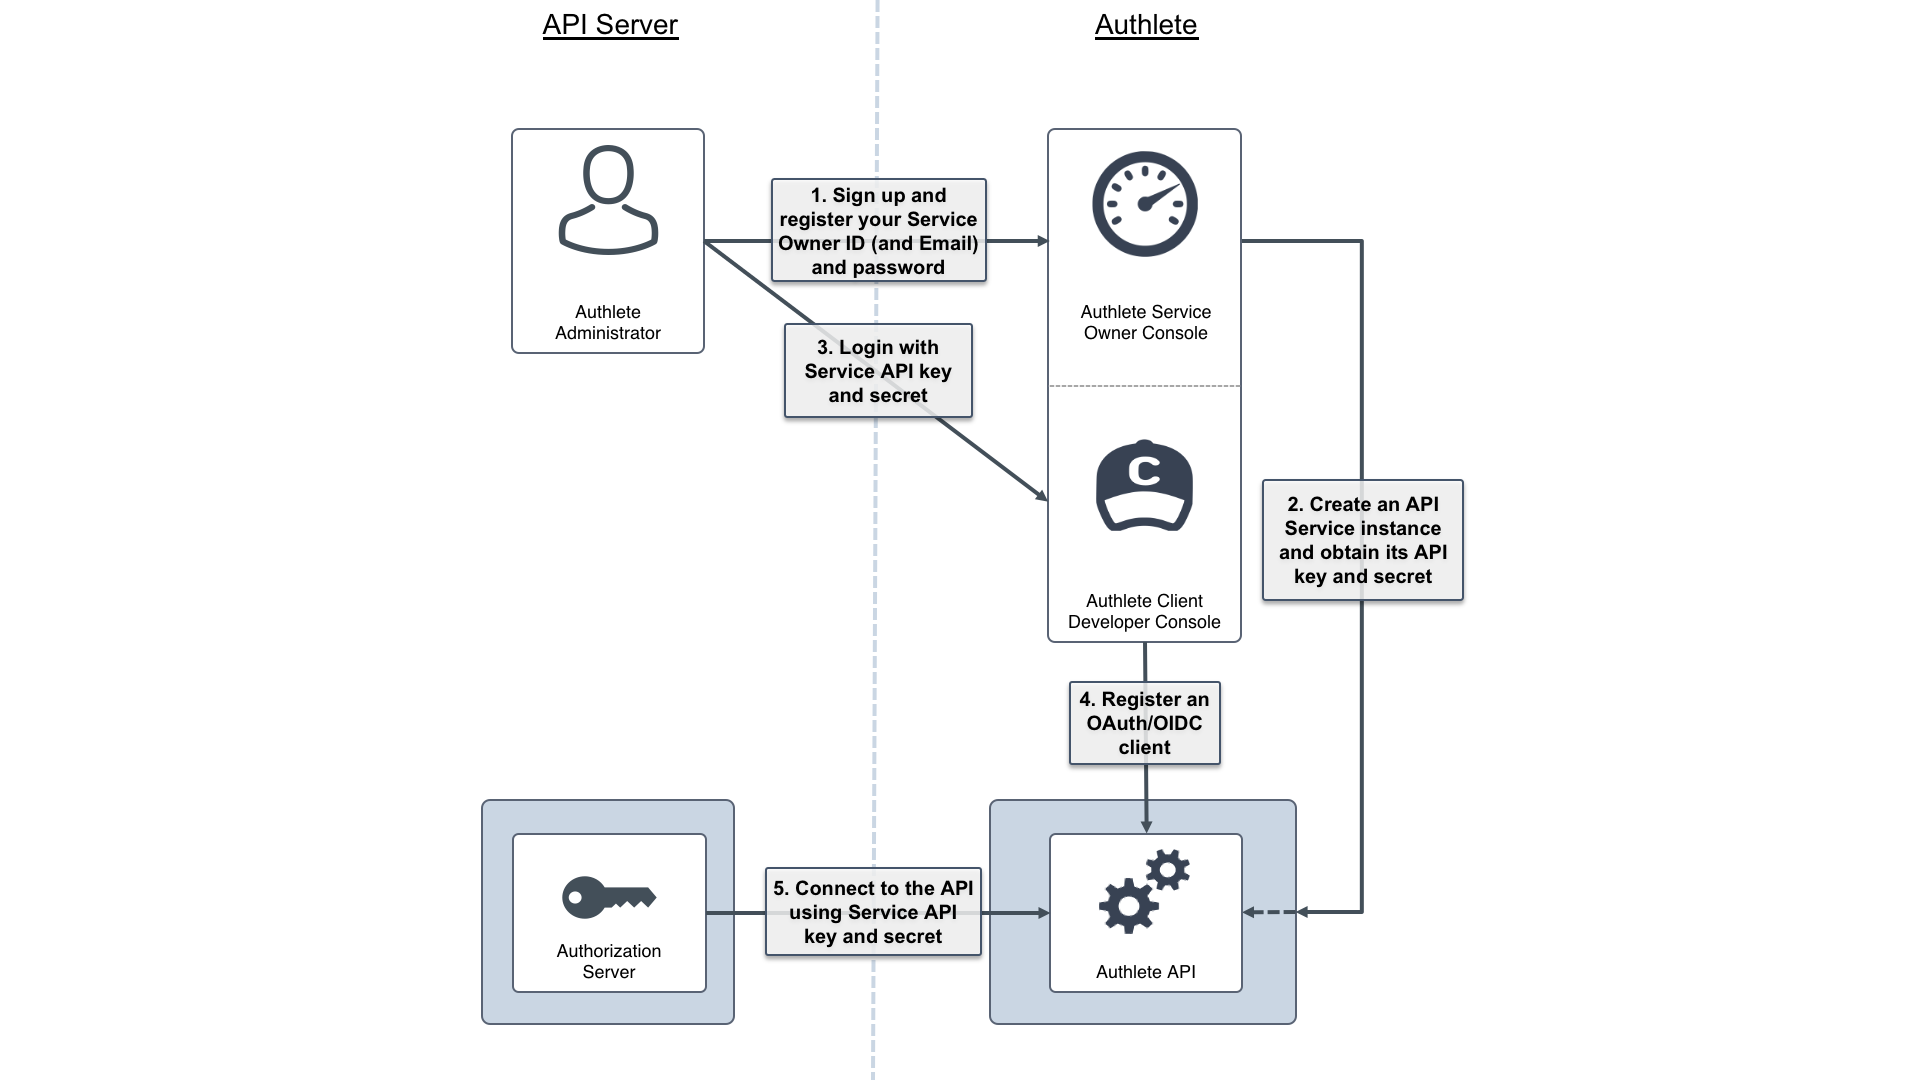
## 1. Sign up to Authlete
You need your own **Service Owner** account before using Authlete APIs as your authorization server backend.
1. Open the Authlete Service Owner signup page: `https://so.authlete.com/accounts/signup`.
2. Complete the form and keep your **Login ID** and **Password** safe.
3. After registration, log in to the Service Owner Console at `https://so.authlete.com/accounts/login` using the same credentials.

Once logged in successfully, you have access to Authlete's Service Owner Console.

You can log out at any time with the **Log out** link in the upper-right corner.
## 2. Create an API service instance
Next, create your first Authlete API service.
1. Log in to the Service Owner Console at `https://so.authlete.com/accounts/login`.
2. Click **Create Service**.
3. Enter an arbitrary name for the service and click **Create**.
4. Confirm creation in the dialog.
A new service is created. The following values are generated automatically:


| Item | Value example |
| ------------------------------------ | --------------------------------------------- |
| API Key | `10738933707579` |
| API Secret | `Xg6jVpJCvsaXvy2ks8R5WzjdMYlvQqOym3slDX0wNhQ` |
| Client Application Developer Console | `https://cd.authlete.com/10738933707579` |
* The **API Key** and **API Secret** are used:
* As the **Login ID** and **Password** for the Developer Console.
* As credentials for your authorization server to call Authlete APIs.
* The **Client Application Developer Console** URL will be used in the next step.
## 3. Log in to Developer Console
Now add client information to the new service.
1. Open the Developer Console URL for your service (for example, `https://cd.authlete.com/10738933707579`).
2. Log in with:
* **Login ID**: your API Key (for example, `10738933707579`)
* **Password**: your API Secret (for example, `Xg6jVpJCvsaXvy2ks8R5WzjdMYlvQqOym3slDX0wNhQ`)

## 4. Register an OAuth/OIDC client
Once logged into the Developer Console:
1. Click **Create App**.

2. On the **Basic** tab, enter:
* **Client Name**: any descriptive name.
* **Client Type**: `CONFIDENTIAL`.

3. Switch to the **Authorization** tab and configure:
| Item | Value |
| ---------------------------- | ------------------------------------------- |
| Redirect URIs | `https://client.example.org/cb/example.com` |
| Client Authentication Method | `CLIENT_SECRET_BASIC` |
4. Click **Create** and confirm in the dialog.
The client is now registered. Typical resulting values look like:


| Item | Value example |
| ---------------------------- | ---------------------------------------------------------------------------------------- |
| Client ID | `12818600553323` |
| Client Secret | `-olDIKD9BihRfB8O1JxobUEKBZ7PIV5Z6oaqxAshmoUtUZgB-wjmmxTYDiDV6vM_Mgl267PeNrRftq8cWplvmg` |
| Client Type | `CONFIDENTIAL` |
| Redirect URIs | `https://client.example.org/cb/example.com` |
| Client Authentication Method | `CLIENT_SECRET_BASIC` |
The **Client ID** and **Client Secret** will be used as `client_id` and `client_secret` when your client calls the authorization server.
## 5. Connect to the API
Finally, verify that the environment works by calling Authlete's `/api/auth/authorization` API, acting as the authorization server.

### Linux/Mac example
Use the following `curl` command (replace `API Key`, `API Secret`, and `Client ID` with your own values):
```bash theme={null}
curl -s -X POST https://api.authlete.com/api/auth/authorization \
-u ':' \
-H 'Content-Type: application/json' \
-d '{ "parameters": "redirect_uri=https://client.example.org/cb/example.com&response_type=code&client_id=" }'
```
### Windows (PowerShell) example
On Windows 10, use `curl.exe`, escape `"` characters, and use backticks for line continuation:
```powershell theme={null}
curl.exe -s -X POST https://api.authlete.com/api/auth/authorization `
-u ':' `
-H 'Content-Type: application/json' `
-d '{\"parameters\" : \"redirect_uri=https://client.example.org/cb/example.com&response_type=code&client_id=\"}'
```
If the request is valid, Authlete responds with JSON similar to:
```json theme={null}
{
"resultMessage": "[A004001] Authlete has successfully issued a ticket to the service (API Key = 10723797812772) for the authorization request from the client (ID = 12800697055611). [response_type=code, openid=false]",
"type": "authorizationResponse",
"resultCode": "A004001",
"client": { /* ... */ },
"ticket": "bi2Kxe2WW5mK_GZ_fDFOpK1bnY6xTy40Ap_8nxf-7AU",
"action": "INTERACTION",
"service": {
"supportedClaims": [ /* ... */ ],
"supportedScopes": [ /* ... */ ]
}
}
```
## Conclusion and next steps
In this guide, you:
* Signed up for an Authlete 2.x Service Owner account.
* Created an API service instance.
* Logged into the Developer Console and registered an OAuth/OIDC client.
* Verified connectivity by calling the `/api/auth/authorization` API.
To continue:
* Read **OAuth 2.0 Basics (2.x)** to walk through the full authorization code flow using Authlete 2.x APIs: [OAuth 2.0 Basics (2.x)](/v2/get-started/core-concepts/oauth-basics).
* Read **OIDC Basics (2.x)** to add OpenID Connect and ID tokens on top of OAuth 2.0: [OIDC Basics (2.x)](/v2/get-started/core-concepts/oidc-basics).
* Explore sample authorization server implementations on GitHub: [Authorization server implementations](https://github.com/authlete).