> ## Documentation Index
> Fetch the complete documentation index at: https://developers.authlete.com/llms.txt
> Use this file to discover all available pages before exploring further.
# Using Demo Authorization Server
> Authlete にサインアップし、2.x サービスの作成とクライアント登録を行い、Authlete API に接続するまでの手順です。
このページは **Authlete 2.x** 向けのドキュメントです。3.0 の内容は [Using Demo Authorization Server(3.0)](/ja/get-started/quickstarts/using-demo-authorization-server) をご覧ください。
# サインアップから Authlete サービス作成までの手順(2.x)
## はじめに
このドキュメントでは、Authlete に初めてサインアップし、新規 2.x サービスの作成と、そのサービスへの OAuth/OIDC クライアント登録を行い、Authlete の `/api/auth/authorization` エンドポイントを呼び出して設定を確認するまでの手順について説明します。
## 手順の流れ
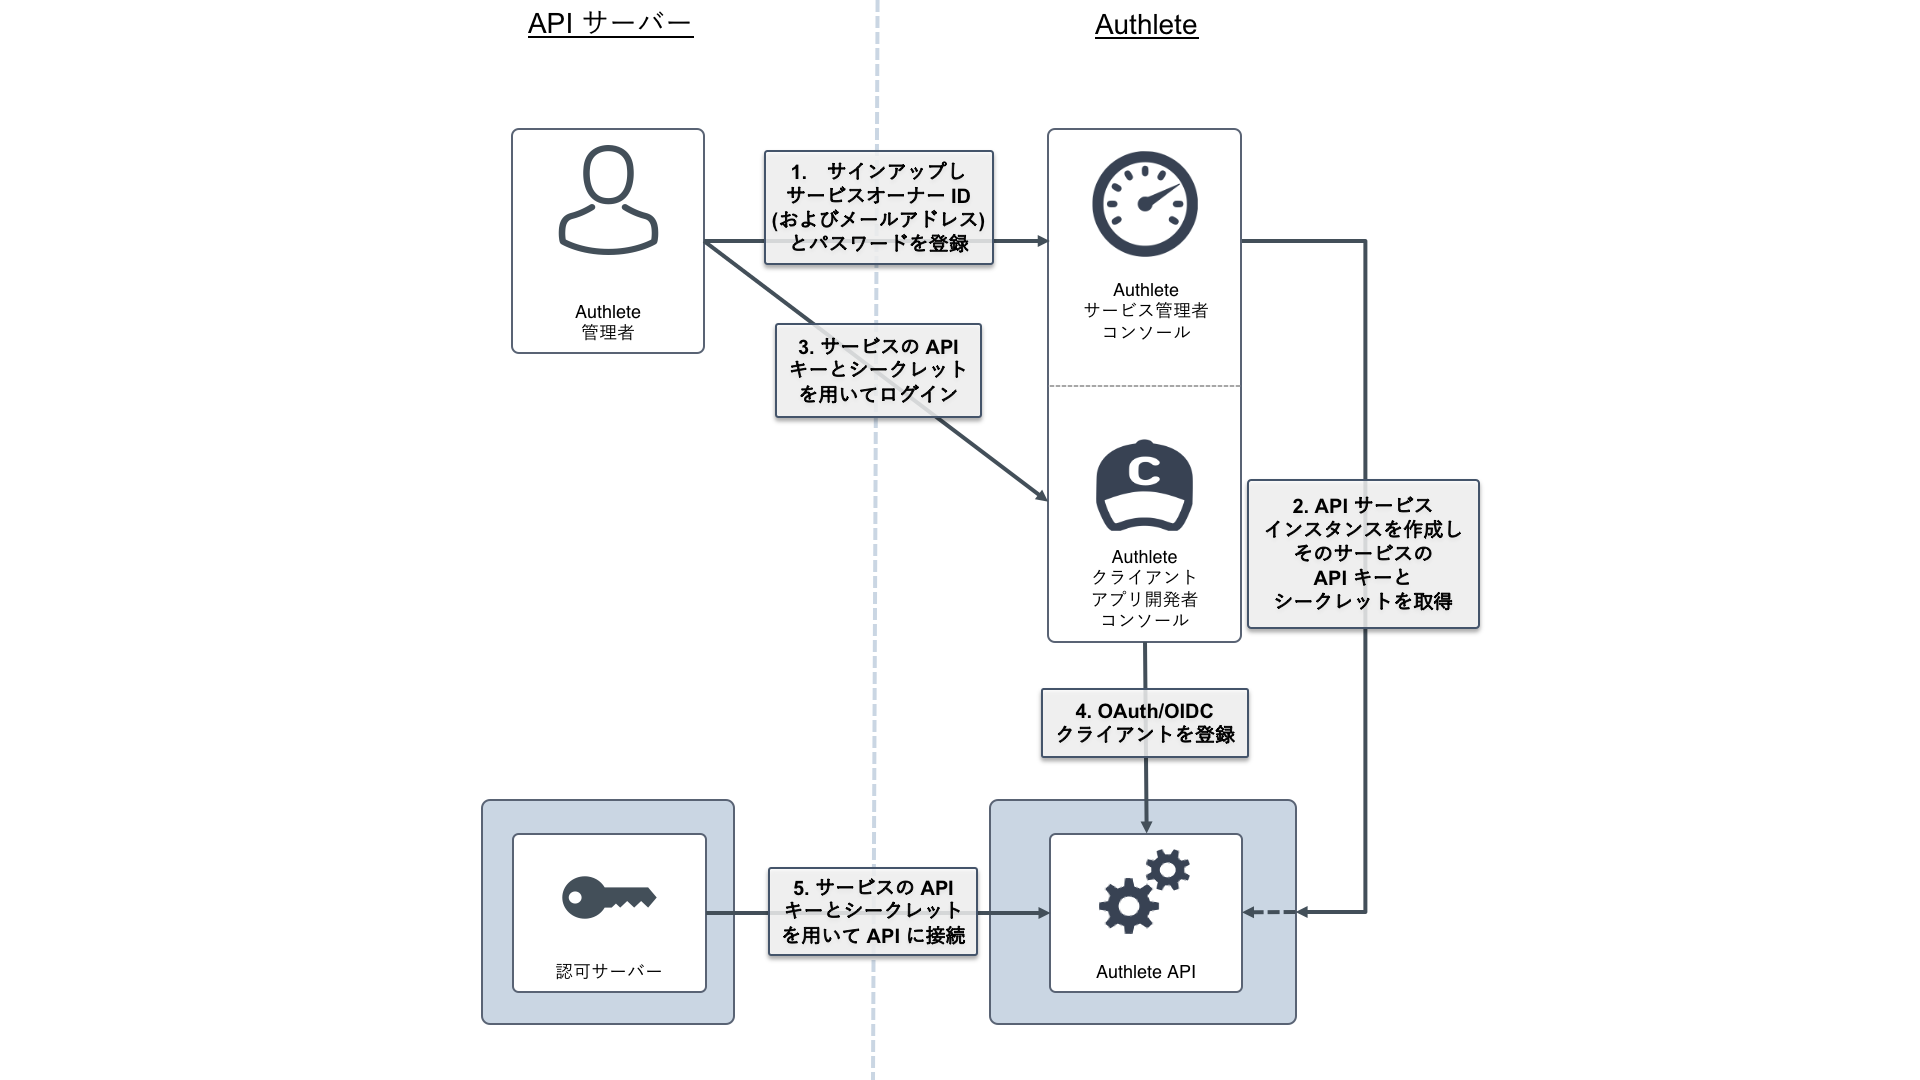
本チュートリアルでは以下の順序で設定を進めます。
1. Authlete にサインアップ
2. API サービスインスタンスを作成
3. クライアントアプリ開発者コンソールにログイン
4. OAuth/OIDC クライアントを登録
5. API に接続
## 1. Authlete にサインアップ
Authlete を認可サーバーのバックエンドとして用いる場合には、まず Authlete の「サービスオーナー」のアカウントを取得する必要があります。
1. Authlete サービスオーナーのサインアップページ `https://so.authlete.com/accounts/signup` を開きます。
2. フォームを入力し、「ログイン ID」と「パスワード」を忘れないように保管します。
3. 登録後、同じ資格情報を用いて `https://so.authlete.com/accounts/login` からサービス管理者コンソールにログインします。

ログインに成功すると、Authlete のサービス管理者コンソールが利用できるようになります。

なおログアウトする場合には、ページ右上の「ログアウト」をクリックします。
## 2. API サービスインスタンスを作成
次に、最初の Authlete API サービスを準備します。
1. サービス管理者コンソール `https://so.authlete.com/accounts/login` にログインします。
2. 「サービス作成」をクリックします。
3. 任意の「サービス名」を入力し、「作成」をクリックします。
4. 確認のダイアログで「OK」をクリックします。


新規サービスの作成が完了しました。以下の値が自動生成されます。

| 項目 | 値の例 |
| ----------------- | --------------------------------------------- |
| API キー | `10723797812772` |
| API シークレット | `ekYoYTI84qZcpe6bXGzDwduQ1fGBYxJT8K8Tnwd7poc` |
| クライアントアプリ開発者コンソール | `https://cd.authlete.com/10723797812772` |
* 自動生成された「API キー」と「API シークレット」は、次のように用いられます。
* クライアントアプリ開発者コンソールの「ログイン ID」と「パスワード」として。
* 認可サーバーが Authlete API を呼び出す際のクレデンシャルとして。
* 「クライアントアプリ開発者コンソール」の URL は次の手順で使用します。
## 3. クライアントアプリ開発者コンソールにログイン
次に、この新規サービスに新規クライアントの設定を追加します。
1. サービスのクライアントアプリ開発者コンソール URL(例: `https://cd.authlete.com/10723797812772`)にアクセスします。
2. 以下でログインします。
* **ログイン ID**: API キー(例: `10723797812772`)
* **パスワード**: API シークレット(例: `ekYoYTI84qZcpe6bXGzDwduQ1fGBYxJT8K8Tnwd7poc`)

## 4. OAuth/OIDC クライアントを登録
クライアントアプリ開発者コンソールにログイン後、以下を行います。
1. 「アプリ作成」をクリックします。

本チュートリアルでは、以下のような OAuth/OIDC クライアントを登録します。
* コンフィデンシャルクライアントとして動作(参考: [RFC 6749: Section 2.1. Client Types](https://tools.ietf.org/html/rfc6749#section-2.1))
* クライアント ID とクライアントシークレットを `Authorization: Basic` に指定して送信(同 [2.3.1. Client Password](https://tools.ietf.org/html/rfc6749#section-2.3.1))
* 認可レスポンスのリダイレクションエンドポイントとして `https://client.example.org/cb/example.com` を使用(同 [3.1.2. Redirection Endpoint](https://tools.ietf.org/html/rfc6749#section-3.1.2))
2. 「基本情報」タブで、以下を入力します。
* **クライアント名**: 任意の分かりやすい名前
* **クライアントタイプ**: `CONFIDENTIAL`

3. 「認可」タブに切り替え、以下を設定します。
| 項目 | 値 |
| ---------- | ------------------------------------------- |
| リダイレクト URI | `https://client.example.org/cb/example.com` |
| クライアント認証方式 | `CLIENT_SECRET_BASIC` |

4. 「作成」をクリックし、確認のダイアログで「OK」をクリックします。
これにより、クライアント情報の登録が完了しました。自動生成された値の例は以下の通りです。


| 項目 | 値の例 |
| ------------ | ---------------------------------------------------------------------------------------- |
| クライアント ID | `12800697055611` |
| クライアントシークレット | `dcDHEXr_tXNi7QdIMXLSXpXAy_j7Cr4C4LT2xAukQcW_09E2Ag1jTBdwpQrG-HBxflPF4Bz_Nb9Zd_ySAxOs6A` |
| クライアントタイプ | `CONFIDENTIAL` |
| リダイレクト URI | `https://client.example.org/cb/example.com` |
| クライアント認証方式 | `CLIENT_SECRET_BASIC` |
自動生成された「クライアント ID」と「クライアントシークレット」は、クライアントが認可サーバーにリクエストを行う際の `client_id` と `client_secret` の値として用いられます。
## 5. API に接続
最後に、構成した環境が正しく動作するかどうか、認可サーバーの立場で Authlete の `/api/auth/authorization` API を呼び出して確認します。

### Linux/Mac の例
以下の `curl` コマンドを実行します(`API Key`, `API Secret`, `Client ID` はご自身の値に置き換えてください)。
```bash theme={null}
curl -s -X POST https://api.authlete.com/api/auth/authorization \
-u ':' \
-H 'Content-Type: application/json' \
-d '{ "parameters": "redirect_uri=https://client.example.org/cb/example.com&response_type=code&client_id=" }'
```
### Windows (PowerShell) の例
Windows 10 では `curl.exe` を用い、`"` をエスケープし、行の区切りにバッククォートを用います。
```powershell theme={null}
curl.exe -s -X POST https://api.authlete.com/api/auth/authorization `
-u ':' `
-H 'Content-Type: application/json' `
-d '{\"parameters\" : \"redirect_uri=https://client.example.org/cb/example.com&response_type=code&client_id=\"}'
```
リクエストが適切な場合、Authlete から以下のようなレスポンス(見やすさのため改行し一部省略)が返却されます。
```json theme={null}
{
"resultMessage": "[A004001] Authlete has successfully issued a ticket to the service (API Key = 10723797812772) for the authorization request from the client (ID = 12800697055611). [response_type=code, openid=false]",
"type": "authorizationResponse",
"resultCode": "A004001",
"client": { /* ... */ },
"ticket": "bi2Kxe2WW5mK_GZ_fDFOpK1bnY6xTy40Ap_8nxf-7AU",
"action": "INTERACTION",
"service": {
"supportedClaims": [ /* ... */ ],
"supportedScopes": [ /* ... */ ]
}
}
```
## まとめと次のステップ
本チュートリアルでは、次のことを行いました。
* Authlete 2.x のサービスオーナーアカウントを作成した。
* API サービスインスタンスを作成した。
* 開発者コンソールにログインし、OAuth/OIDC クライアントを登録した。
* `/api/auth/authorization` API を呼び出して接続を確認した。
続いて、以下をご参照ください。
* Authlete 2.x API を用いた認可コードフロー全体を試す: [OAuth 2.0 Basics (2.x)](/ja/v2/get-started/core-concepts/oauth-basics)
* OAuth 2.0 の上に OpenID Connect と ID トークンを追加する: [OIDC Basics (2.x)](/ja/v2/get-started/core-concepts/oidc-basics)
* GitHub の認可サーバー実装例を調べる: [認可サーバー実装](https://github.com/authlete)