> ## Documentation Index
> Fetch the complete documentation index at: https://developers.authlete.com/llms.txt
> Use this file to discover all available pages before exploring further.

# クイックスタート

> Authlete アカウントの設定方法、サービスとクライアントの作成方法、管理コンソールの操作方法について説明します。

<Note>
  このページは **Authlete 3.0** 用です。2.x では [Authlete のセットアップ（2.x）](/ja/v2/get-started/setting-up-authlete) をご覧ください。**入力フィールドで値を入れて curl を動的に生成するインタラクティブ版**は [www.authlete.com のクイックスタート](https://www.authlete.com/ja/developers/getting_started/) をご利用ください。
</Note>

## はじめに

このクイックスタートでは、Authlete アカウントの作成から Authlete API の呼び出しまでを紹介します。

## 1. Authlete アカウントの取得

Authlete を利用するには Authlete アカウントが必要です。Authlete アカウントを取得すると、管理コンソールを通じて Authlete のすべての機能を設定できます。

Authlete の Web サイトにアクセスし、右上の「[無料トライアル](https://console.authlete.com/register)」をクリックしてください。

![homepage](https://storage.googleapis.com/authlete-website/resources/tutorial-getting-started-images/ja/001.jpg)

アカウントの登録方法を選択します。ソーシャルログイン (Google または GitHub) を用いるか、もしくはメールアドレスを入力します。

![signup](https://storage.googleapis.com/authlete-website/resources/tutorial-getting-started-images/ja/002.jpg)

ソーシャルログインもしくはメールアドレスの有効性が確認された後に、ユーザー情報を尋ねるページが表示されます。姓・名などの基本情報を入力してください。また、Authlete のプライバシーポリシーおよび利用規約を確認し、同意の上で、「登録」をクリックしてください。

![user-info](https://storage.googleapis.com/authlete-website/resources/tutorial-getting-started-images/ja/006.jpg)

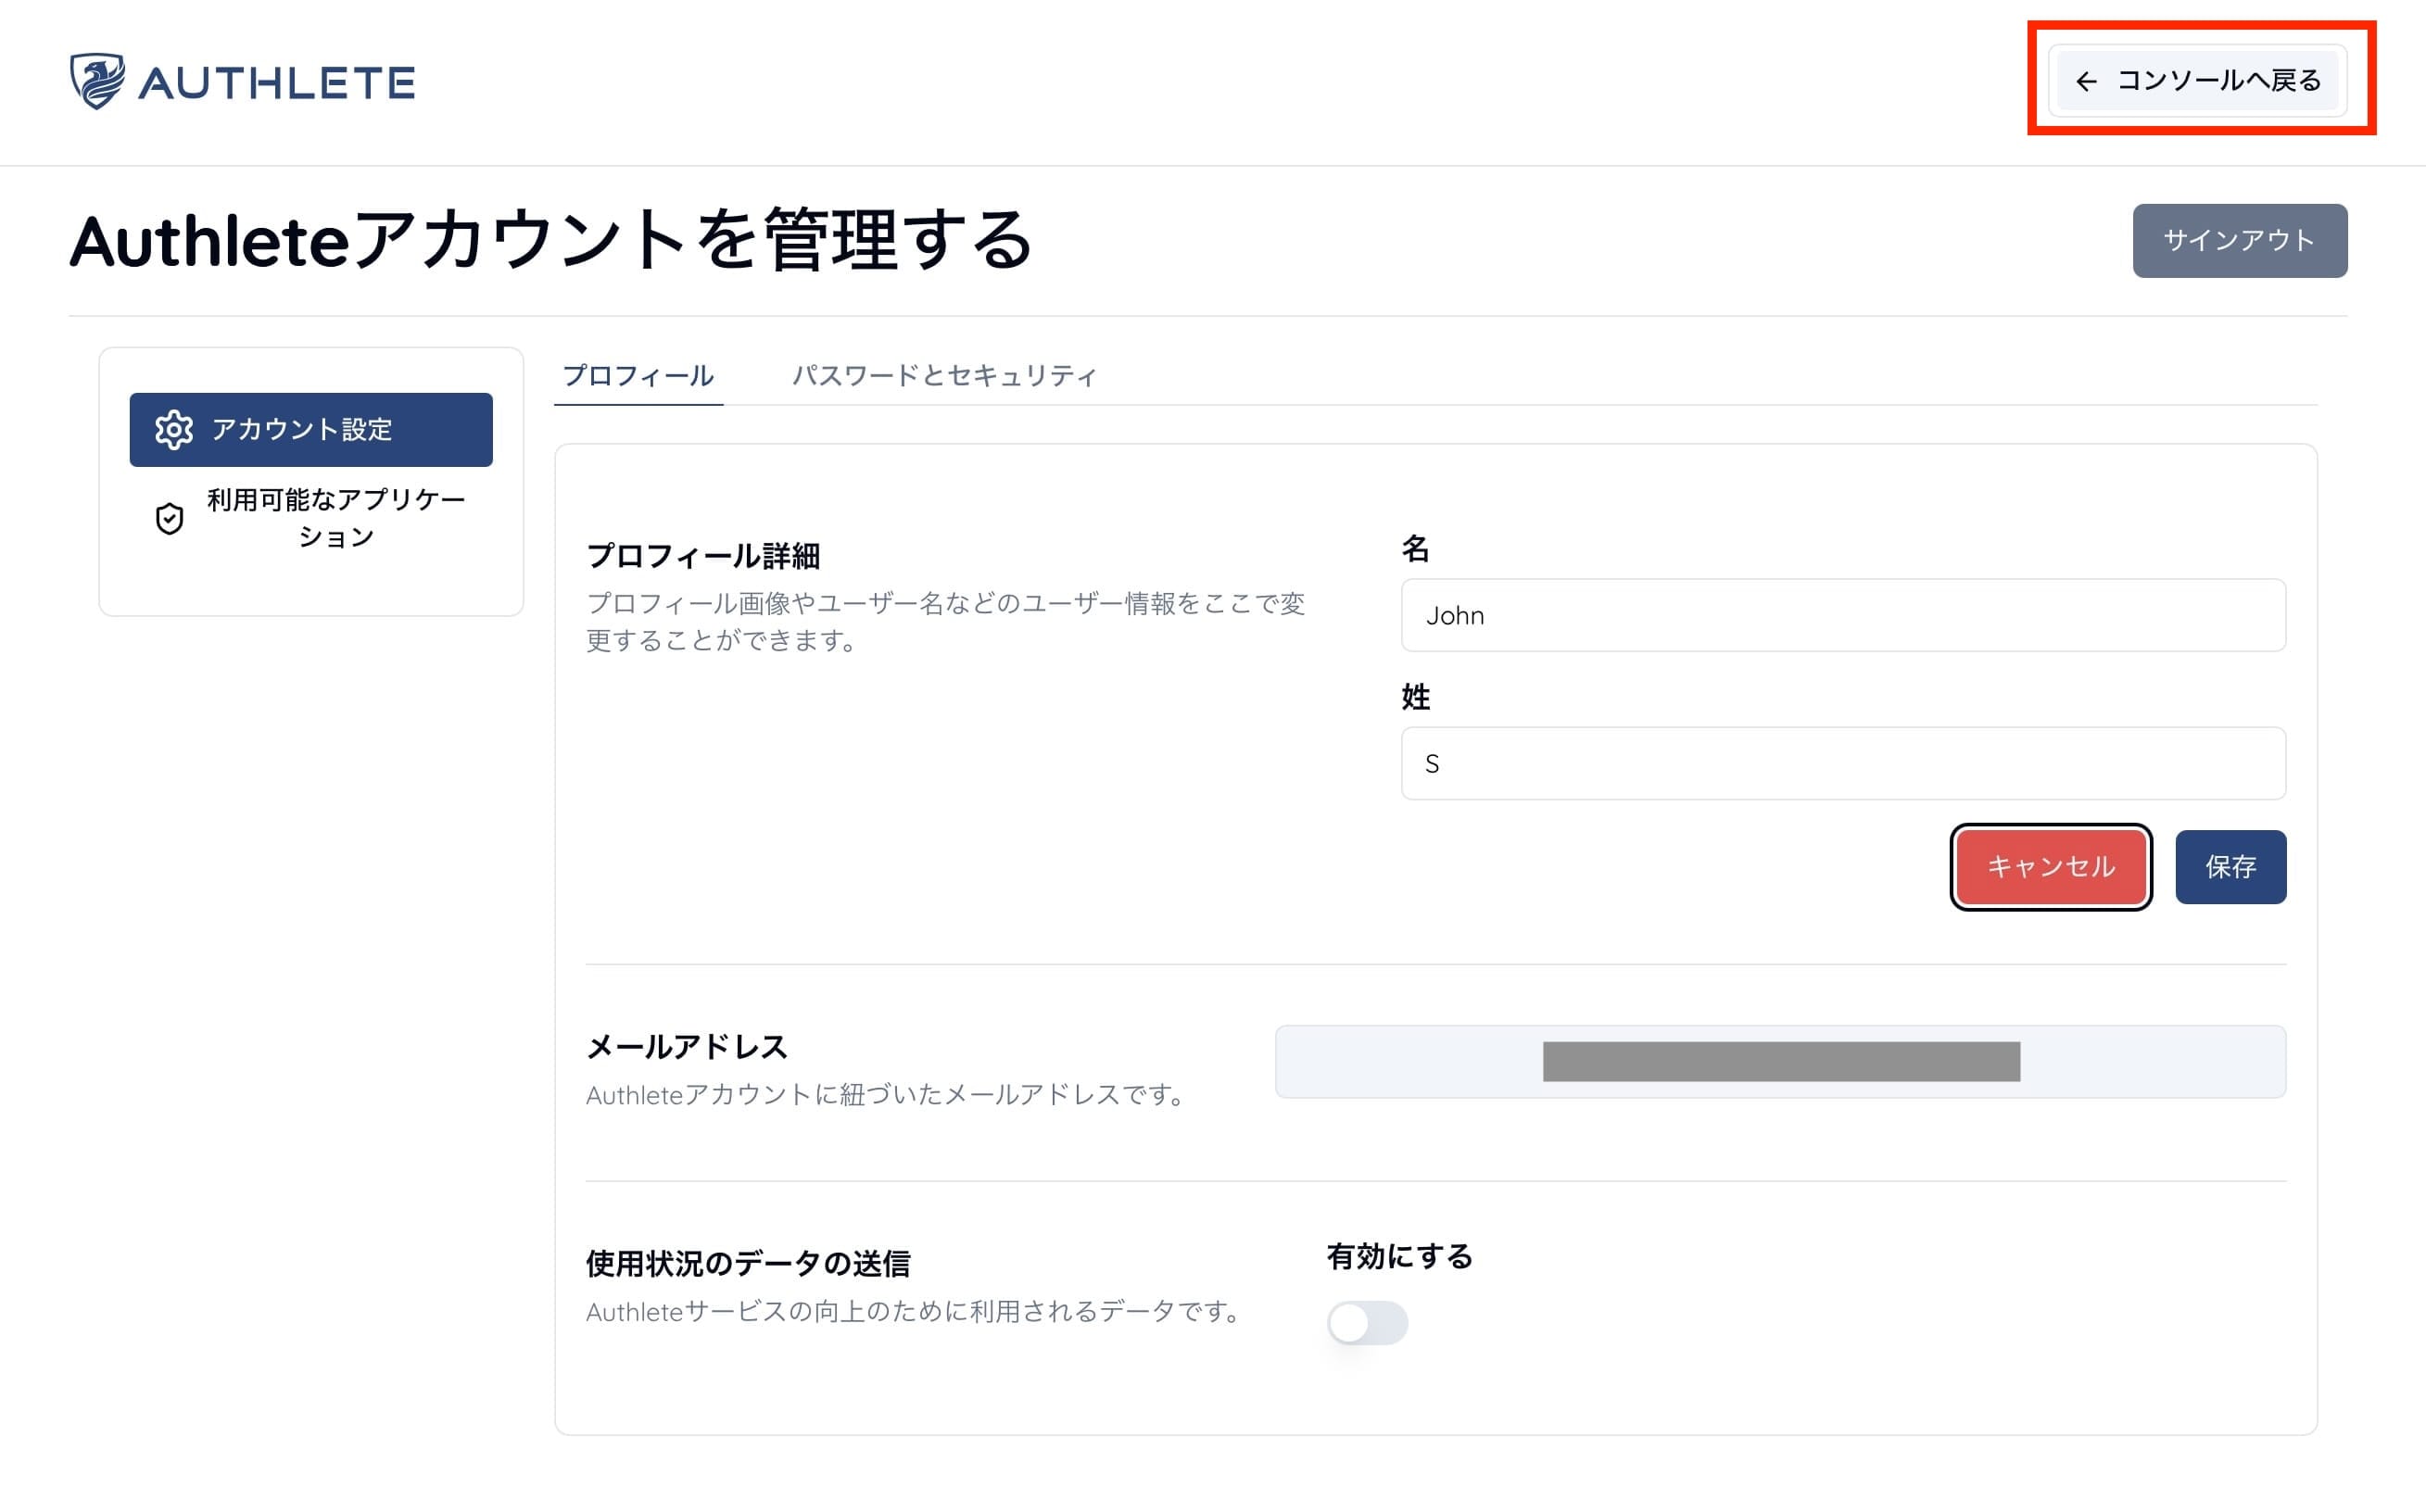
これで Authlete アカウントの登録が完了しました。ここで、以下の「Authlete アカウントを管理する」ページが表示された場合には、右上の「コンソールに戻る」をクリックし、管理コンソールに移動します。
![user-info](https://storage.googleapis.com/authlete-website/resources/tutorial-getting-started-images/ja/007.jpg)

## 2. 組織の作成

管理コンソールの最初のページは「すべての組織」です。組織とは、1 つ以上の Authlete サービス（OAuth/OIDC サーバーのバックエンドとなる、Authlete API のインスタンス）を共有するユーザーのグループのことです。このページにはユーザーの所属組織が表示されます。

最初の組織を作成するために、「初めての組織を作成」をクリックします。

![org-empty](https://storage.googleapis.com/authlete-website/resources/tutorial-getting-started-images/ja/008.jpg)

任意の組織名 (例: Acme) を入力して「作成」をクリックし、新規の組織を作成します。

![new-org](https://storage.googleapis.com/authlete-website/resources/tutorial-getting-started-images/ja/009.jpg)

## 3. サービスの作成

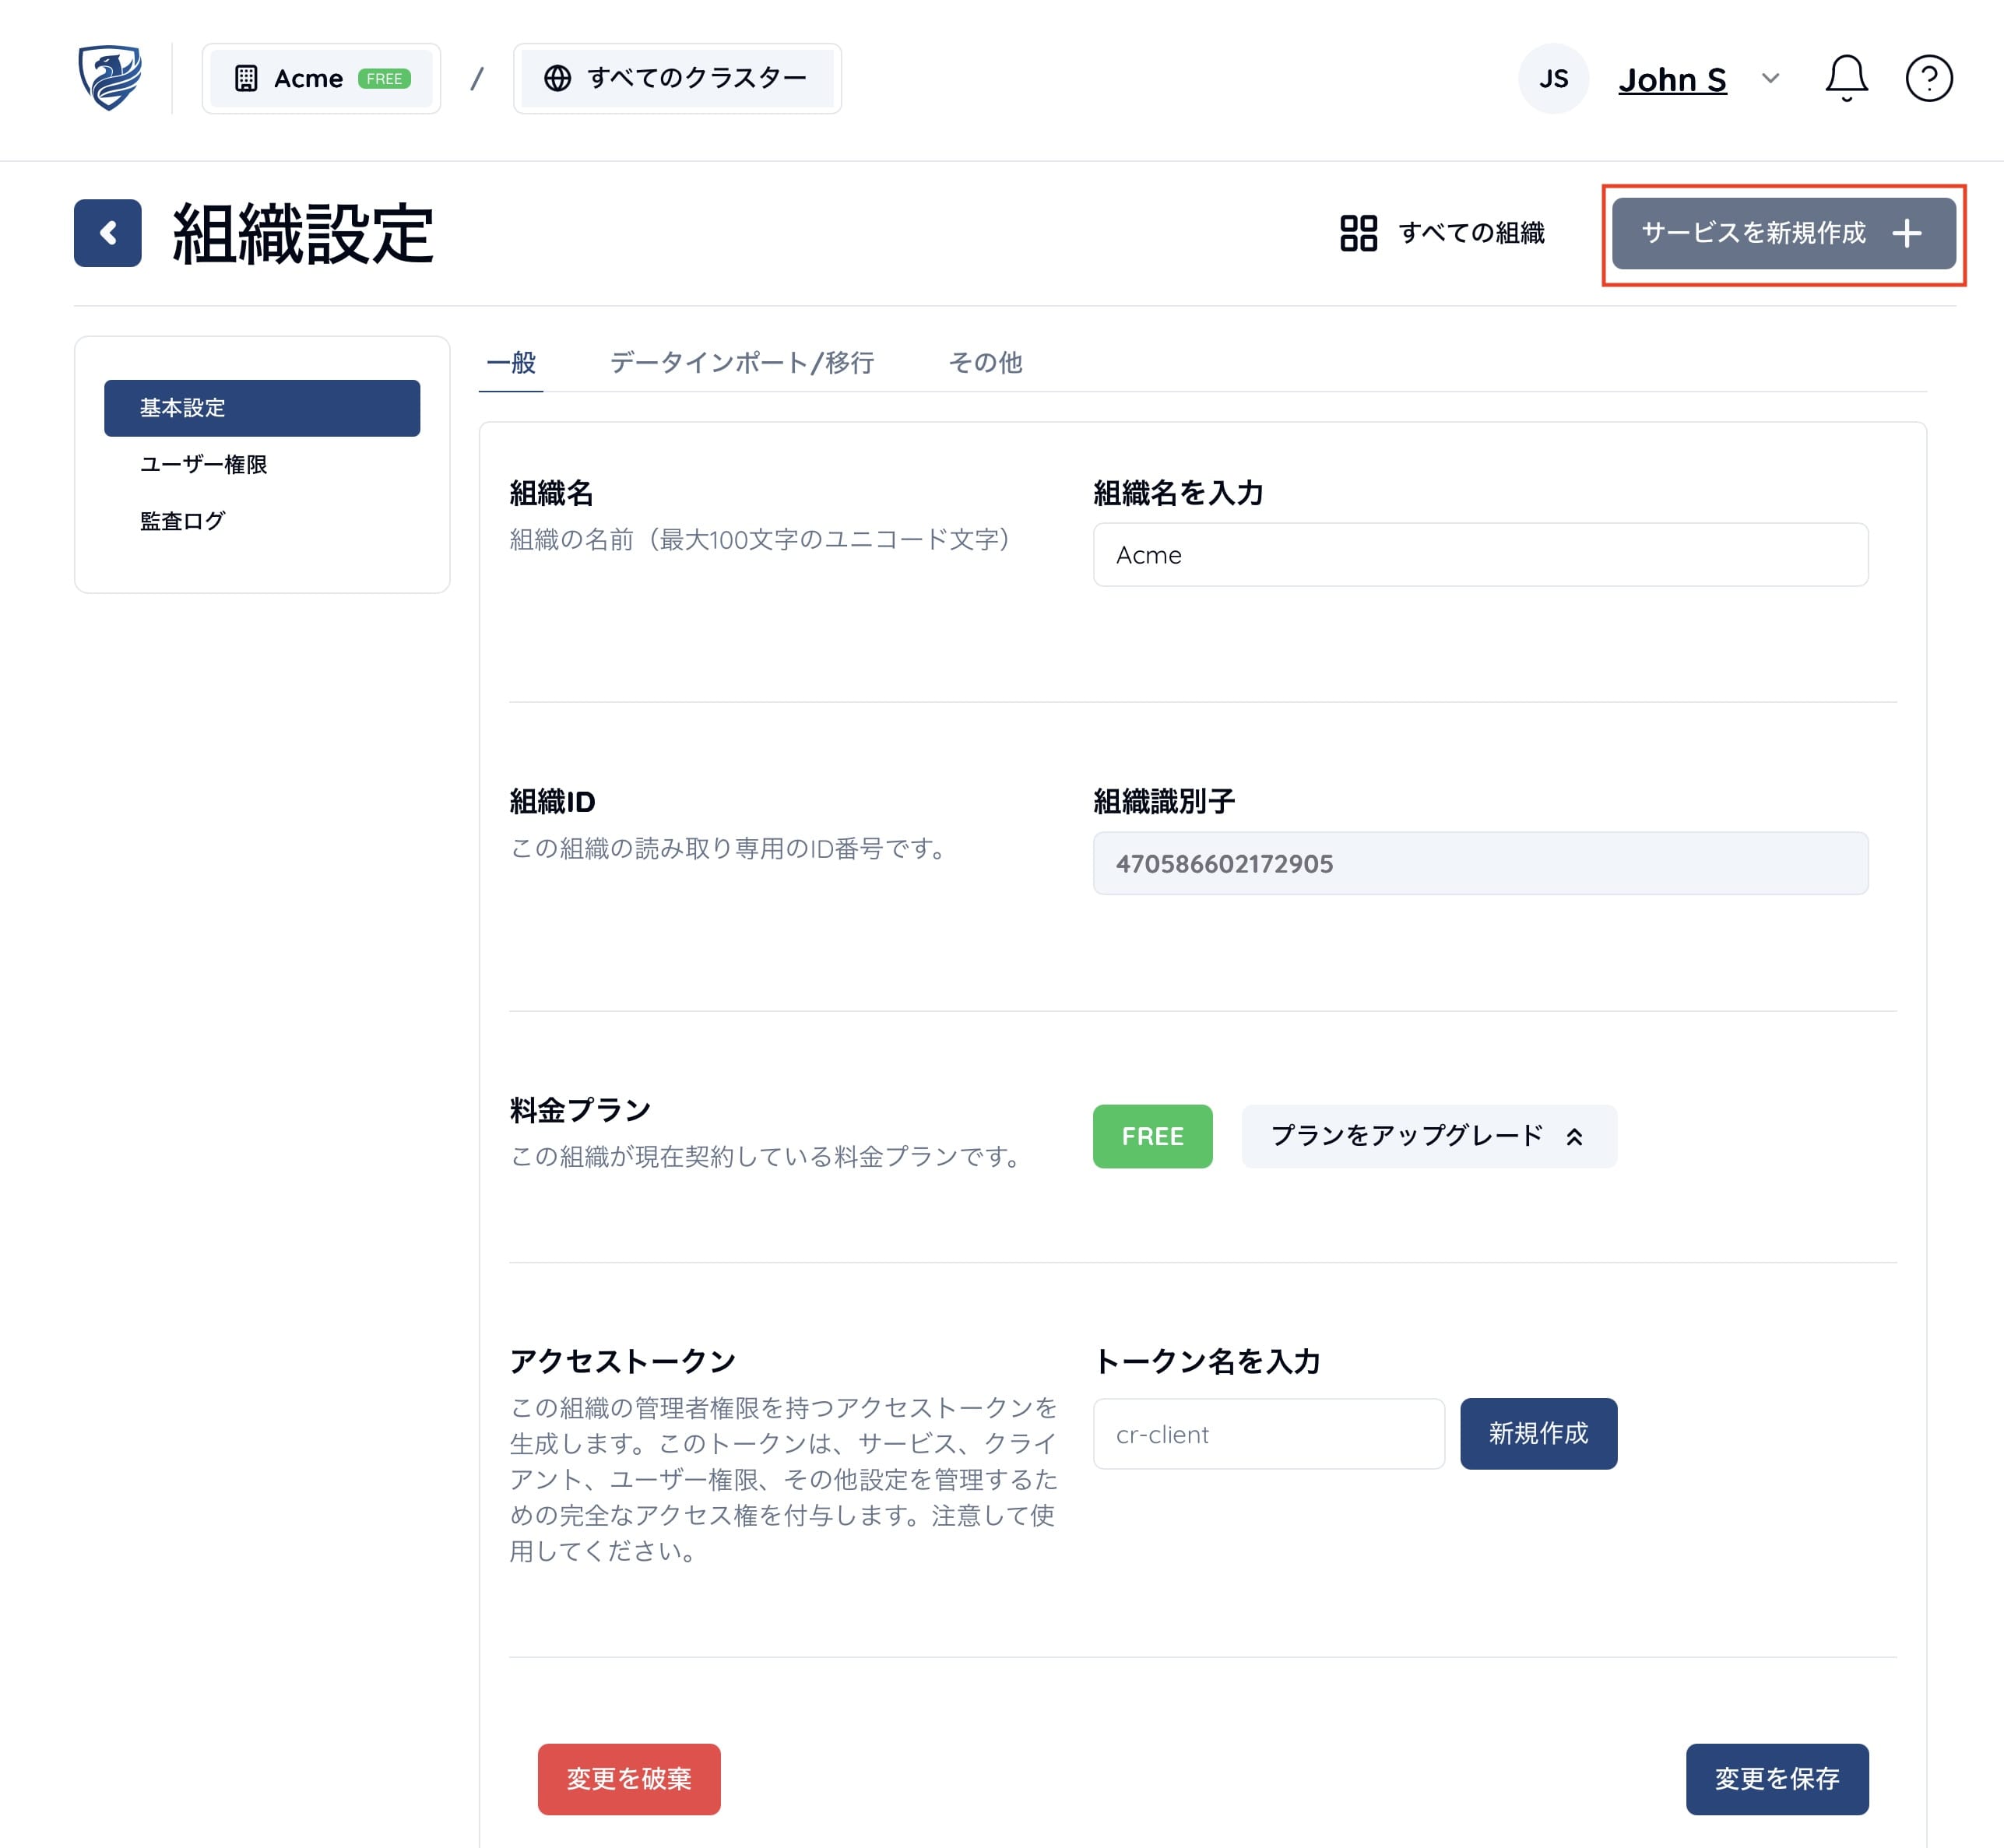
組織の作成に成功すると「組織設定」ページが表示されます。右上の「サービスを新規作成」をクリックし、この組織内に新規の Authlete サービスを作成します。
![new-org](https://storage.googleapis.com/authlete-website/resources/tutorial-getting-started-images/ja/010.jpg)

Authlete サービスの作成にあたり、そのサービスが動作する場所を「API クラスター」(例: JP) から選択してください。サービスに関するすべてのデータは選択したクラスターに保存されます。データの所在地要件や環境（例: 開発、テスト、本番環境）の分離要件に応じて、クラスターを決定してください。

次に、「サービス名（例: Sample Service）」を入力します。また必要に応じて「サービスの詳細情報」と「指定可能なサービスプロファイル」を指定します。

入力が完了したら「作成」をクリックします。

![service-creation](https://storage.googleapis.com/authlete-website/resources/tutorial-getting-started-images/ja/011.jpg)

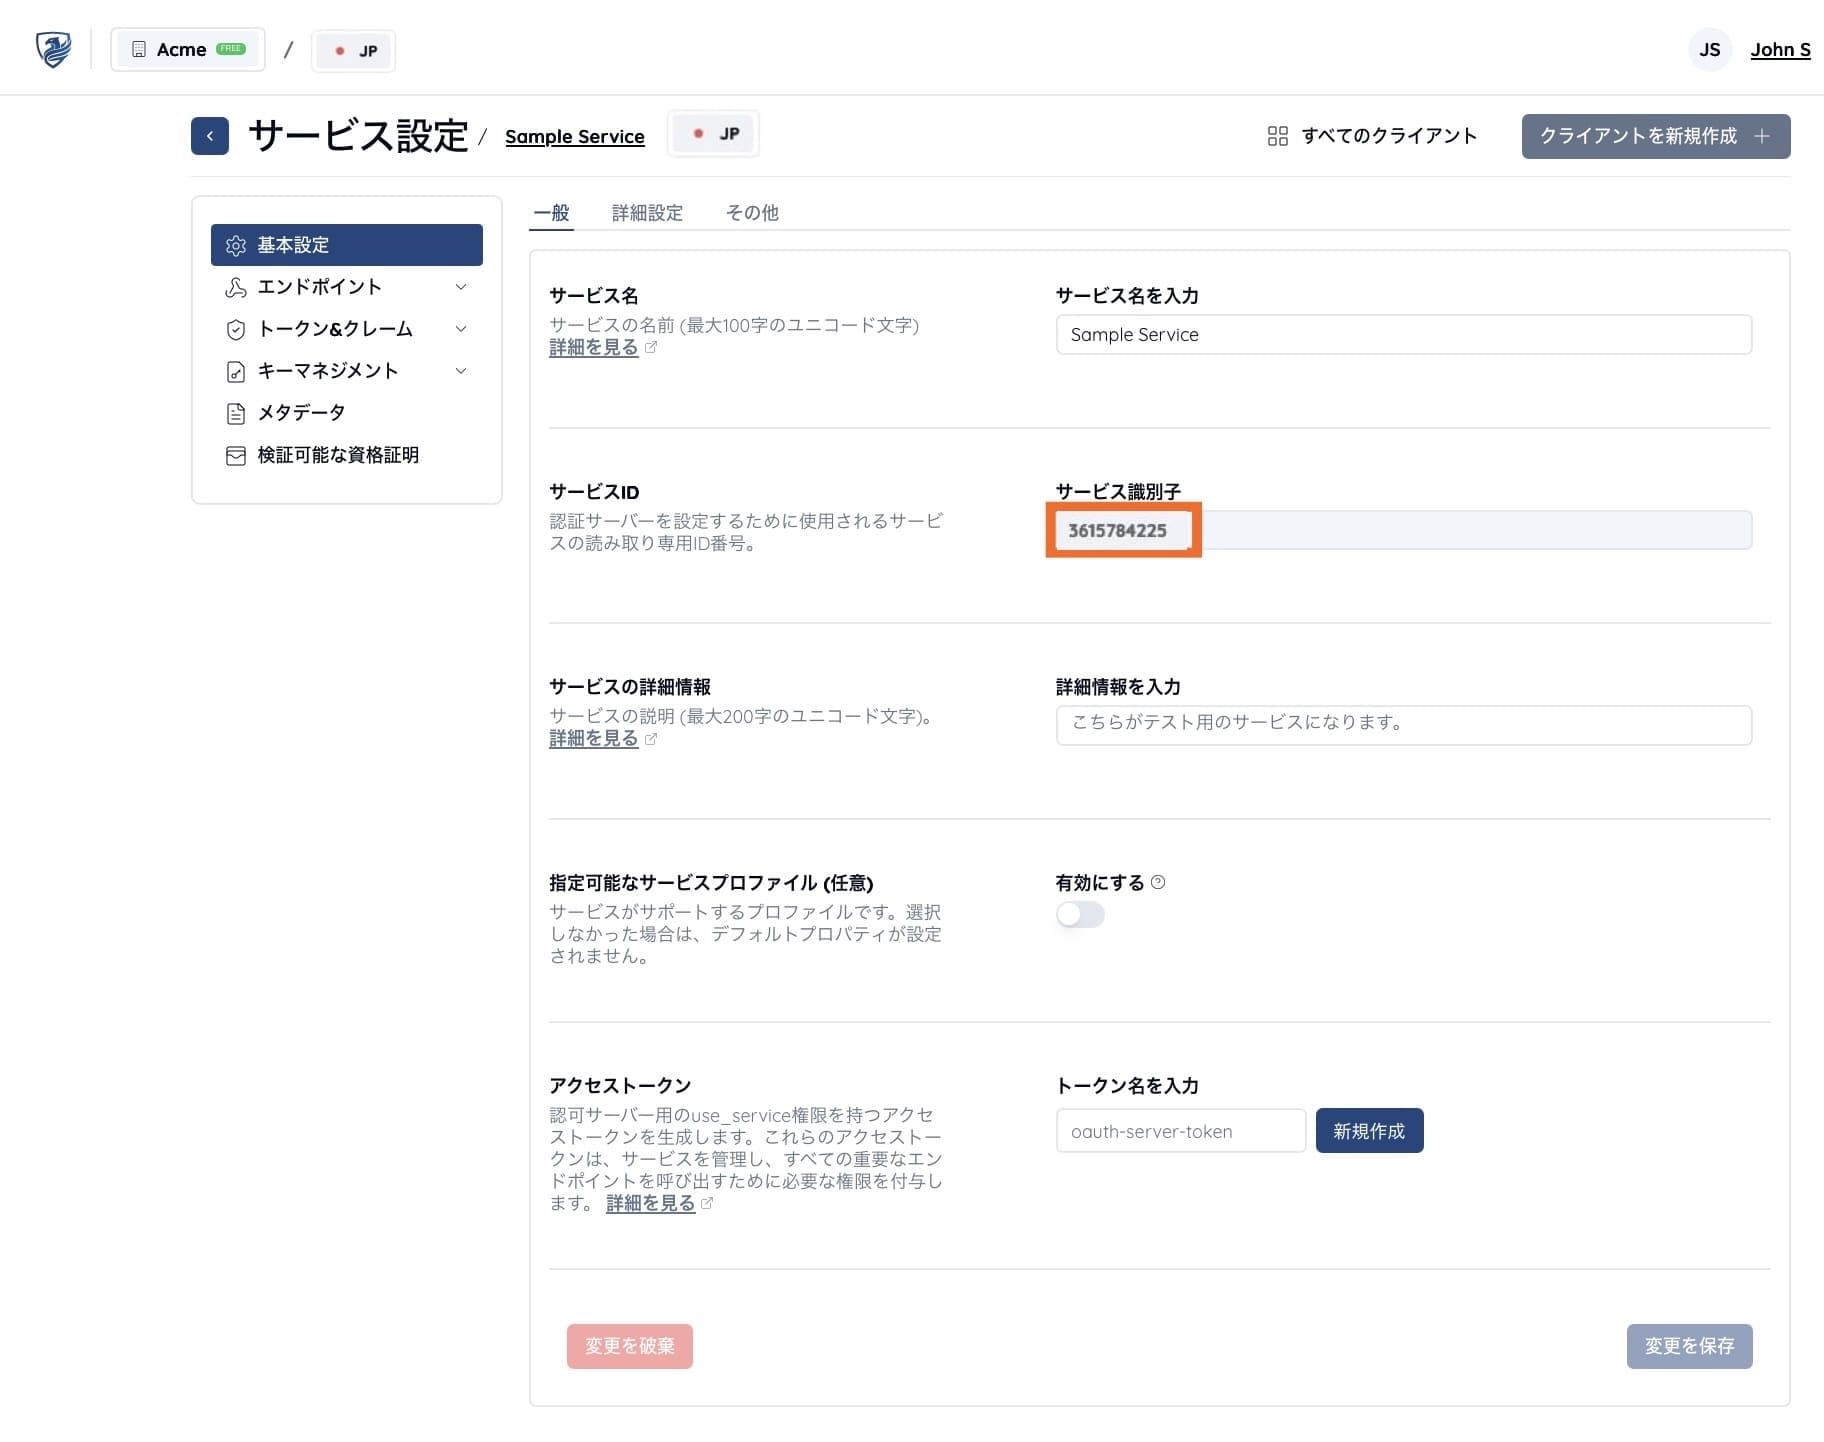
サービスの作成に成功すると「サービス設定」ページが表示されます。多くの Authlete API においてリクエスト時に必要となる、「サービス ID」の値 (例: `3615784225`) を控えておきます。
![service-creation](https://storage.googleapis.com/authlete-website/resources/tutorial-getting-started-images/ja/013_3a.jpg)

## 4. サービスアクセストークンの取得

このサービスを利用する (OAuth/OIDC サーバーを構築するために Authlete API を呼び出す) ためには、API リクエストに必要な「サービスアクセストークン」を取得する必要があります。

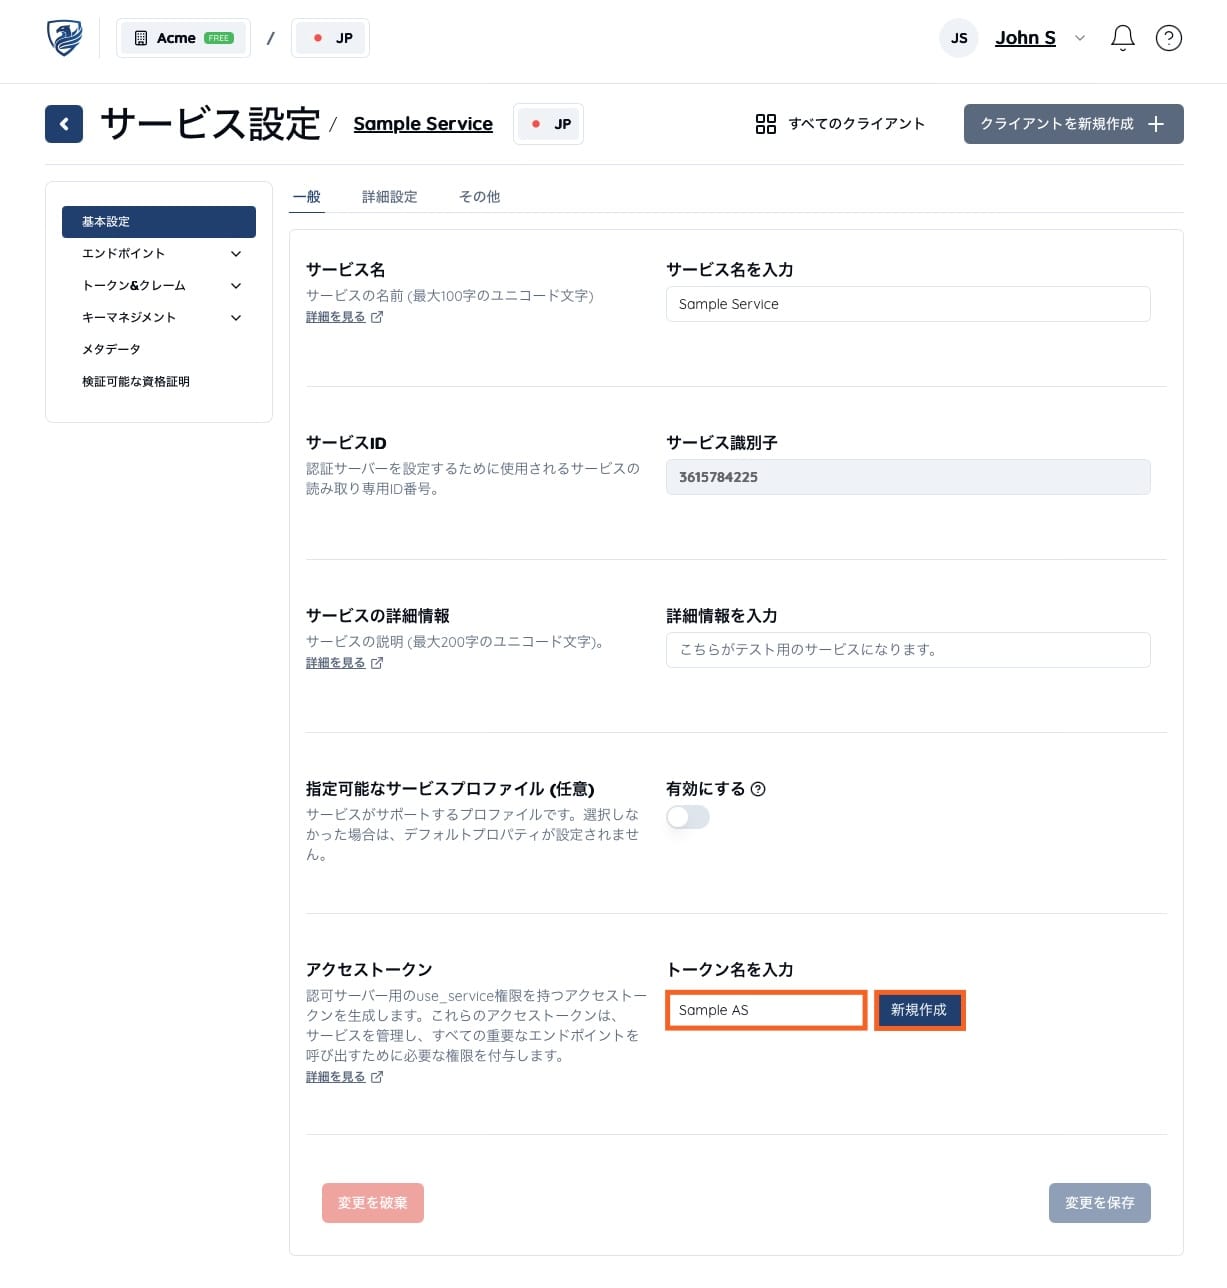
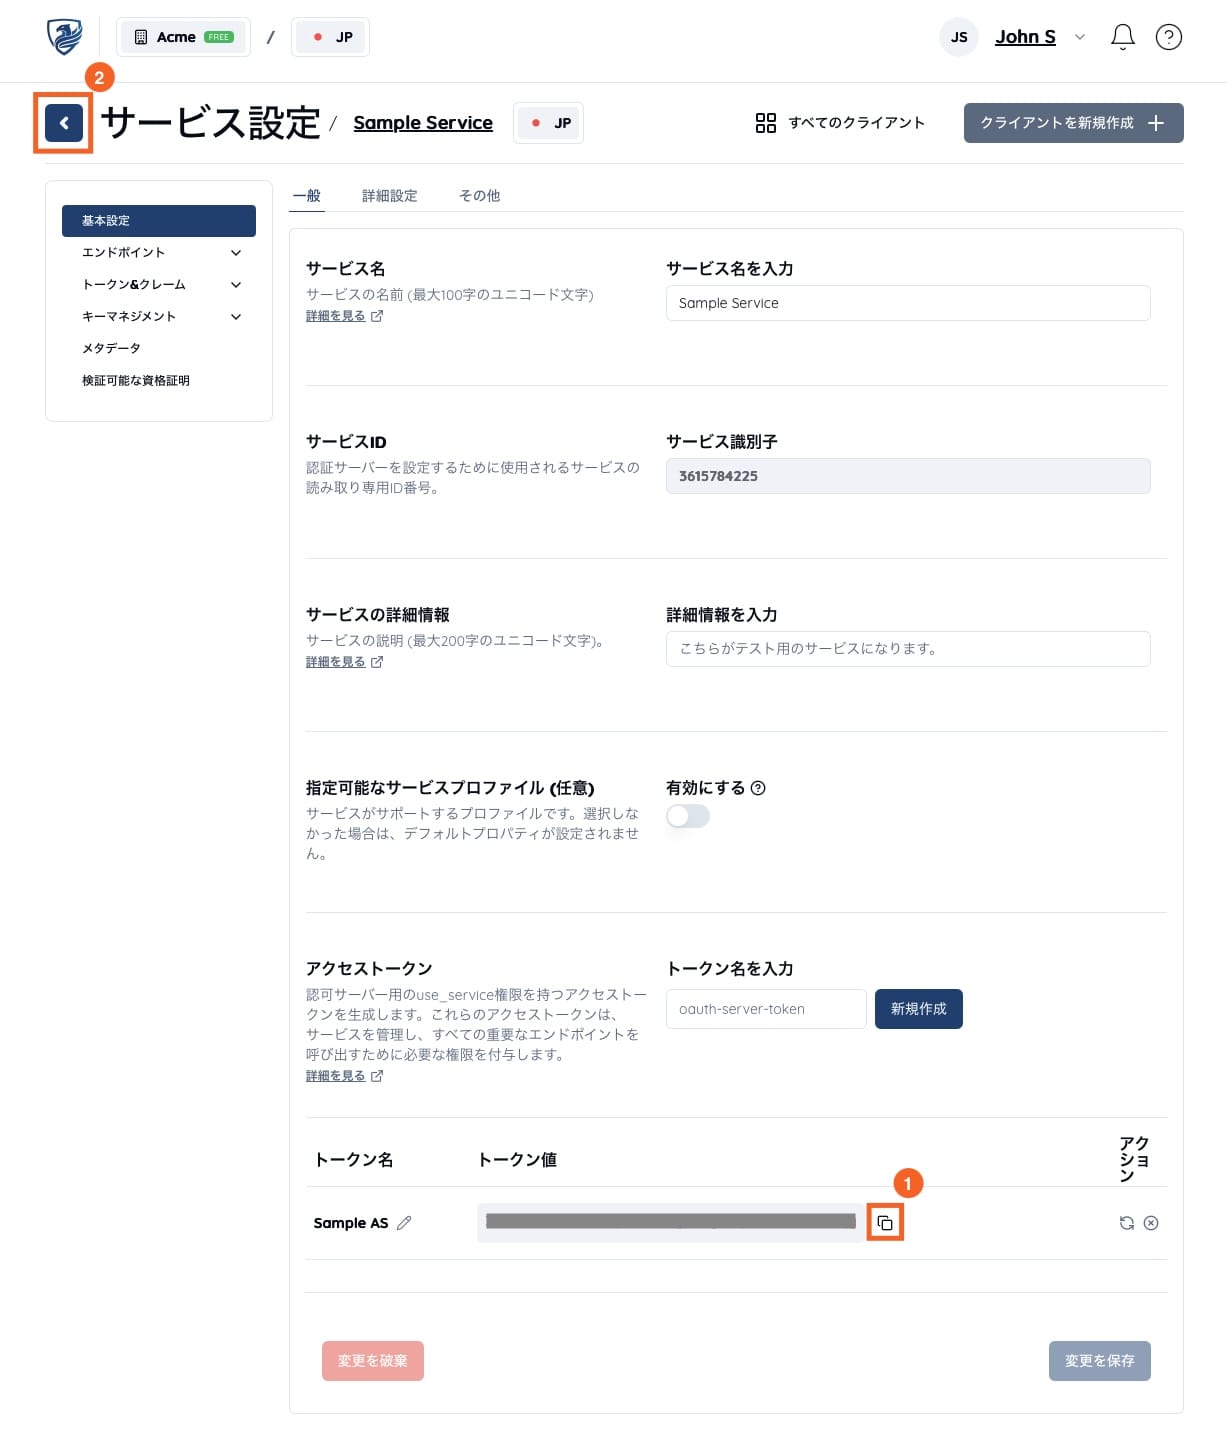
「アクセストークン」の項目にて、任意のトークン名 (例: Sample AS) を入力し、「新規作成」をクリックします。
![service-creation](https://storage.googleapis.com/authlete-website/resources/tutorial-getting-started-images/ja/012_2.jpg)

生成されたサービスアクセストークンの項目にある「コピー」のアイコンをクリックし、サービスアクセストークンの値 (例: `qwEF2t8gxW9MerraRyVtscDTKVPa66kjBBPUpBduvXw`) を控えておきます。
最後に、左上の「サービス設定」の左にある「◀️」をクリックし、「サービス概要」に移動します。
![service-creation](https://storage.googleapis.com/authlete-website/resources/tutorial-getting-started-images/ja/013_3.jpg)

これで、Authlete API を試す準備が整いました。

## 5. Authlete API の呼び出し

Authlete API のひとつである [サービス設定 API](/api-reference)（`GET /api/{serviceId}/service/configuration` — [OpenID プロバイダーの設定情報](https://openid.net/specs/openid-connect-discovery-1_0.html#ProviderConfig)を生成する API）を用いて、API リクエストが成功するかどうか確認します。

**[API リファレンス](/api-reference)** の「Service Configuration」でサービス ID と Bearer トークンを入力してリクエストを試すこともできます。

ここでは、curl を用いた API リクエストの送信例を示します。以下の入力欄の値を変えると、下のコマンドが自動で更新されます。

<table>
  <tbody>
    <tr>
      <td>API クラスターのホスト名</td>

      <td>
        <input type="text" id="c-url" defaultValue="https://us.authlete.com" className="w-full max-w-md px-3 py-2 rounded-md border border-zinc-300 dark:border-zinc-600 bg-white dark:bg-zinc-800 text-zinc-900 dark:text-zinc-100 text-sm outline-none" />
      </td>
    </tr>

    <tr>
      <td>サービスアクセストークン</td>

      <td>
        <input type="text" id="c-tok" placeholder="例: qwEF2t8gxW9M..." className="w-full max-w-md px-3 py-2 rounded-md border border-zinc-300 dark:border-zinc-600 bg-white dark:bg-zinc-800 text-zinc-900 dark:text-zinc-100 text-sm outline-none" />
      </td>
    </tr>

    <tr>
      <td>サービス ID</td>

      <td>
        <input type="text" id="c-ver" placeholder="例: 3615784225" className="w-full max-w-md px-3 py-2 rounded-md border border-zinc-300 dark:border-zinc-600 bg-white dark:bg-zinc-800 text-zinc-900 dark:text-zinc-100 text-sm outline-none" />
      </td>
    </tr>
  </tbody>
</table>

### curl の例

**Linux / Mac:**

<pre id="tmpl-setup-bash" style={{ display: 'none' }}>
  {`curl -X GET "$1/api/$2/service/configuration" \\
    -H "Authorization: Bearer $3"`}
</pre>

<div className="dynamic-curl-wrapper rounded-xl overflow-hidden border border-zinc-200 dark:border-zinc-700 bg-zinc-50 dark:bg-zinc-900/50 my-4 shadow-sm" data-template-id="tmpl-setup-bash" data-input-ids="c-url,c-ver,c-tok" data-language="bash">
  <div className="flex items-center justify-between px-4 py-2 border-b border-zinc-200 dark:border-zinc-700 bg-zinc-100/80 dark:bg-zinc-800/50 text-xs text-zinc-500 dark:text-zinc-400">
    <span className="font-medium uppercase tracking-wide">bash</span>
    <button type="button" className="dynamic-curl-copy px-3 py-1.5 rounded-md text-xs font-medium bg-zinc-200/80 dark:bg-zinc-700/80 text-zinc-700 dark:text-zinc-300">Copy</button>
  </div>

  <pre className="dynamic-curl-output p-4 m-0 overflow-x-auto text-sm leading-relaxed font-mono whitespace-pre dark:!text-zinc-200 dark:!bg-zinc-900" style={{ color: '#242628', backgroundColor: '#f8f9fa', minHeight: '2.5rem' }}>
    {'\u00a0'}
  </pre>
</div>

**Windows (PowerShell):**

<pre id="tmpl-setup-ps" style={{ display: 'none' }}>
  {`curl.exe -X GET "$1/api/$2/service/configuration" \`
    -H "Authorization: Bearer $3" | ConvertFrom-Json`}
</pre>

<div className="dynamic-curl-wrapper rounded-xl overflow-hidden border border-zinc-200 dark:border-zinc-700 bg-zinc-50 dark:bg-zinc-900/50 my-4 shadow-sm" data-template-id="tmpl-setup-ps" data-input-ids="c-url,c-ver,c-tok" data-language="powershell">
  <div className="flex items-center justify-between px-4 py-2 border-b border-zinc-200 dark:border-zinc-700 bg-zinc-100/80 dark:bg-zinc-800/50 text-xs text-zinc-500 dark:text-zinc-400">
    <span className="font-medium uppercase tracking-wide">powershell</span>
    <button type="button" className="dynamic-curl-copy px-3 py-1.5 rounded-md text-xs font-medium bg-zinc-200/80 dark:bg-zinc-700/80 text-zinc-700 dark:text-zinc-300">Copy</button>
  </div>

  <pre className="dynamic-curl-output p-4 m-0 overflow-x-auto text-sm leading-relaxed font-mono whitespace-pre dark:!text-zinc-200 dark:!bg-zinc-900" style={{ color: '#242628', backgroundColor: '#f8f9fa', minHeight: '2.5rem' }}>
    {'\u00a0'}
  </pre>
</div>

リクエストに成功した場合、以下のような API レスポンスが返却されます。

```json theme={null}
{
  "issuer": "https://authlete.com",
  "scopes_supported": [
    "address",
    "email",
    "openid",
    "offline_access",
    "phone",
    "profile",
    "grant_management_query",
    "grant_management_revoke"
  ],
  "response_types_supported": [
    "none",
    "code",
    "id_token",
    "code id_token"
  ]
}
```

## 次のステップ

以下の記事を参考に、認可サーバーの実装に取り組んでみましょう。

* **[OAuth 2.0 Basics - API チュートリアル](/ja/get-started/quickstarts/oauth-2-0-basics)**: Authlete の基本的なしくみを学ぶために、curl 等を用いて直接 Authlete API を呼び出してみましょう。
* **[サンプル認可サーバーのセットアップ](/ja/get-started/quickstarts/using-demo-authorization-server)**: Authlete のフロントエンドとして動作する認可サーバーをデプロイし、OAuth および OpenID Connect のフローを試してみましょう。

## 補足事項

### クライアント情報の作成

最初のクライアント情報を登録するためには、当該サービスの「初めてのクライアントを作成しましょう」をクリックします。

![service-creation](https://storage.googleapis.com/authlete-website/resources/tutorial-getting-started-images/ja/017.jpg)
