> ## Documentation Index
> Fetch the complete documentation index at: https://developers.authlete.com/llms.txt
> Use this file to discover all available pages before exploring further.
# First API Call 🚀
> Set up your Authlete account and make your first API call in just a few minutes.
This page is for Authlete 3.0. For 2.x, see [Getting Started (2.x)](/v2/get-started/quickstarts/getting-started).
## 1. Create an Authlete Account
To use Authlete, you need an account. Once registered, you can configure all features through the management console.
[Visit the Authlete website](https://www.authlete.com) and click [Free Trial](https://console.authlete.com/register) in the upper-right corner.
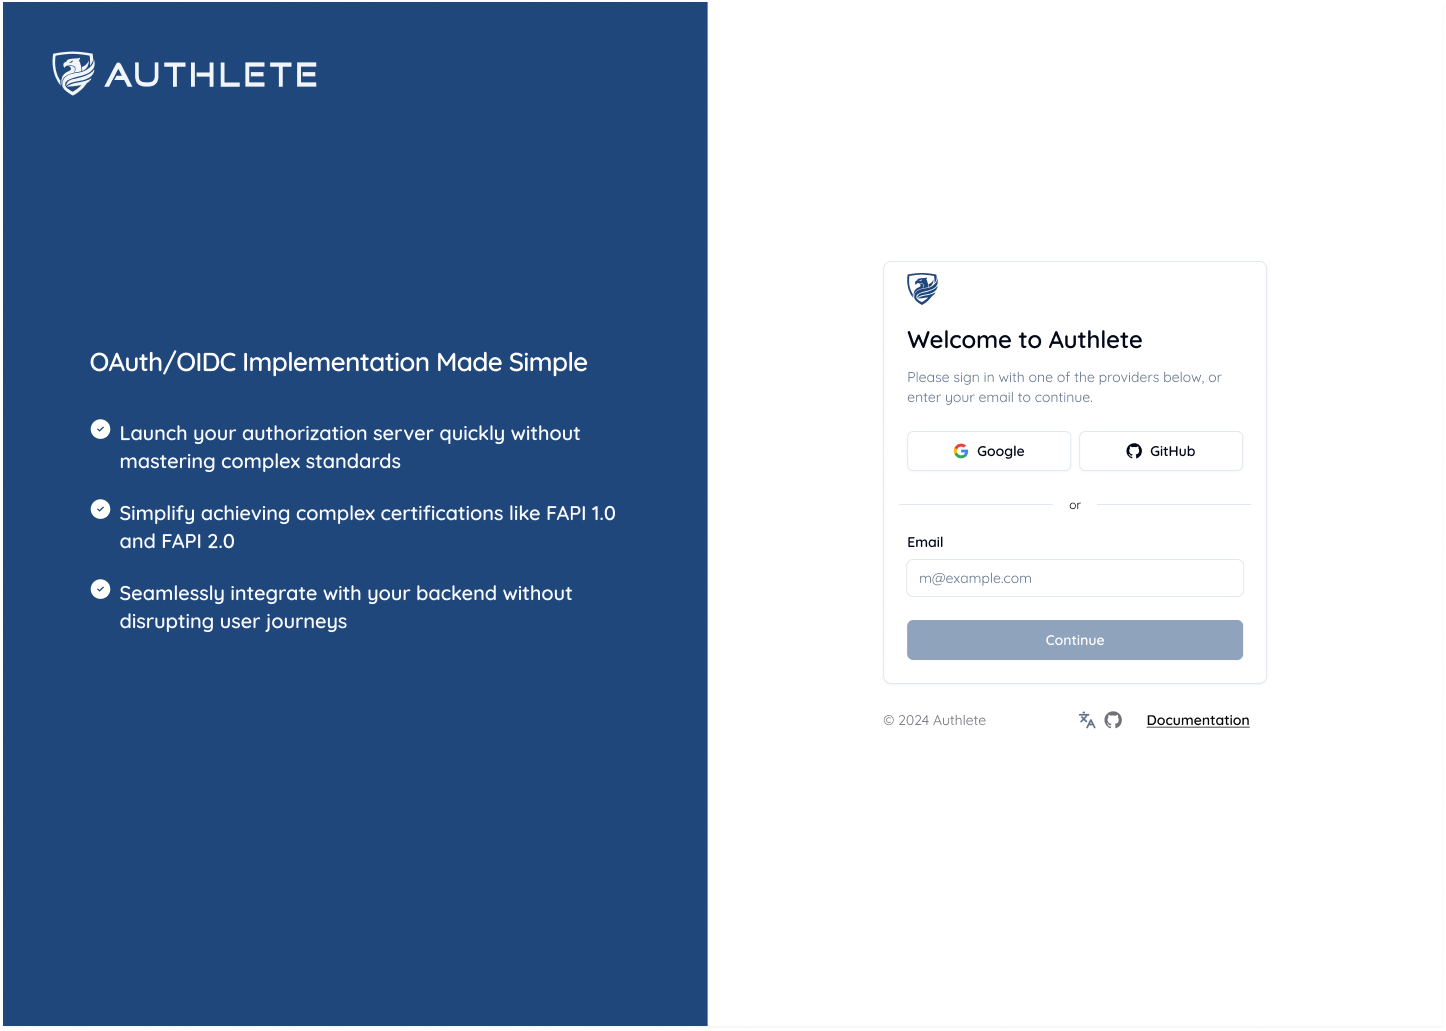
 Choose your preferred registration method. You can use **social login (Google or GitHub)** or sign up with your **email address**.
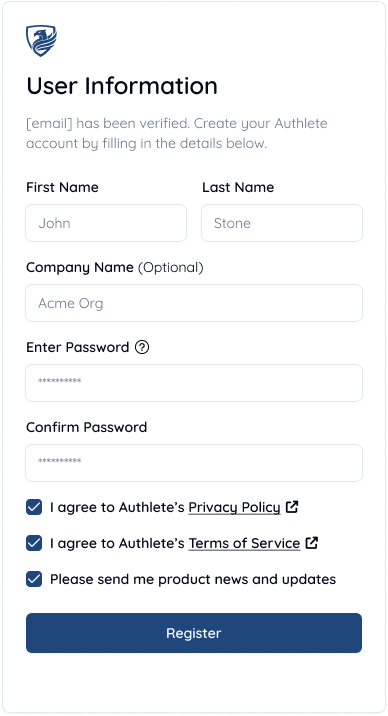
 After verifying your social login or email address, complete the profile page by entering your **first name**, **last name**, and **organization name** (and **Password** if using email registration). Review Authlete’s Privacy Policy and Terms of Service, then click **Register** to agree and complete your signup.
 ***
## 2. Create a Service
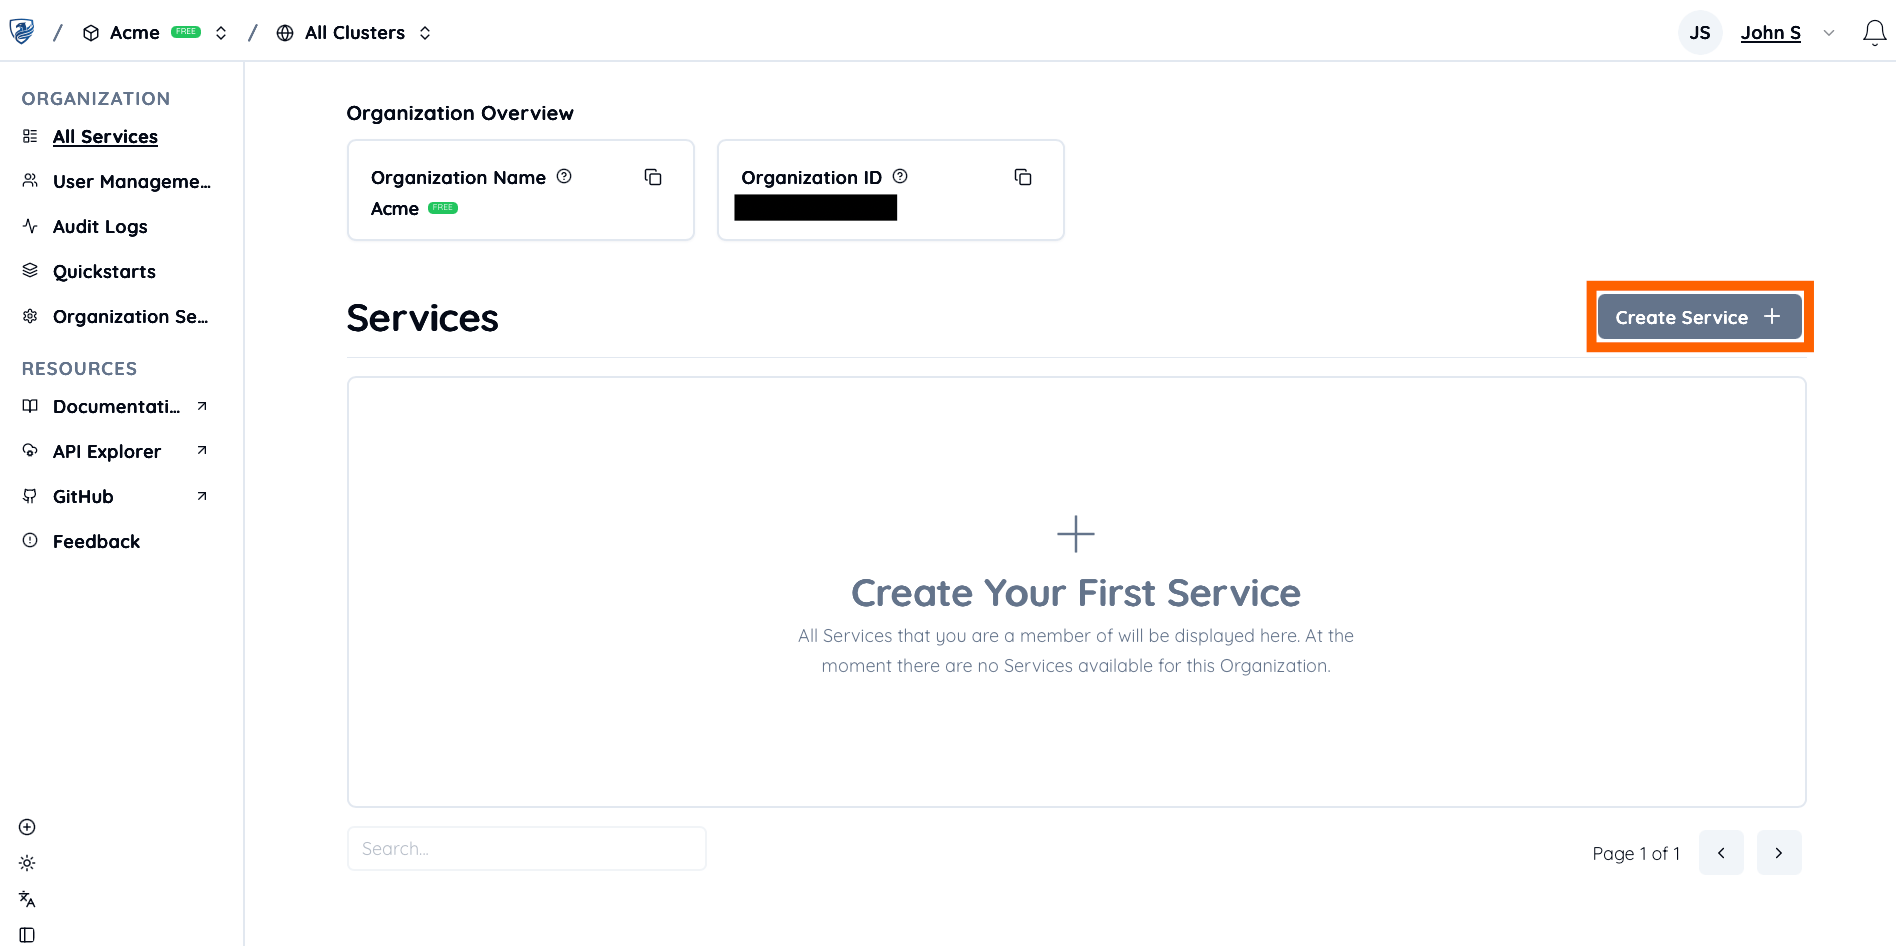
Immediately after signing up, you will be directed to the **Services** page. This page displays all services under your organization (which was created during the signup process).
A **Service** represents the backend of your Authorization Server. It contains all the configurations required to operate a production-grade authorization server, including OAuth/OIDC settings, token management, and security policies.
Click **Create Service** to add a new Authlete service to your organization.
***
## 2. Create a Service
Immediately after signing up, you will be directed to the **Services** page. This page displays all services under your organization (which was created during the signup process).
A **Service** represents the backend of your Authorization Server. It contains all the configurations required to operate a production-grade authorization server, including OAuth/OIDC settings, token management, and security policies.
Click **Create Service** to add a new Authlete service to your organization.
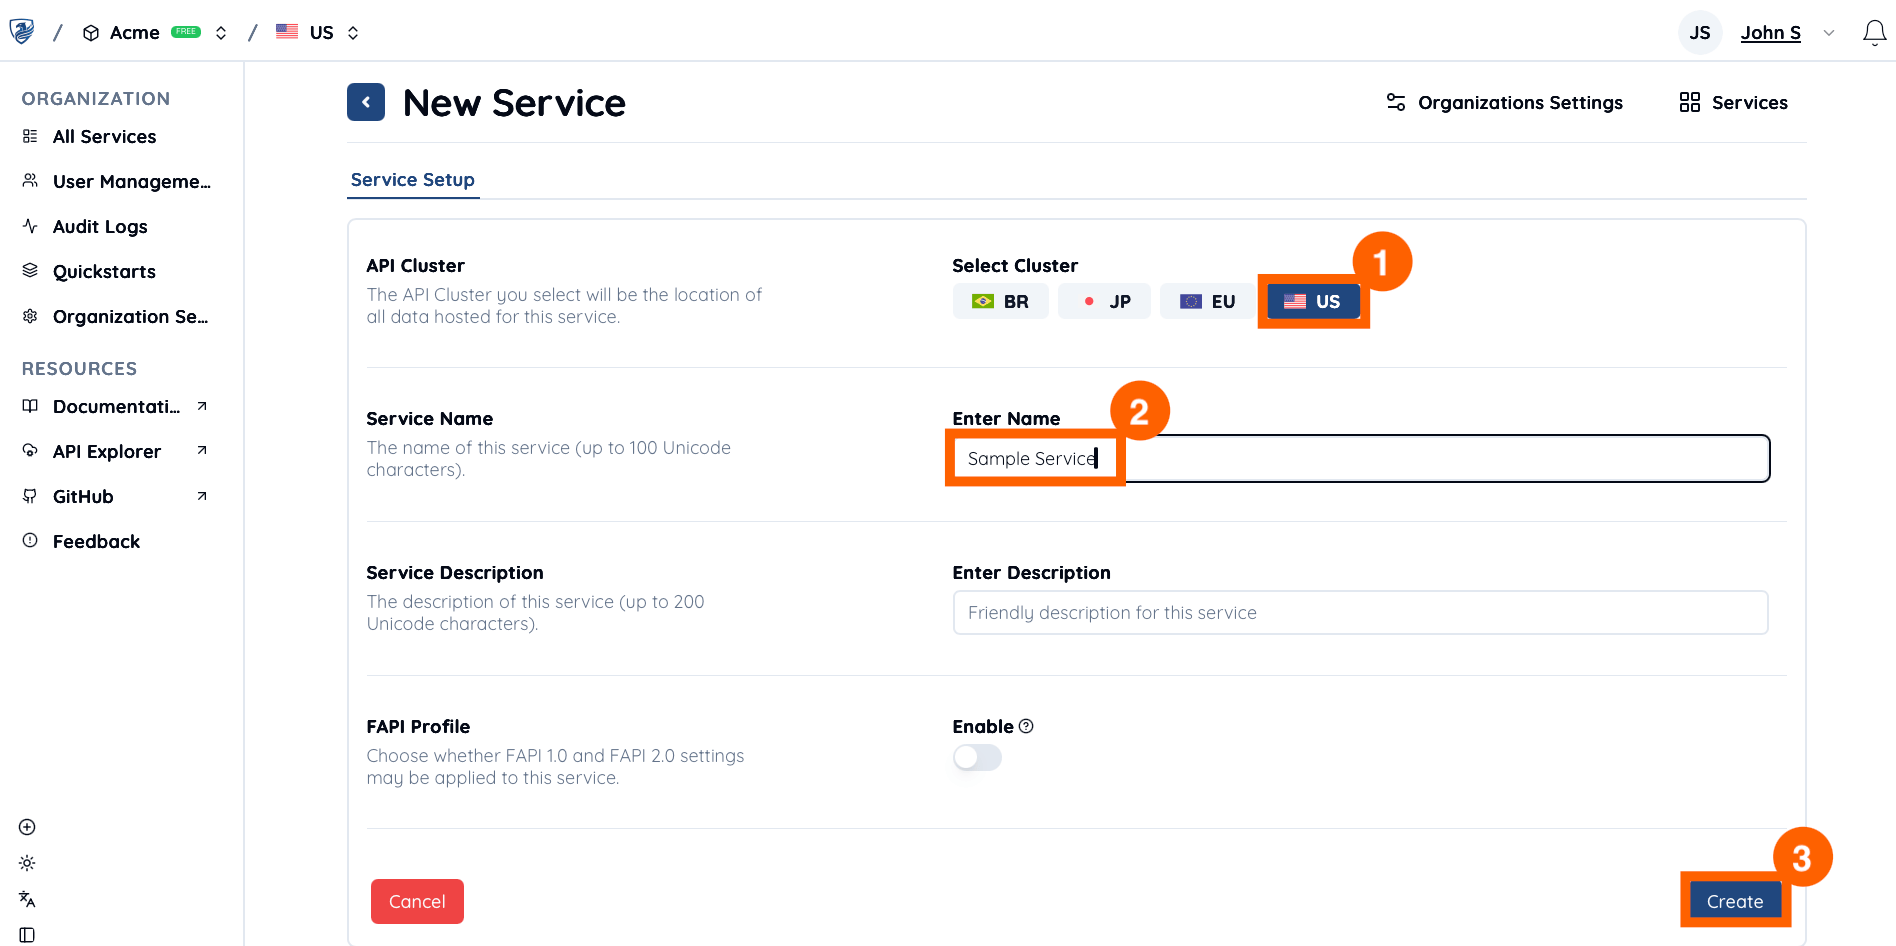
 1. Select your preferred **API Cluster** location (e.g., `US`). All service data will be stored in this selected cluster. Choose the cluster based on your data residency and environment isolation requirements.
2. Enter a **Service Name** (e.g., `Sample Service`).
3. Click **Create** to complete the setup.
1. Select your preferred **API Cluster** location (e.g., `US`). All service data will be stored in this selected cluster. Choose the cluster based on your data residency and environment isolation requirements.
2. Enter a **Service Name** (e.g., `Sample Service`).
3. Click **Create** to complete the setup.
 Now you have completed to create a new Service.
***
## 3. Create a Service Access Token
You will need a **Service Access Token** to authenticate your Authlete API calls.
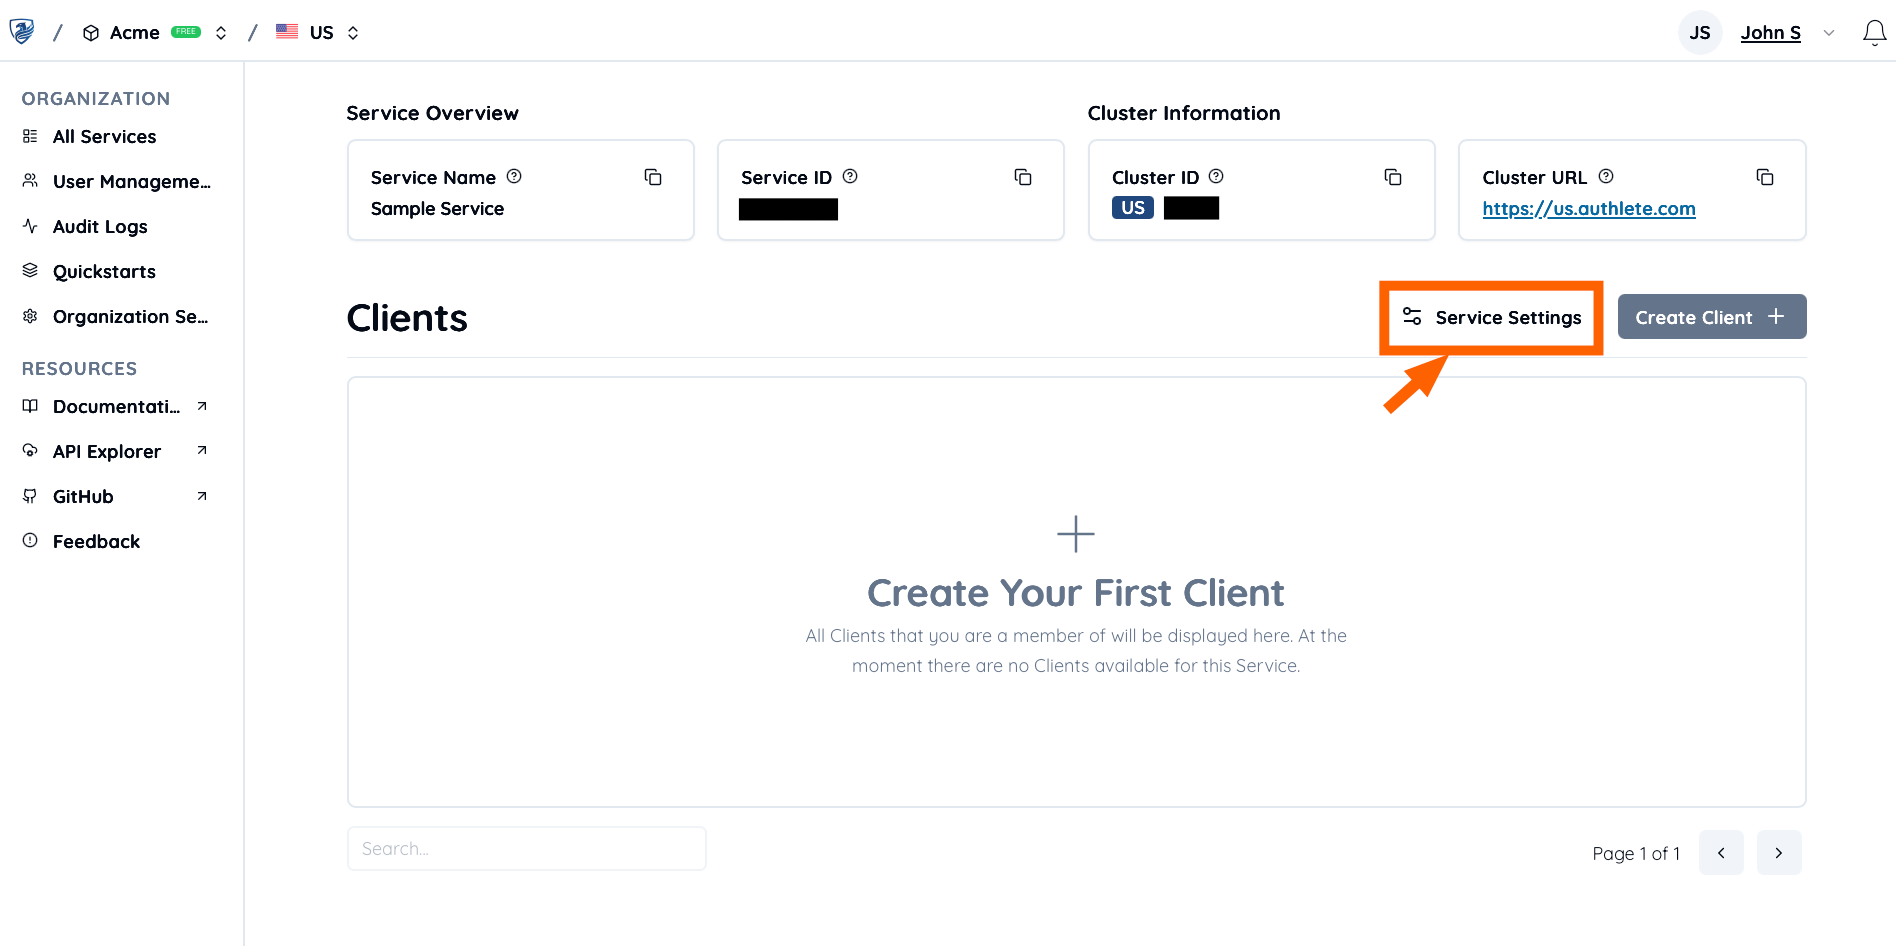
Click **Service Settings** for your newly created service.
Now you have completed to create a new Service.
***
## 3. Create a Service Access Token
You will need a **Service Access Token** to authenticate your Authlete API calls.
Click **Service Settings** for your newly created service.
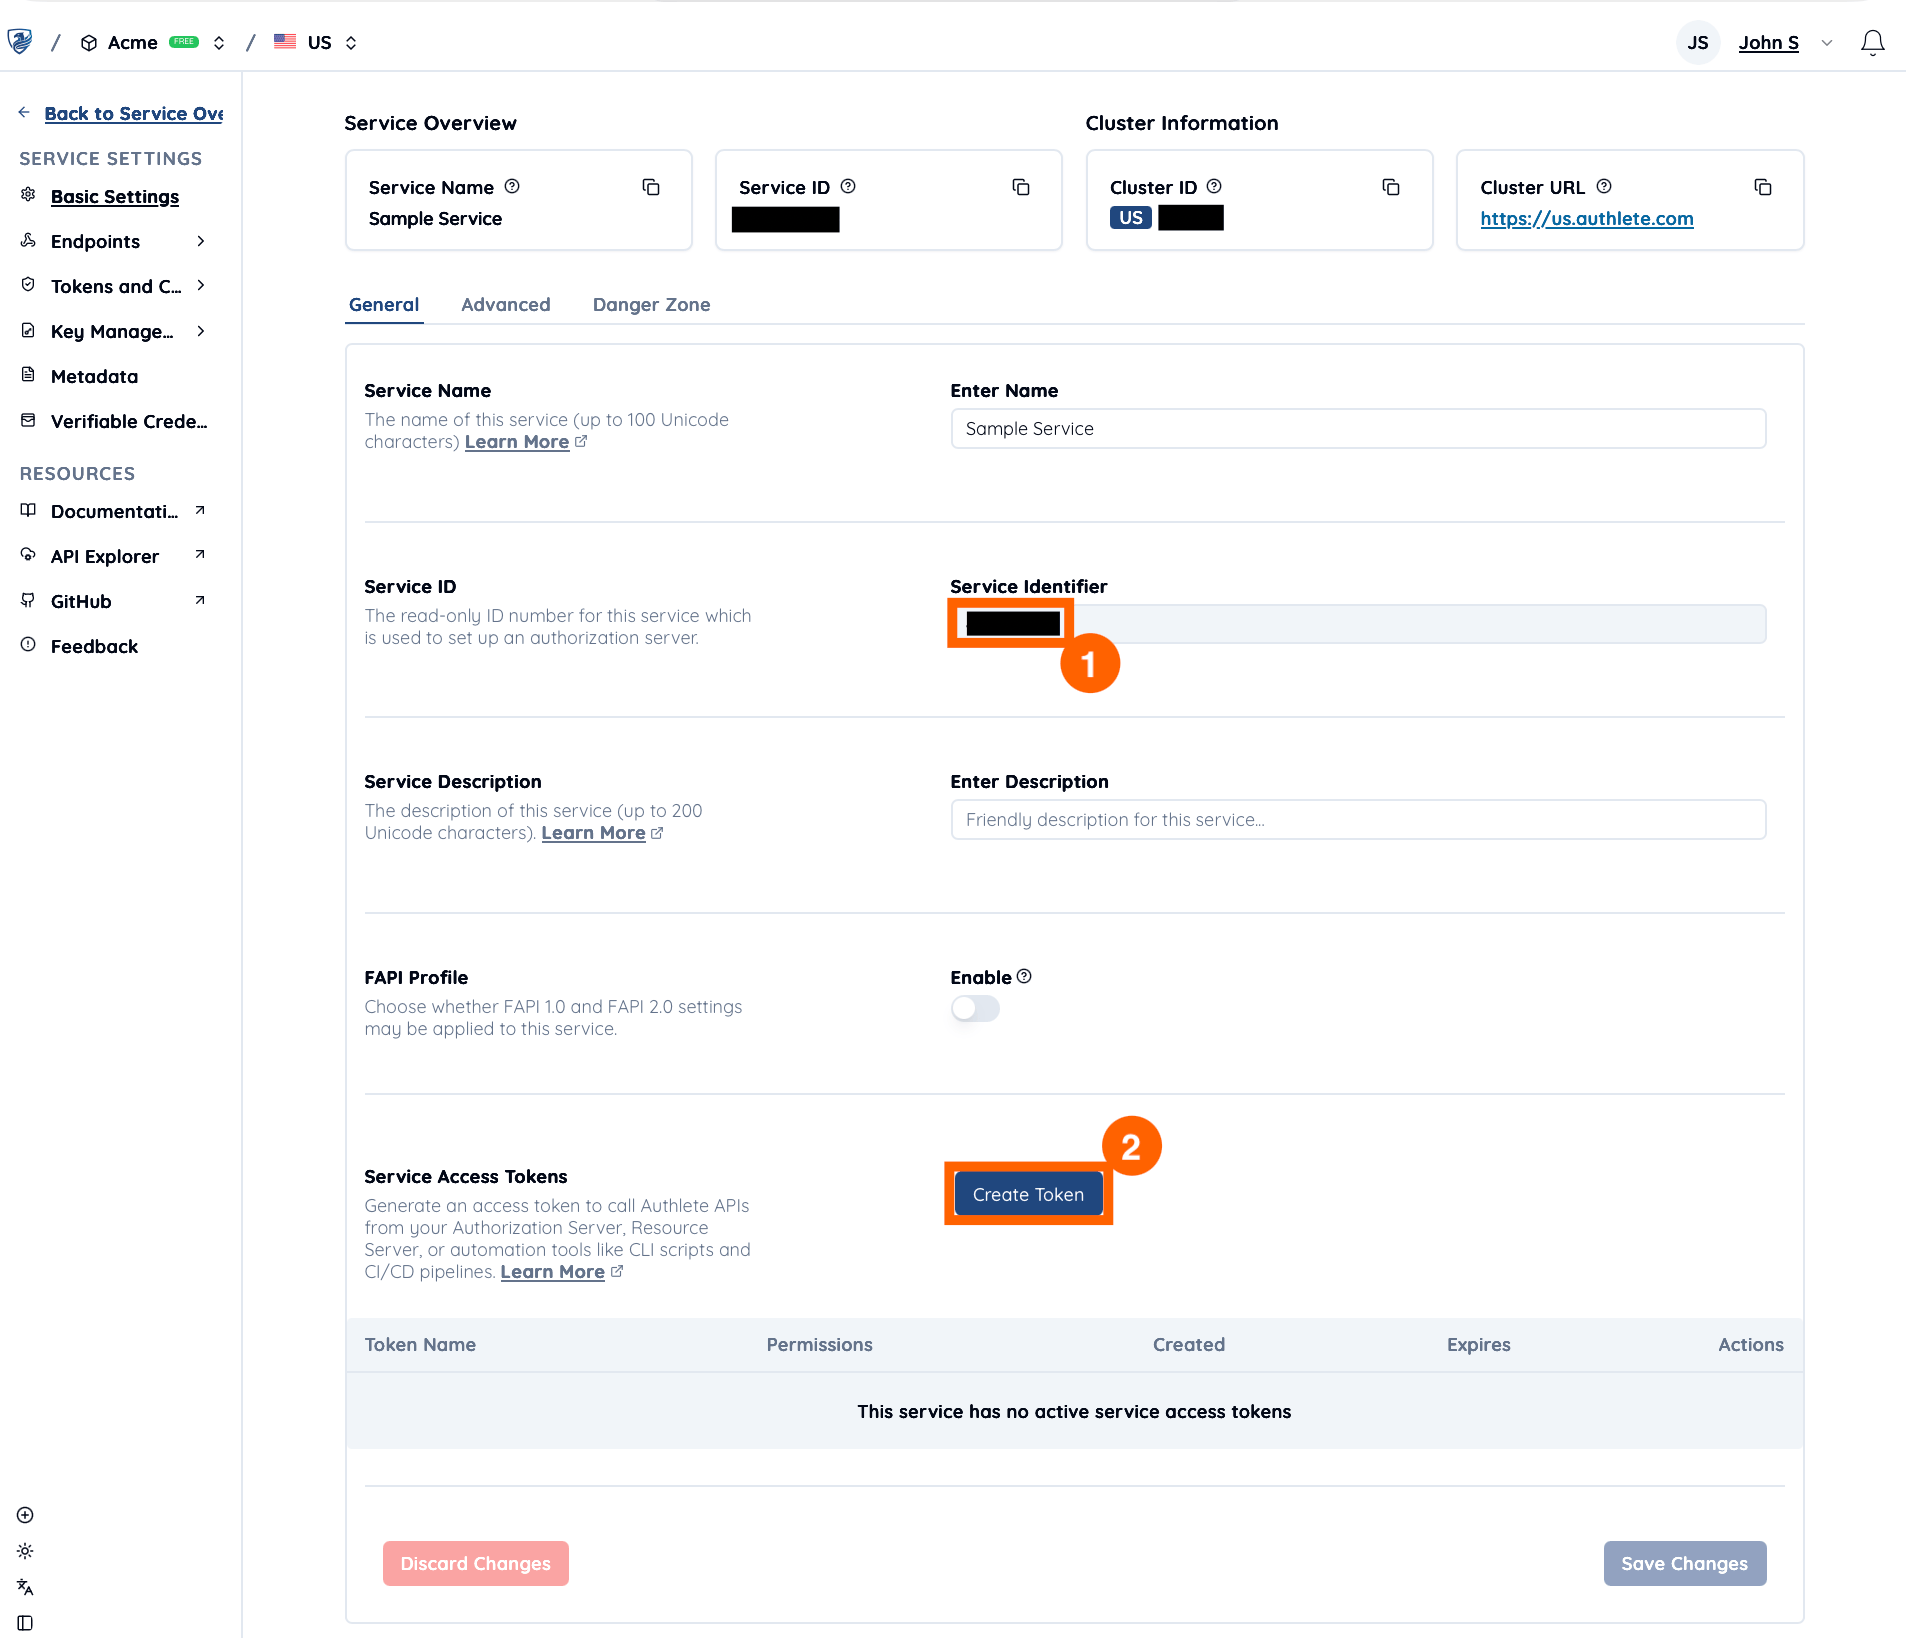
 1. Note down the **Service Identifier** value (e.g., `3615784225`), which is required when making requests in many Authlete APIs.
2. Click **Create Token** to create a new Service Access Token.
1. Note down the **Service Identifier** value (e.g., `3615784225`), which is required when making requests in many Authlete APIs.
2. Click **Create Token** to create a new Service Access Token.
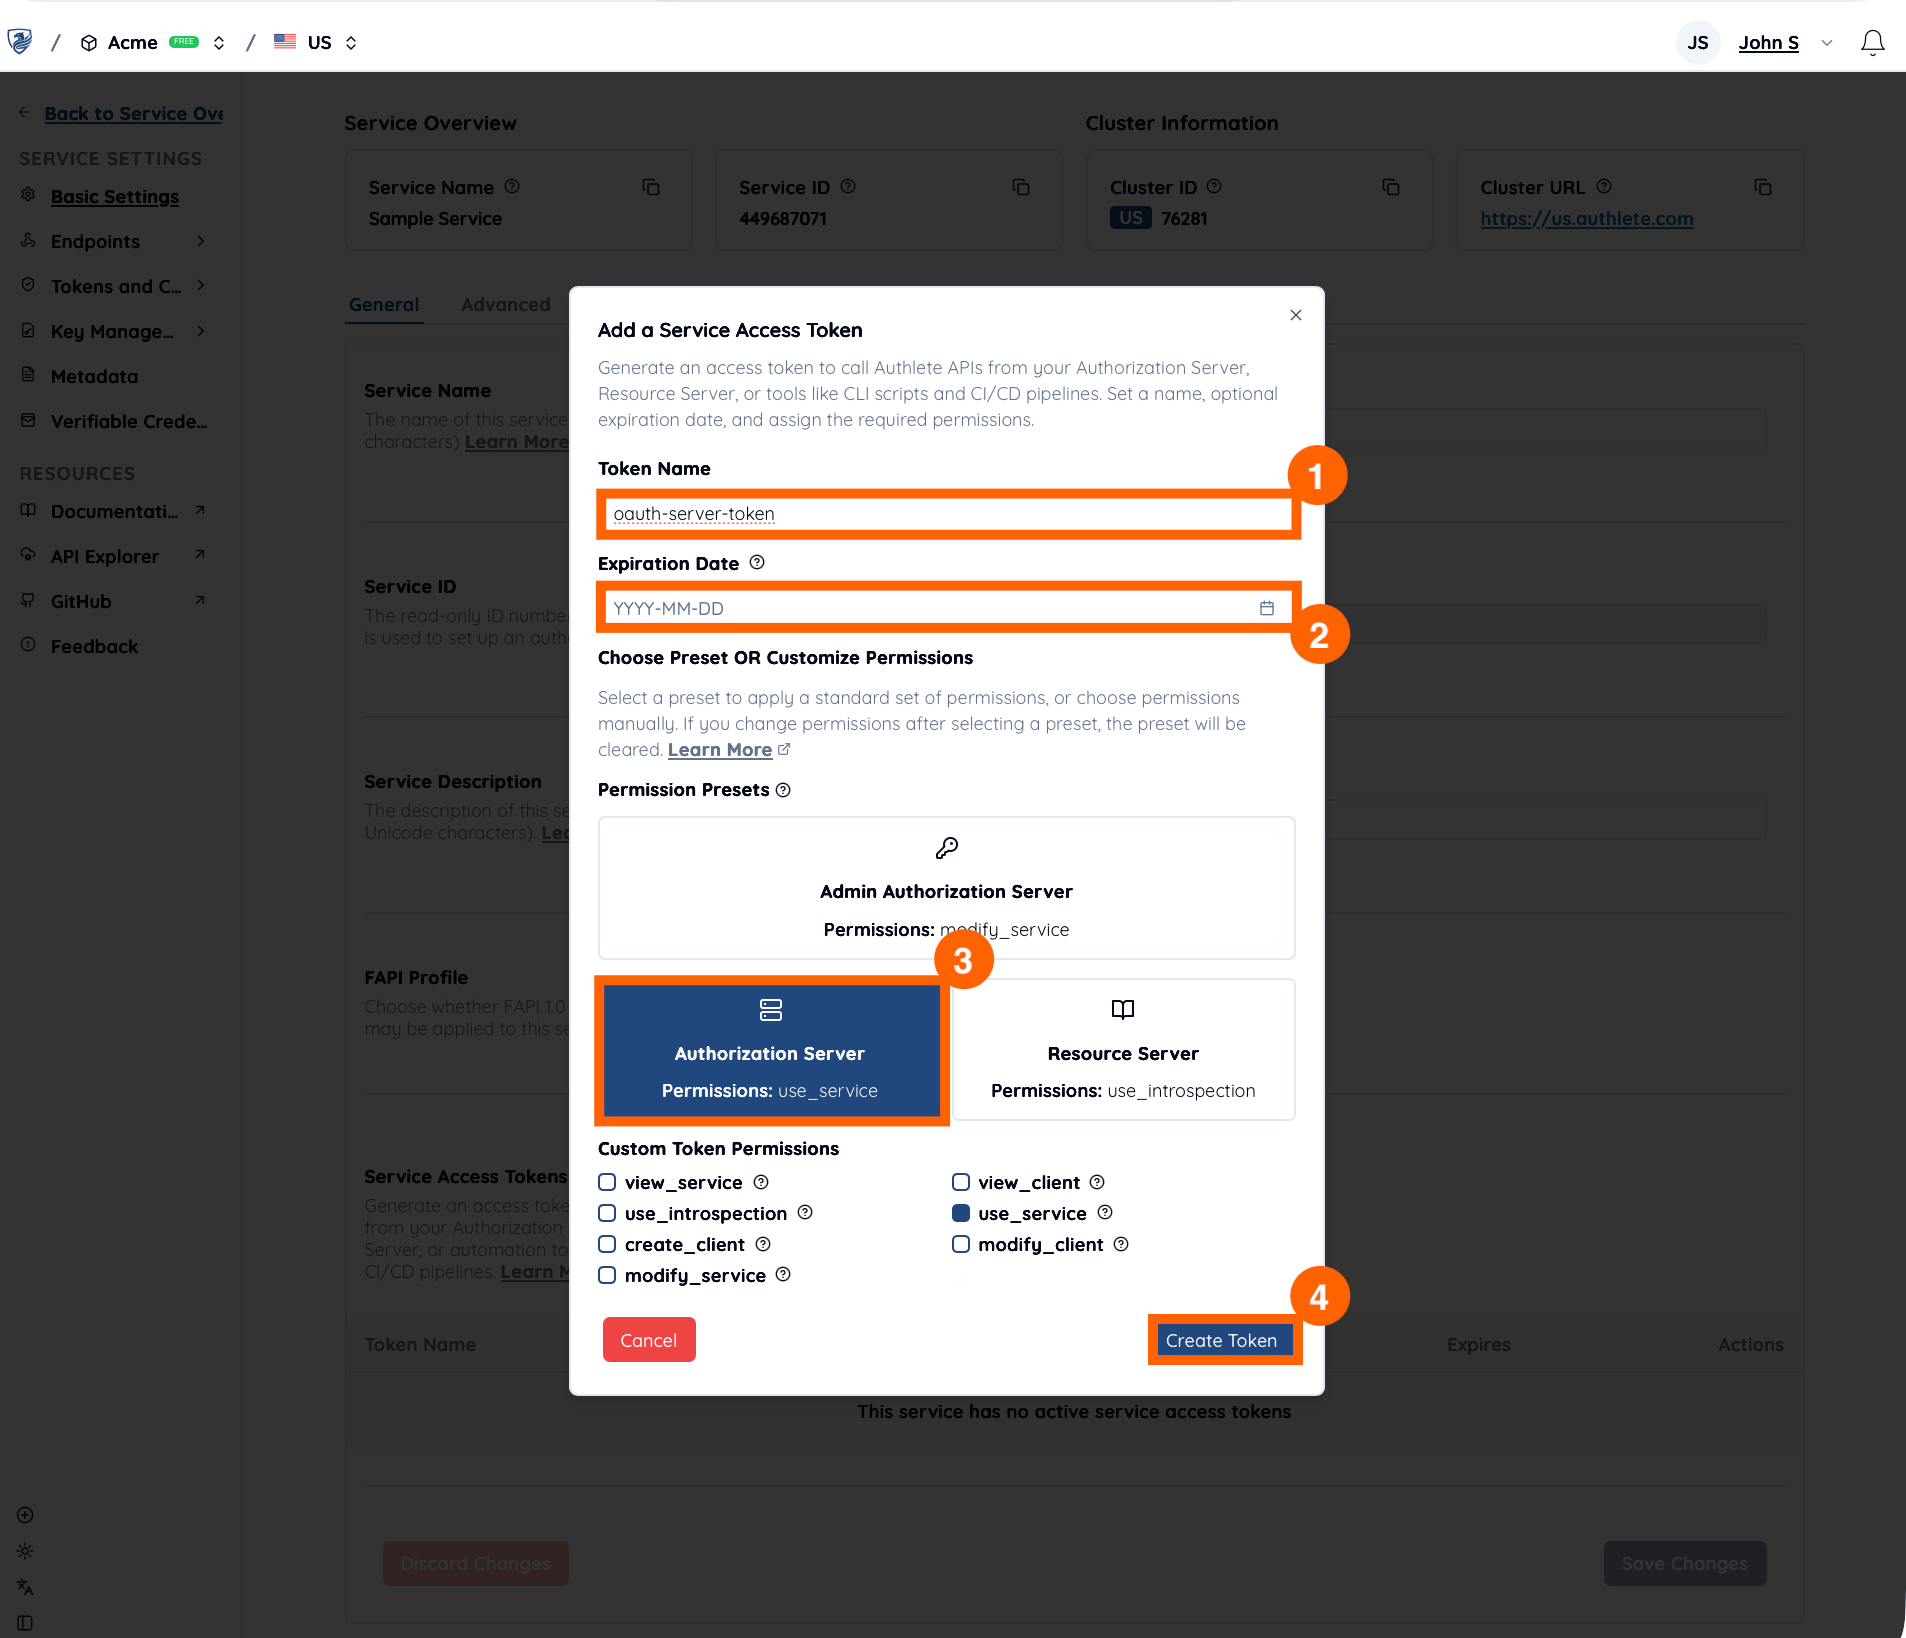
 1. Enter a **token Name** (e.g., `oauth-server-token`).
2. Specify the **Expiration Date**.
3. Select the appropriate **Permissions** (e.g., **Authorization Server** preset).
4. Click **Create Token**.
1. Enter a **token Name** (e.g., `oauth-server-token`).
2. Specify the **Expiration Date**.
3. Select the appropriate **Permissions** (e.g., **Authorization Server** preset).
4. Click **Create Token**.
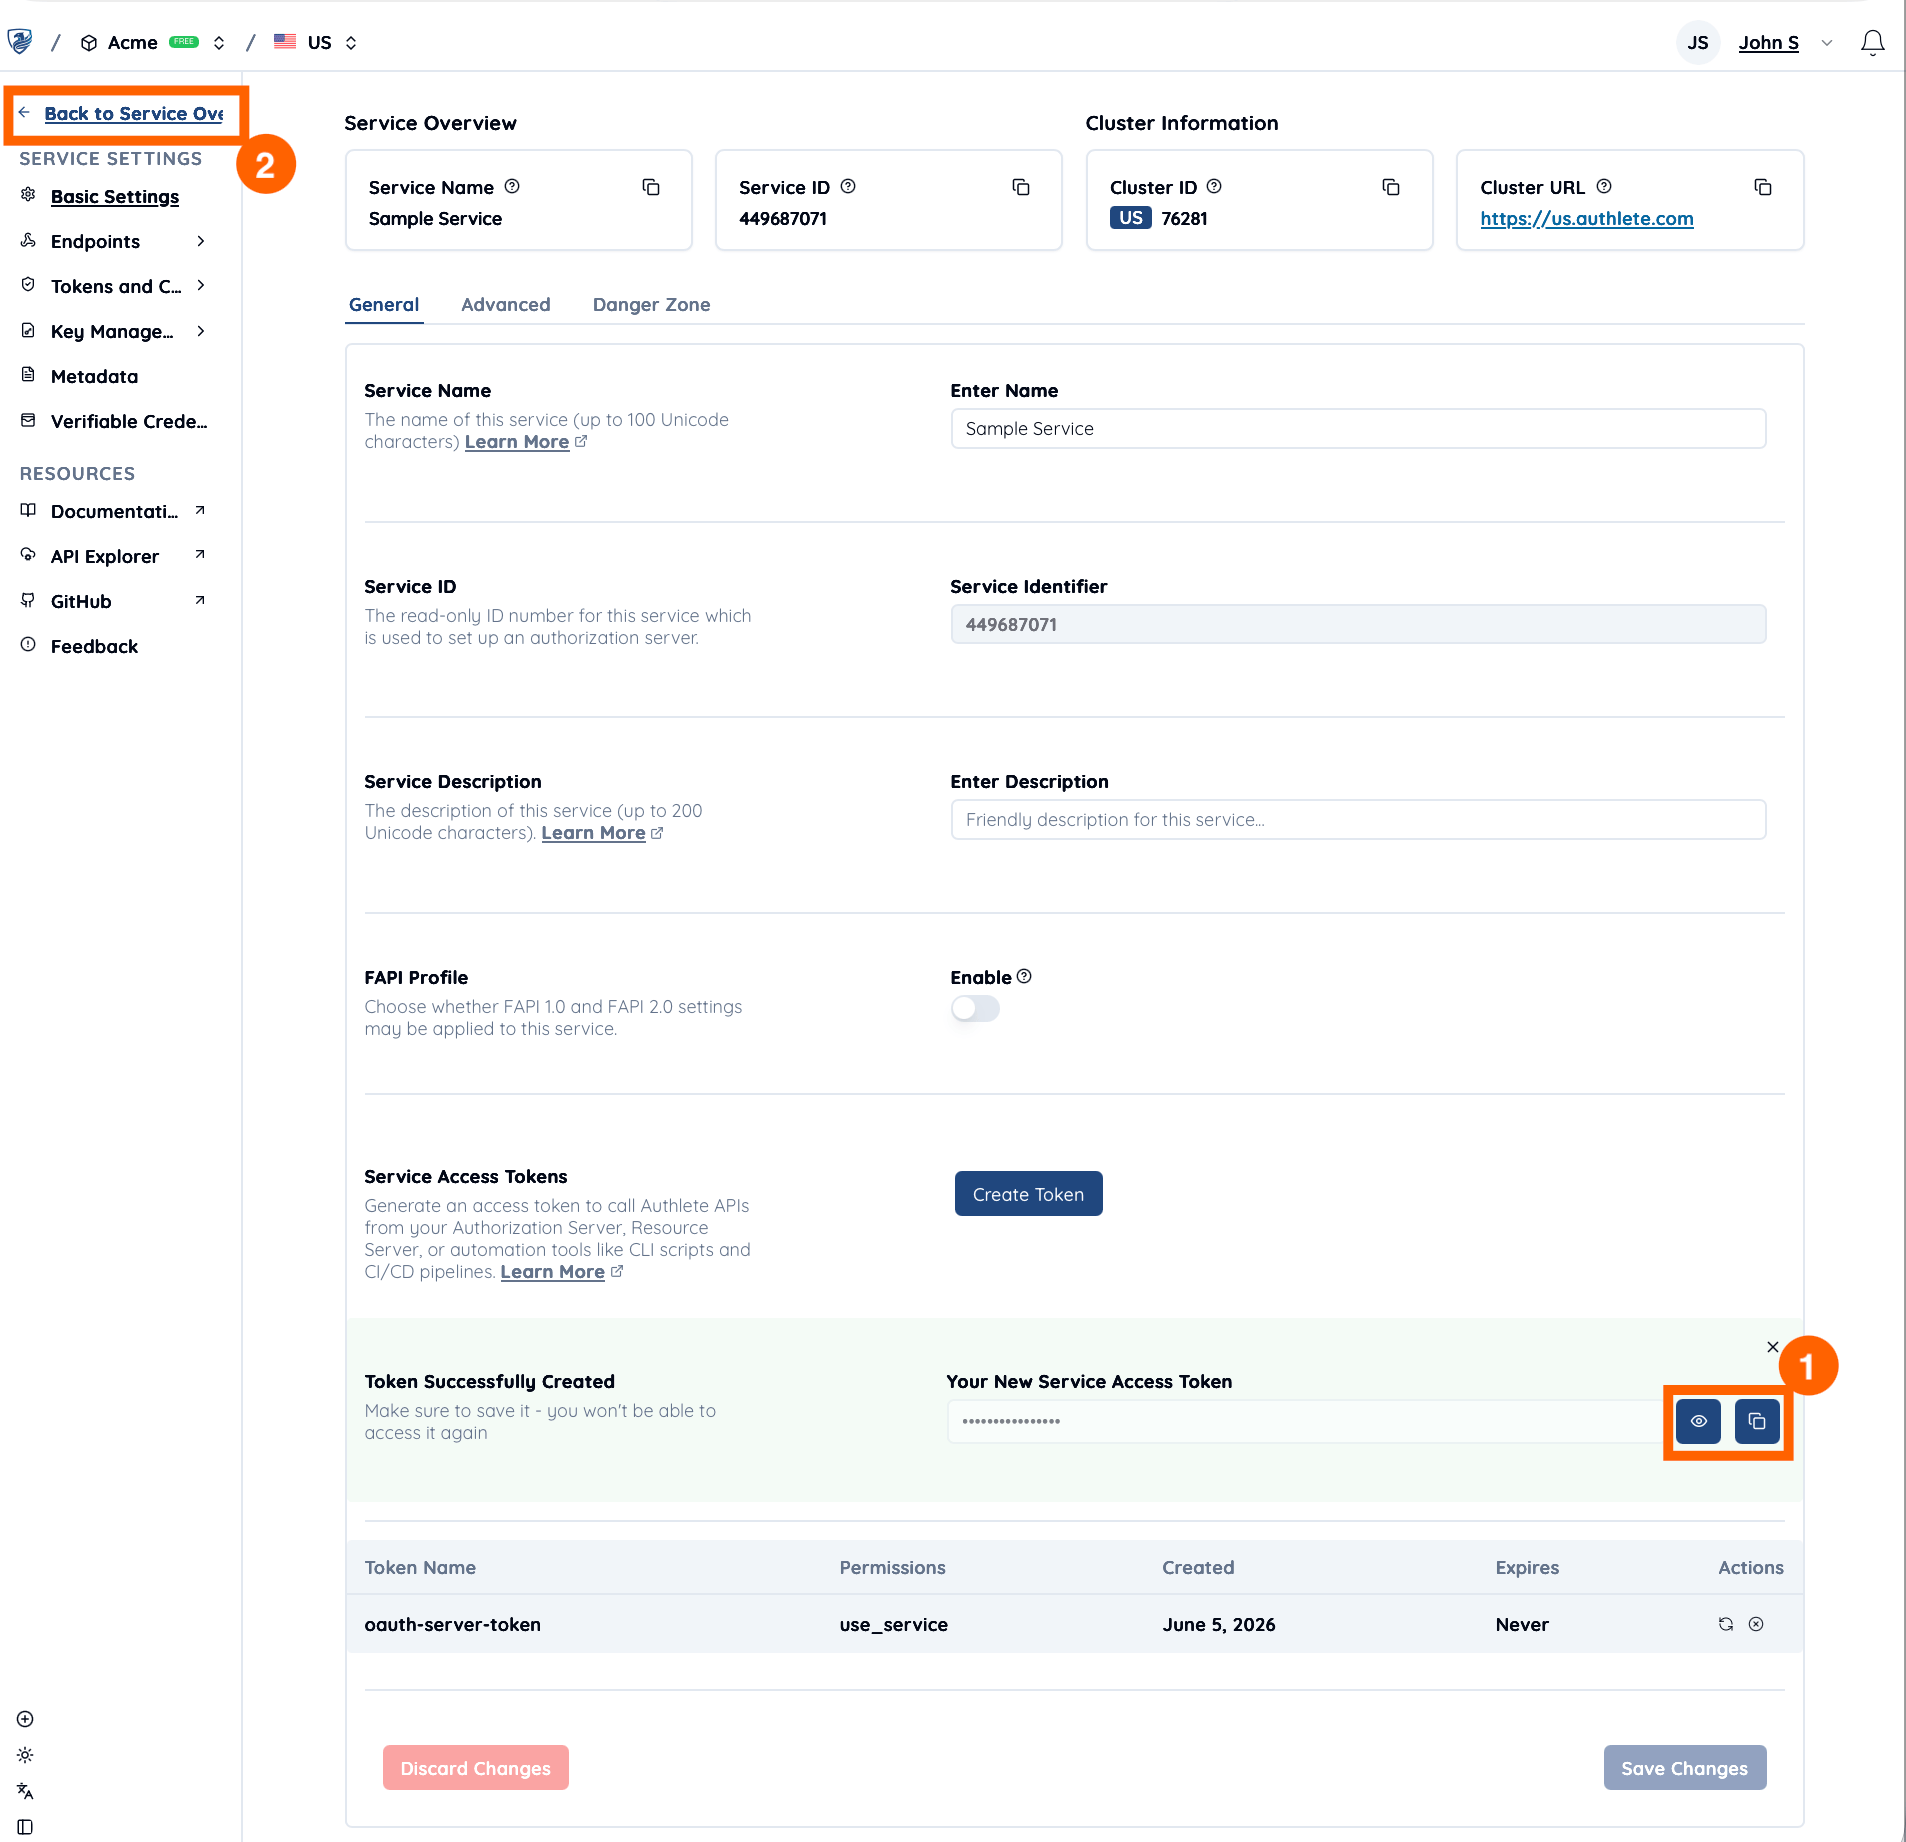
 The new Service Access Token will appear in the list.
1. Click the **Copy** or **Show** icon to retrieve the token value, as it is required for most Authlete API requests. Please note that this value is only displayed once upon creation.
2. Click **Back to Service Overview** to return to the main Service page.
The new Service Access Token will appear in the list.
1. Click the **Copy** or **Show** icon to retrieve the token value, as it is required for most Authlete API requests. Please note that this value is only displayed once upon creation.
2. Click **Back to Service Overview** to return to the main Service page.
 *Now you are ready to test the Authlete API!*
***
## 4. Call the Authlete API
Let’s make your first API request to Authlete’s [/service/configuration](/api-reference/service-management/get-service-configuration) API, which acts as the backend for the OIDC discovery endpoint, generating OpenID provider metadata so that the endpoint can return in response to requests from clients (OIDC relying parties).
```mermaid placement="top-right" theme={null}
%%{init: {
'themeVariables': {
'fontSize': '20px',
'nodeTextMargin': 40
},
'flowchart': {
'nodeSpacing': 40,
'rankSpacing': 40,
'padding': 5
}
}}%%
graph LR
client[OIDC RP]
subgraph as[OIDC IdP]
direction TB
disco[Discovery
*Now you are ready to test the Authlete API!*
***
## 4. Call the Authlete API
Let’s make your first API request to Authlete’s [/service/configuration](/api-reference/service-management/get-service-configuration) API, which acts as the backend for the OIDC discovery endpoint, generating OpenID provider metadata so that the endpoint can return in response to requests from clients (OIDC relying parties).
```mermaid placement="top-right" theme={null}
%%{init: {
'themeVariables': {
'fontSize': '20px',
'nodeTextMargin': 40
},
'flowchart': {
'nodeSpacing': 40,
'rankSpacing': 40,
'padding': 5
}
}}%%
graph LR
client[OIDC RP]
subgraph as[OIDC IdP]
direction TB
disco[Discovery
Endpoint]
end
subgraph authlete[Authlete]
direction TB
config["/service/configuration
API"]
end
client -- Metadata
Request --> disco
disco -- Service
Configuration
Request
--> config
```
Below are examples using **curl** and the **API Explorer**. Please replace the placeholder values with your actual environment details.
| Item | Value |
| :----------------------- | :-------------------------------------------- |
| **API Cluster Hostname** | `https://us.authlete.com` |
| **Service Access Token** | `qwEF2t8gxW9MerraRyVtscDTKVPa66kjBBPUpBduvXw` |
| **Service ID** | `3615784225` |
### Using curl
Run the following command in your terminal to send an HTTP GET request:
```bash For Linux/MacOS theme={null}
curl -X GET "https://us.authlete.com/api/3615784225/service/configuration" \
-H "Authorization: Bearer qwEF2t8gxW9MerraRyVtscDTKVPa66kjBBPUpBduvXw"
```
```powershell For Windows theme={null}
curl.exe -X GET "https://us.authlete.com/api/3615784225/service/configuration" `
-H "Authorization: Bearer qwEF2t8gxW9MerraRyVtscDTKVPa66kjBBPUpBduvXw" | ConvertFrom-Json
```
If successful, the API will return OpenID Provider Metadata similar to this:
```json theme={null}
{
"issuer": "https://authlete.com",
[...]
"scopes_supported": [
"address",
"email",
"openid",
"offline_access",
"phone",
"profile",
"grant_management_query",
"grant_management_revoke"
],
"response_types_supported": [
"none",
"code",
"id_token",
"code id_token"
],
[...]
}
```
### Using API Explorer
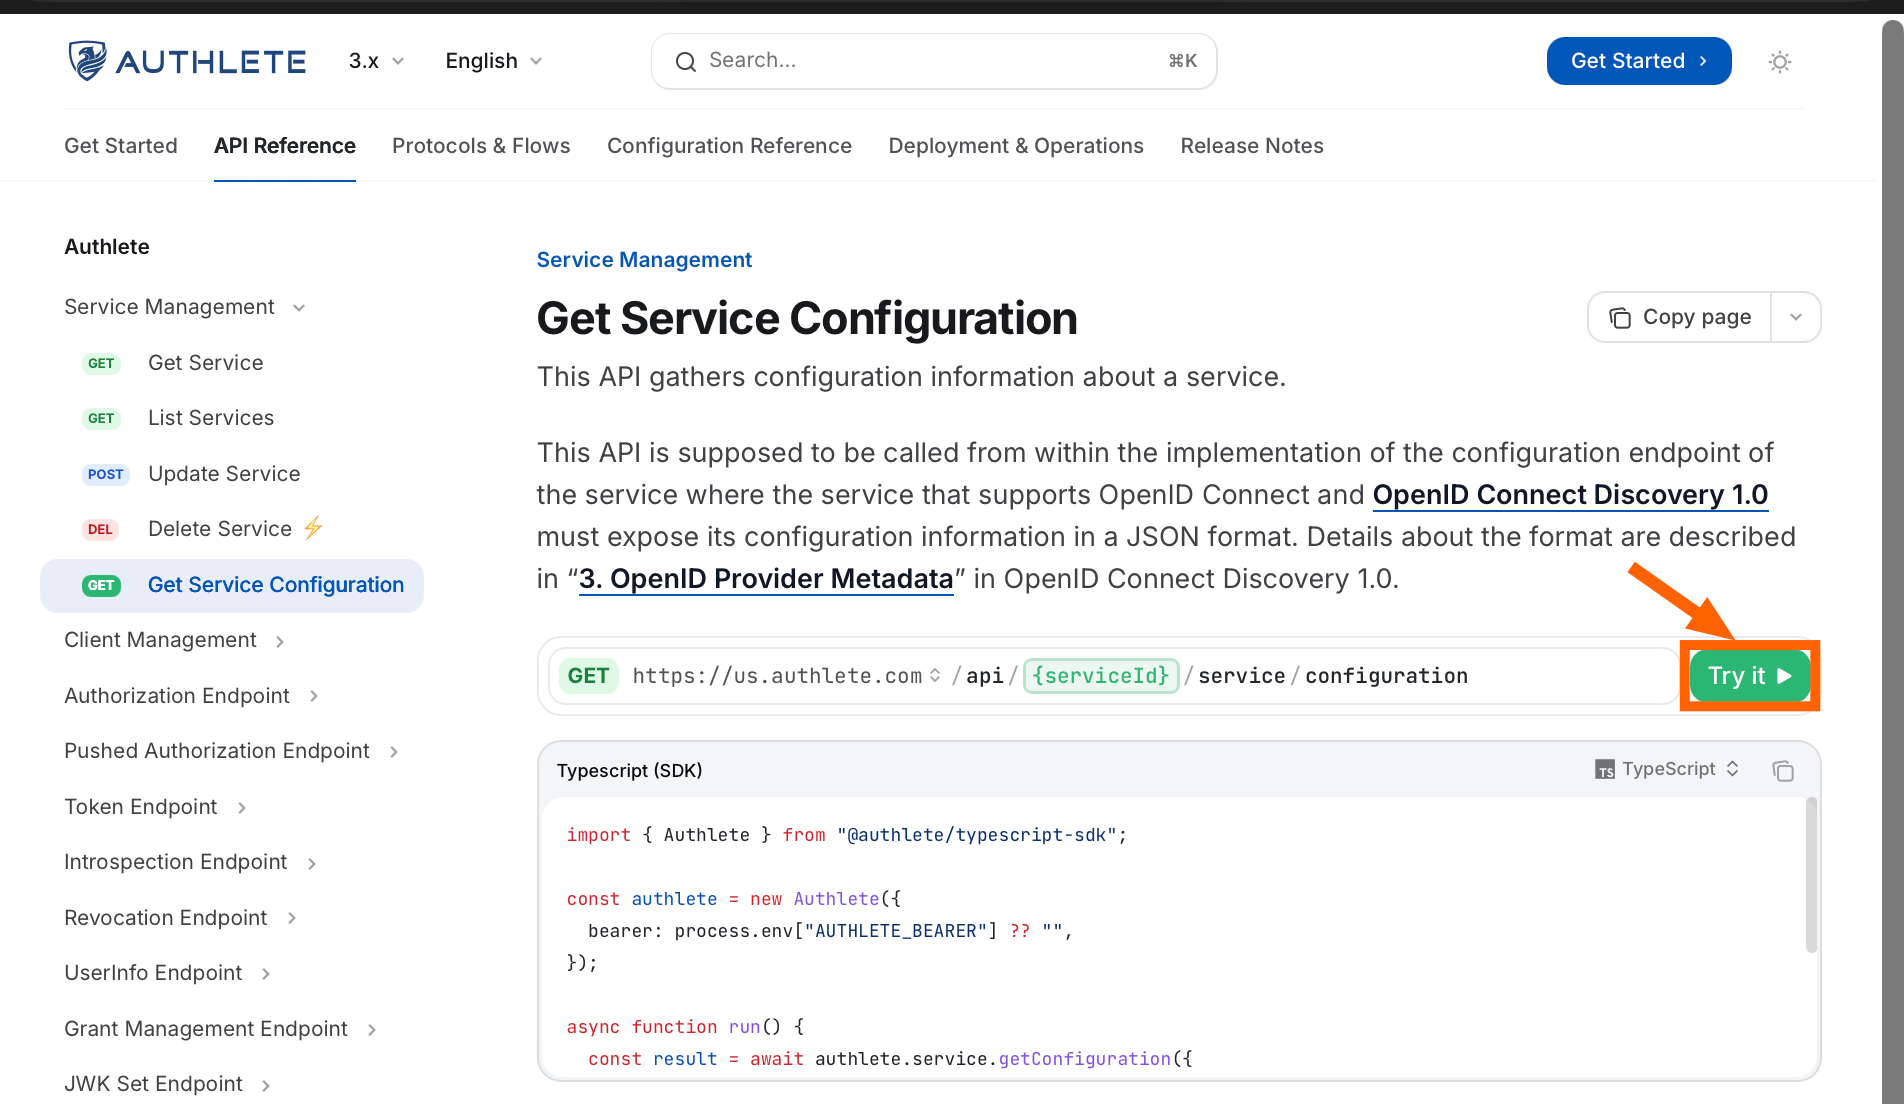
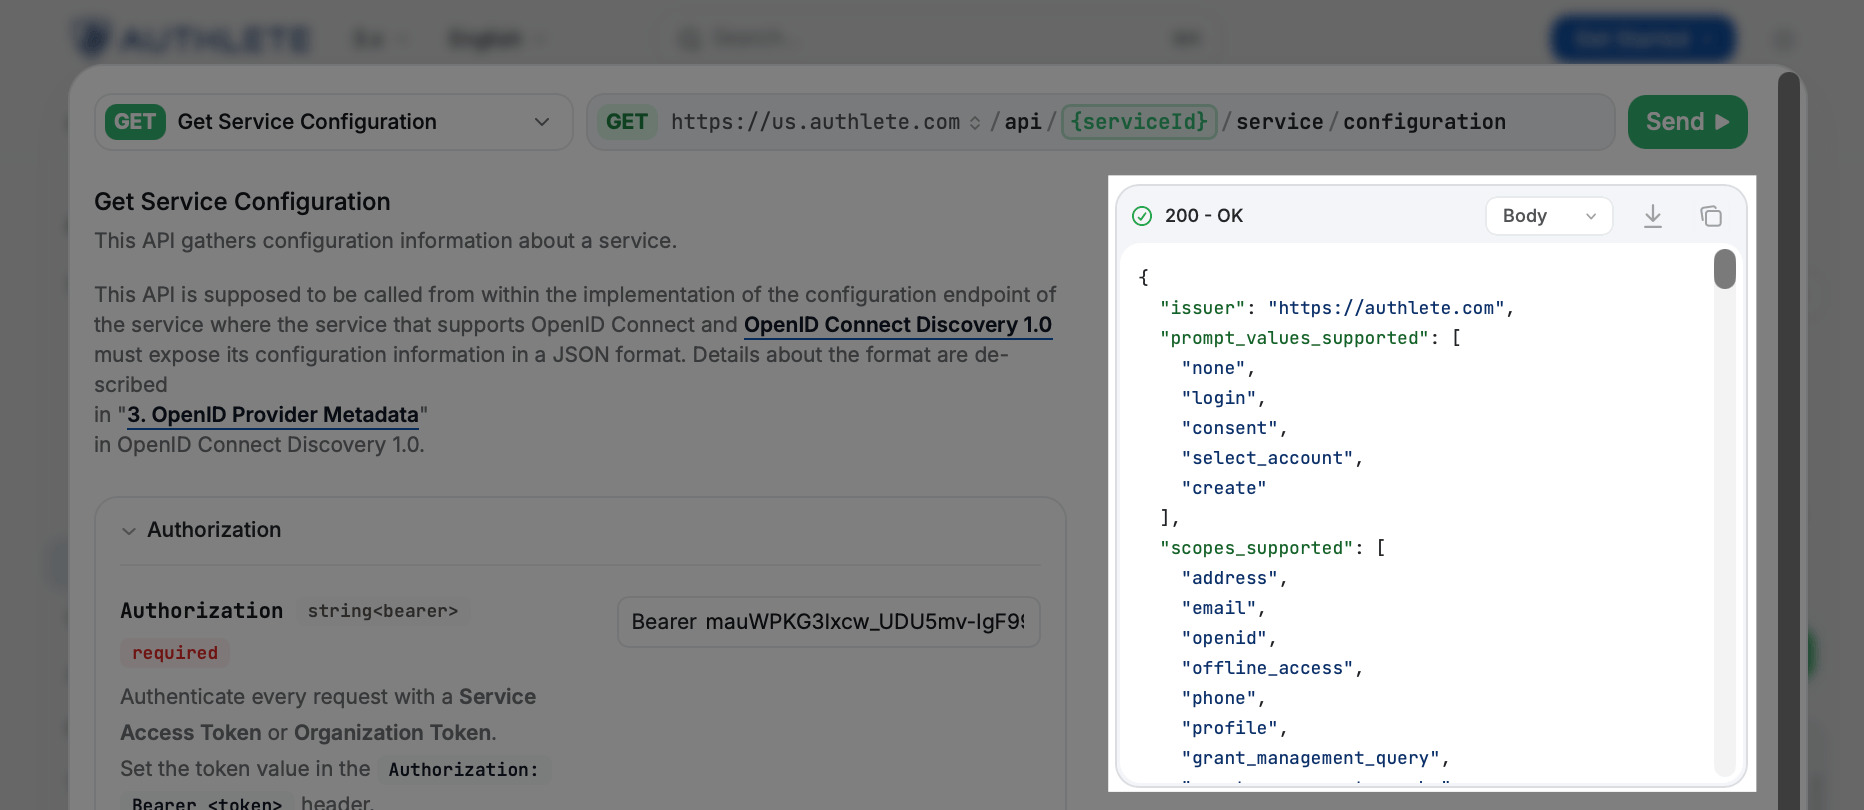
Open the [/service/configuration API reference page](/api-reference/service-management/get-service-configuration) and click the **Try it** button.
 1. Choose the **API Cluster Hostname**.
2. Enter the **Service Access Token**.
3. Enter the **Service ID**.
4. Click **Send**.
1. Choose the **API Cluster Hostname**.
2. Enter the **Service Access Token**.
3. Enter the **Service ID**.
4. Click **Send**.
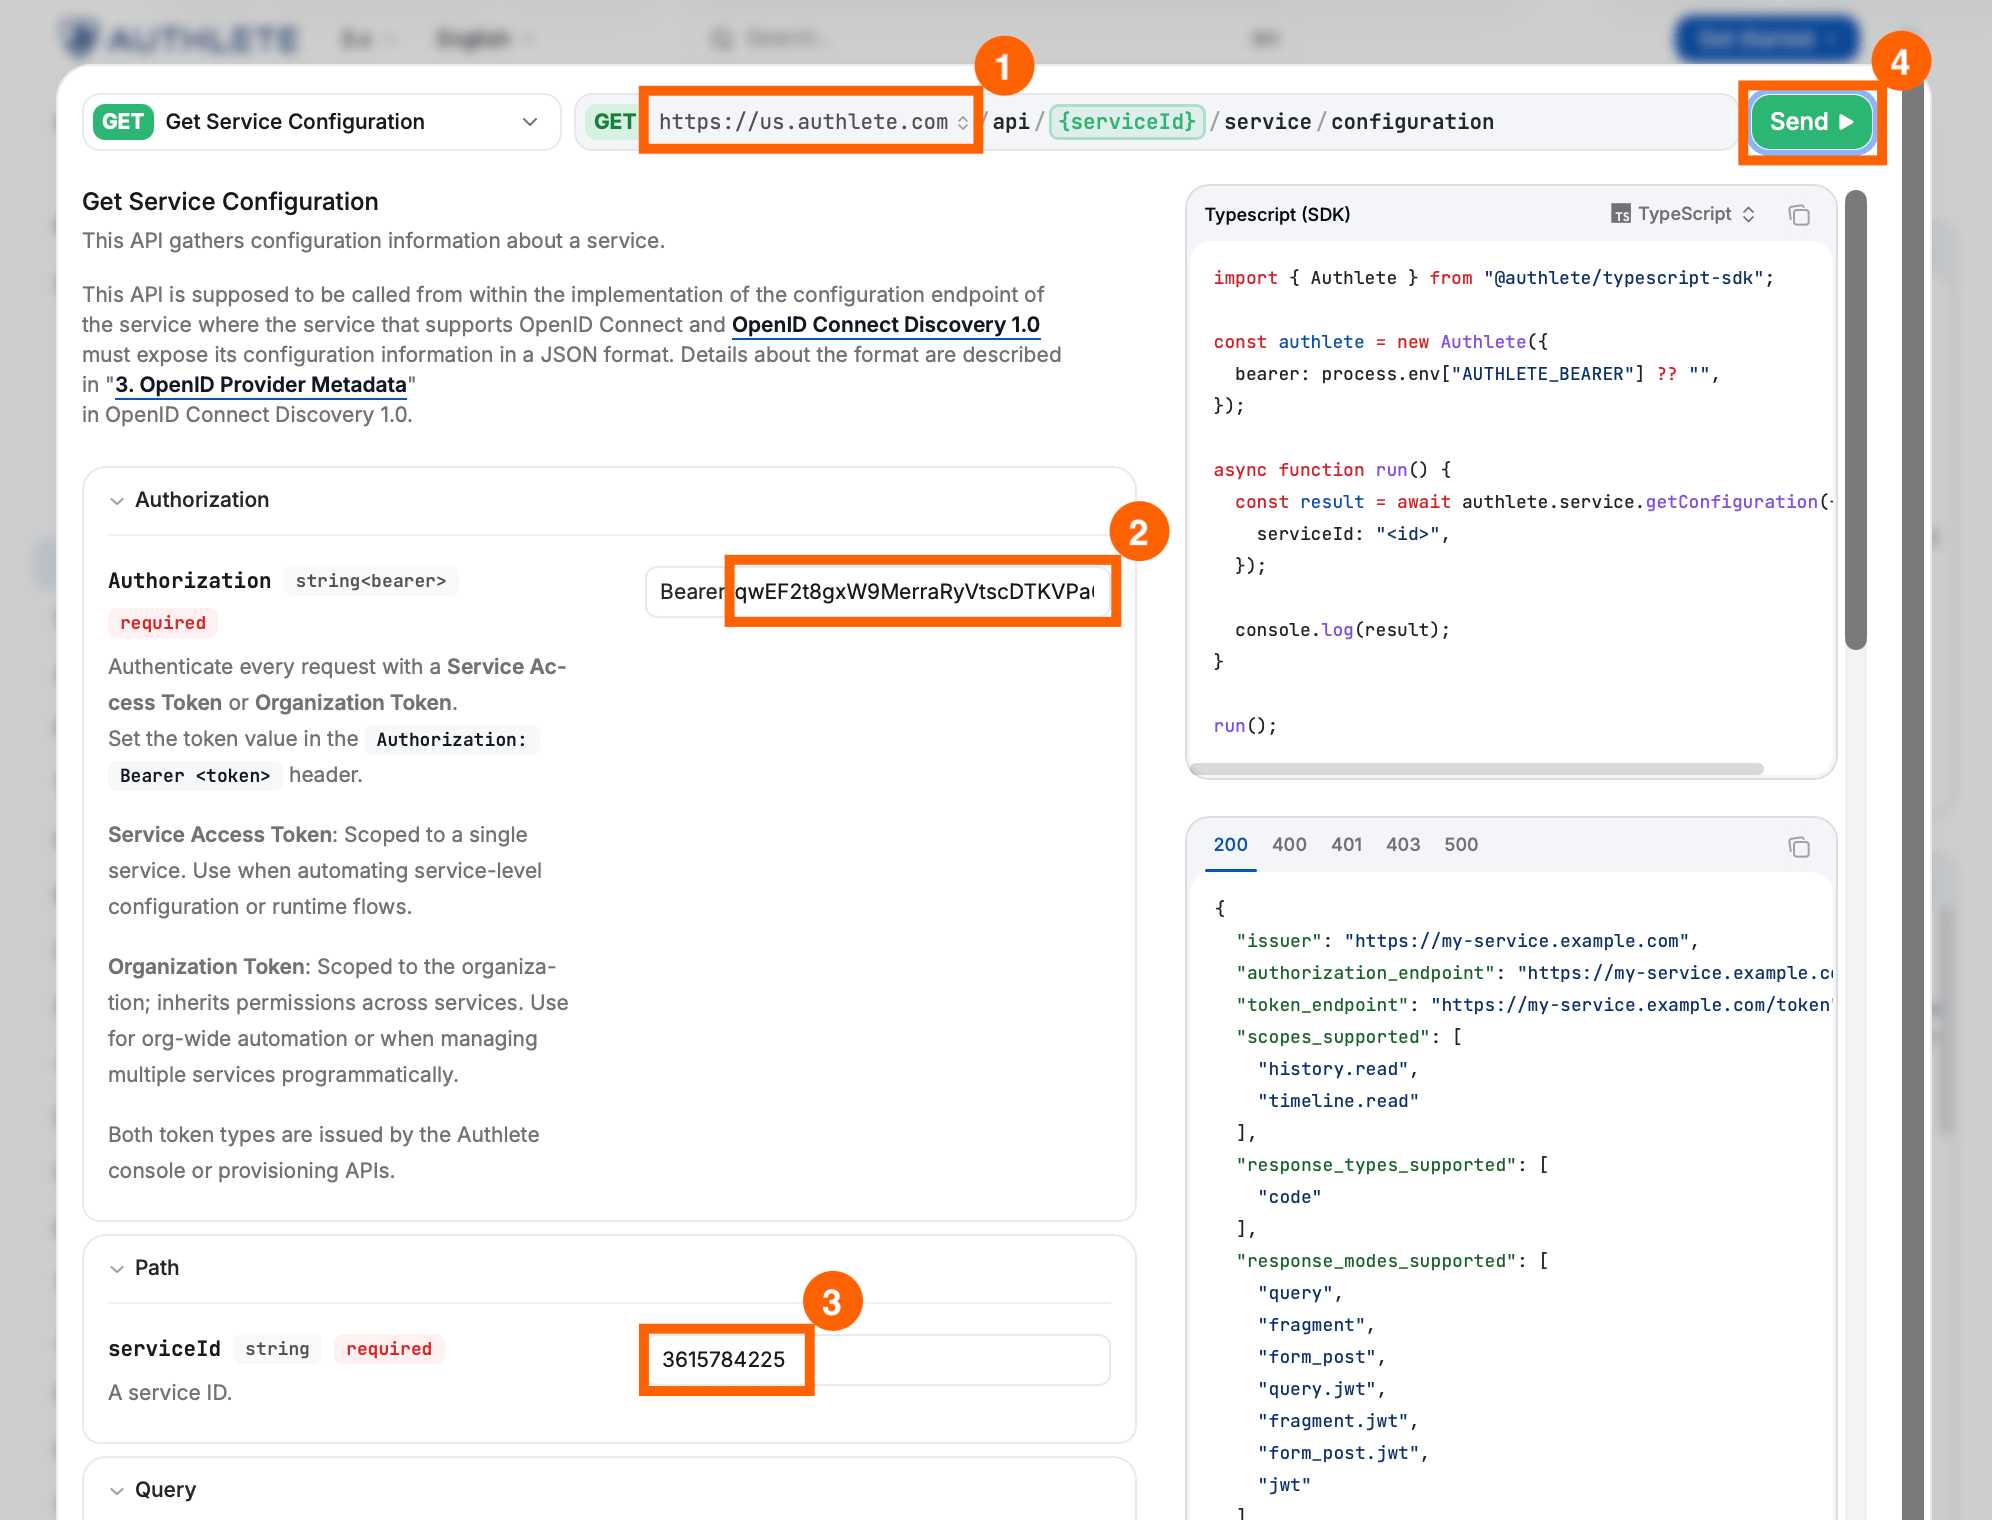 The API response will be displayed in the Response section.
 ***
## Next Steps
Now that your Authlete account is set up and your service is configured, it's time to explore further:
* [**OAuth 2.0 Basics - API Tutorials**](/get-started/quickstarts/oauth-2-0-basics): Learn how Authlete works under the hood by calling the APIs directly using curl and other tools.
* [**Using Demo Authorization Server**](/get-started/quickstarts/using-demo-authorization-server): Deploy an open-source authorization server frontend that integrates with Authlete APIs to test live OAuth/OIDC flows.
***
## Extra: OAuth/OIDC Processing
Let's explore Authlete's OAuth/OIDC protocol processing by testing a sample authorization request.
### Create a Client
A **Client** represents an application that interacts with the Authorization Server to request tokens, or with the Resource Server to access protected resources. Clients are managed within the context of a specific Authlete Service.
On the Service page, click the **Create Client** button at the top-right of the screen.
***
## Next Steps
Now that your Authlete account is set up and your service is configured, it's time to explore further:
* [**OAuth 2.0 Basics - API Tutorials**](/get-started/quickstarts/oauth-2-0-basics): Learn how Authlete works under the hood by calling the APIs directly using curl and other tools.
* [**Using Demo Authorization Server**](/get-started/quickstarts/using-demo-authorization-server): Deploy an open-source authorization server frontend that integrates with Authlete APIs to test live OAuth/OIDC flows.
***
## Extra: OAuth/OIDC Processing
Let's explore Authlete's OAuth/OIDC protocol processing by testing a sample authorization request.
### Create a Client
A **Client** represents an application that interacts with the Authorization Server to request tokens, or with the Resource Server to access protected resources. Clients are managed within the context of a specific Authlete Service.
On the Service page, click the **Create Client** button at the top-right of the screen.
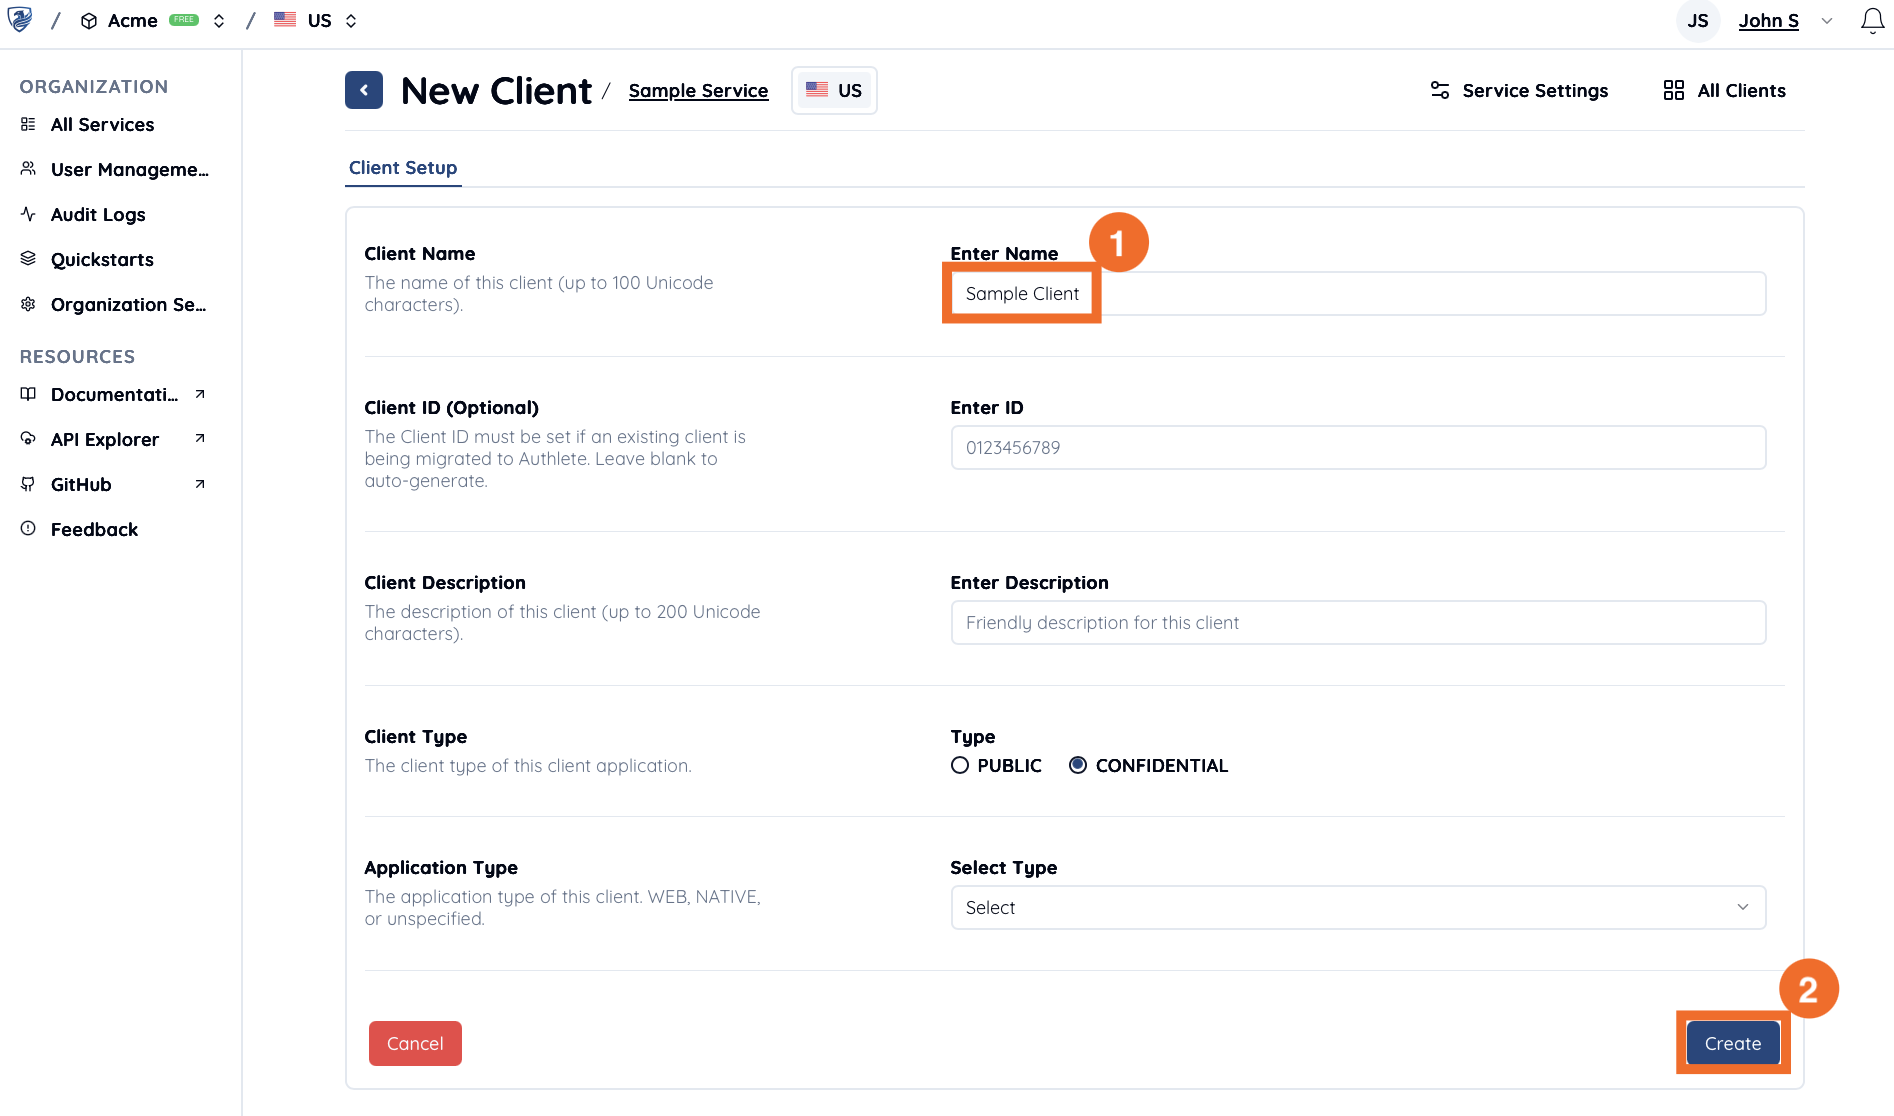
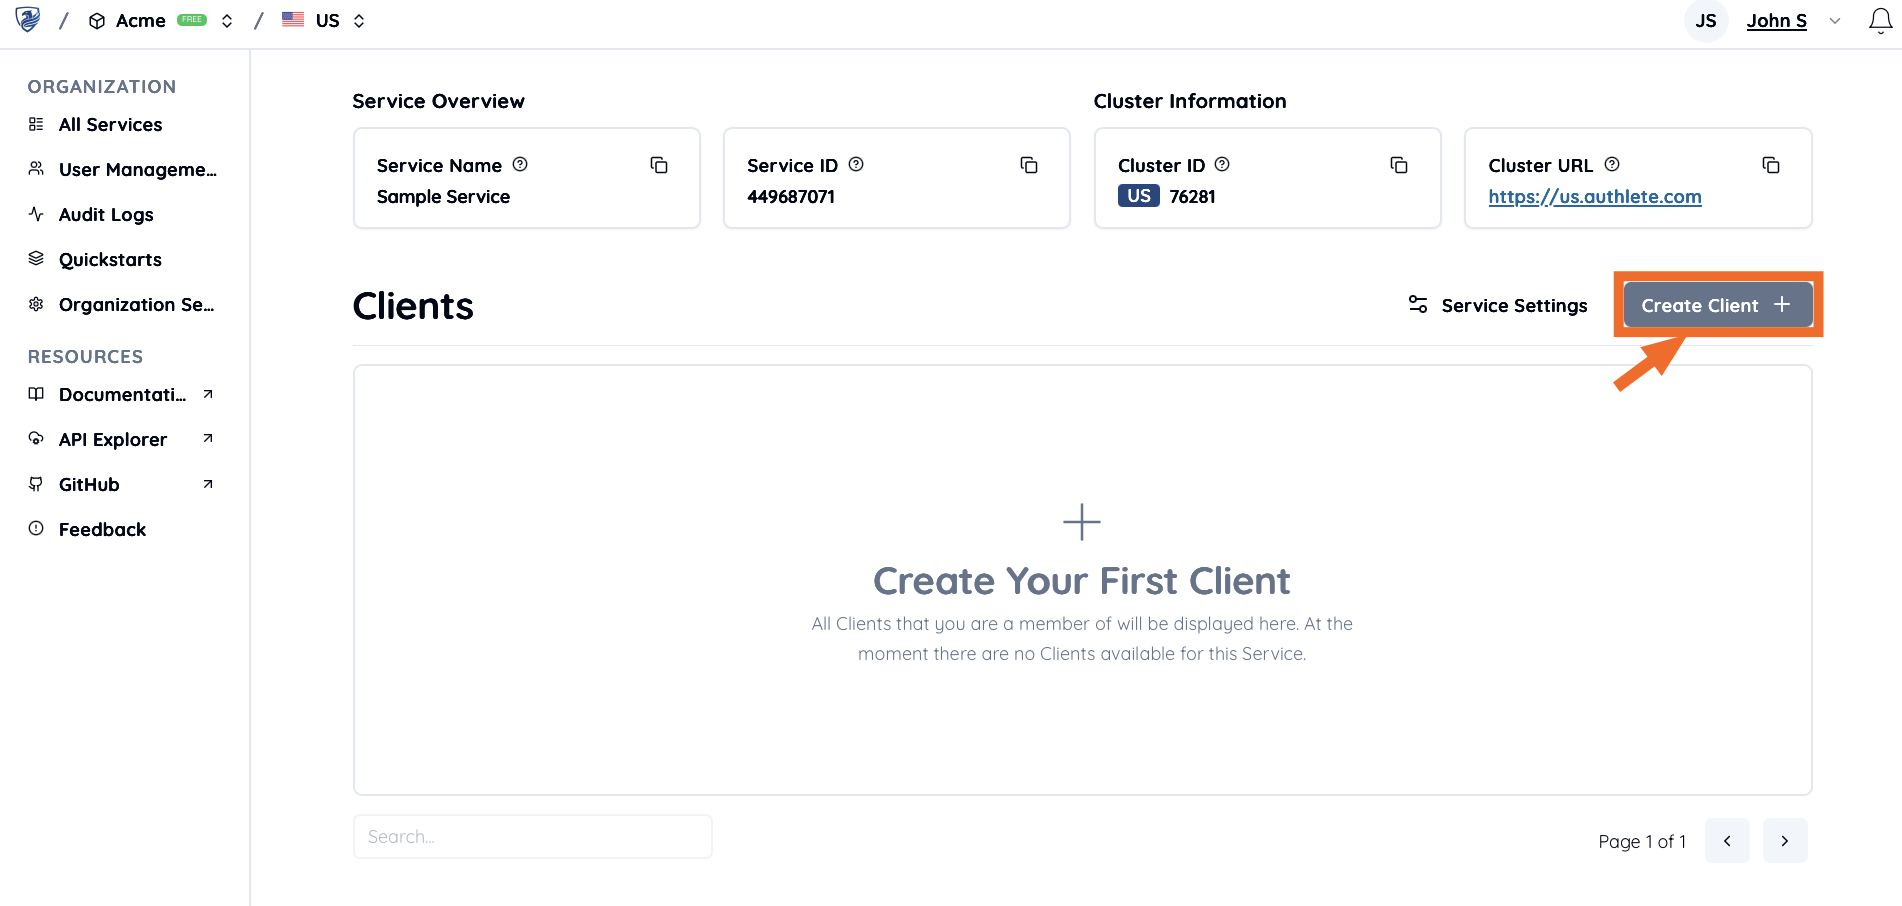 Enter a **Client Name** and click **Create**.
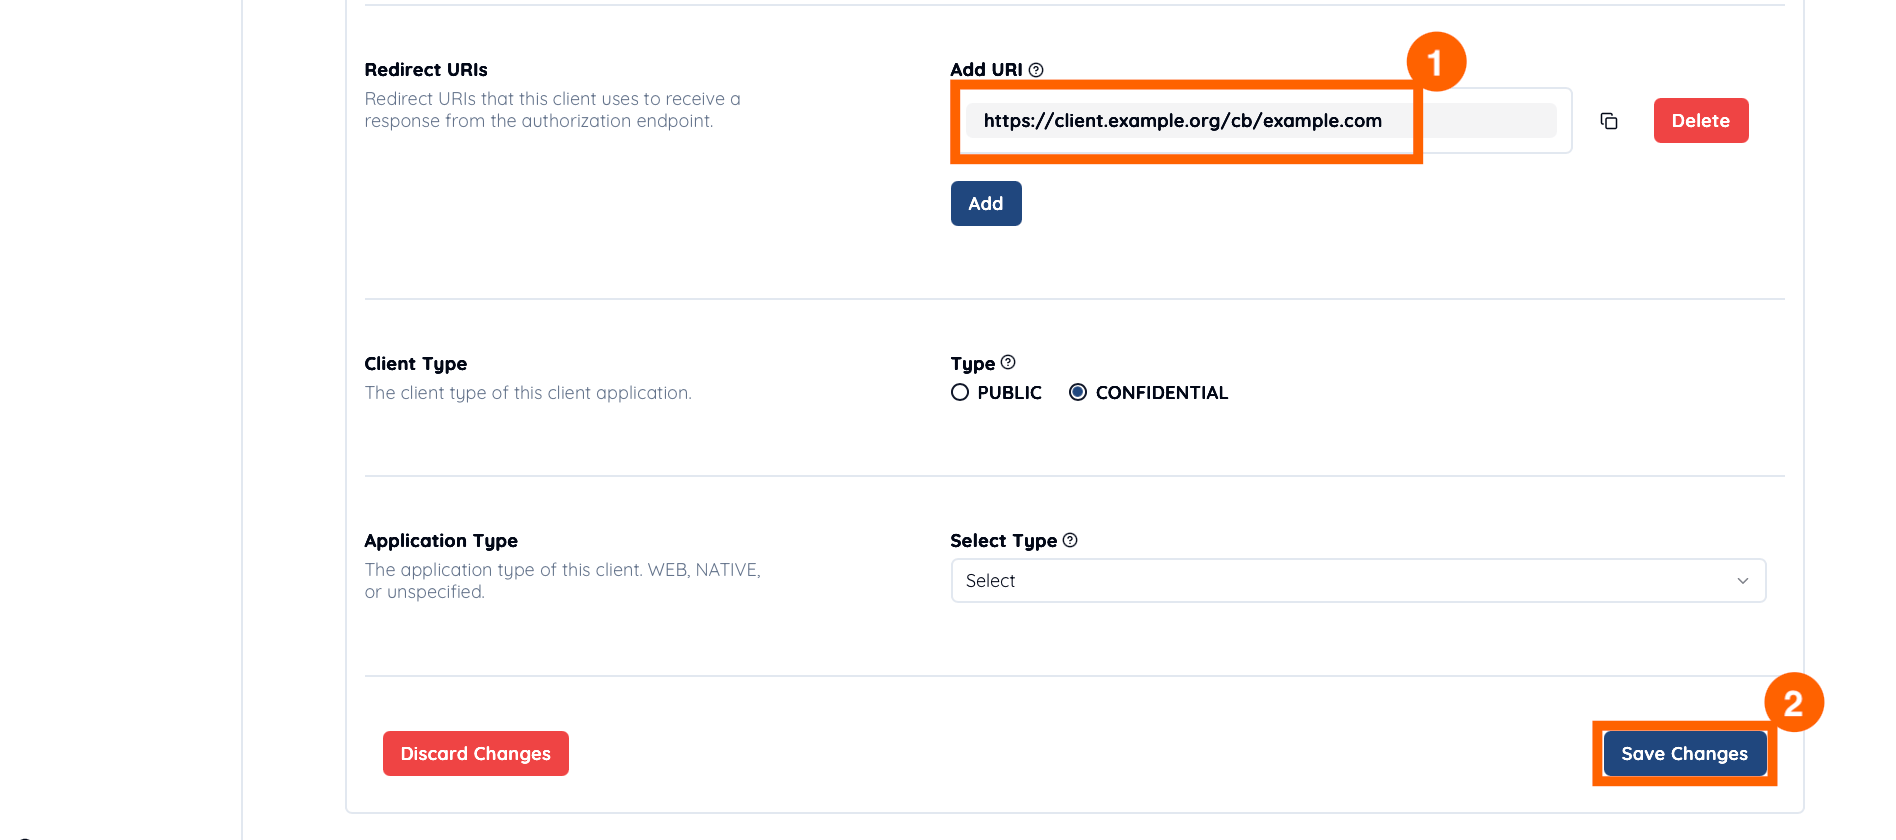
 Once created, the client details will be displayed. Make a note of the **Client ID** and **Client Secret** if needed. In the **Redirect URIs** section, click **Add** to register your application's redirect URIs.
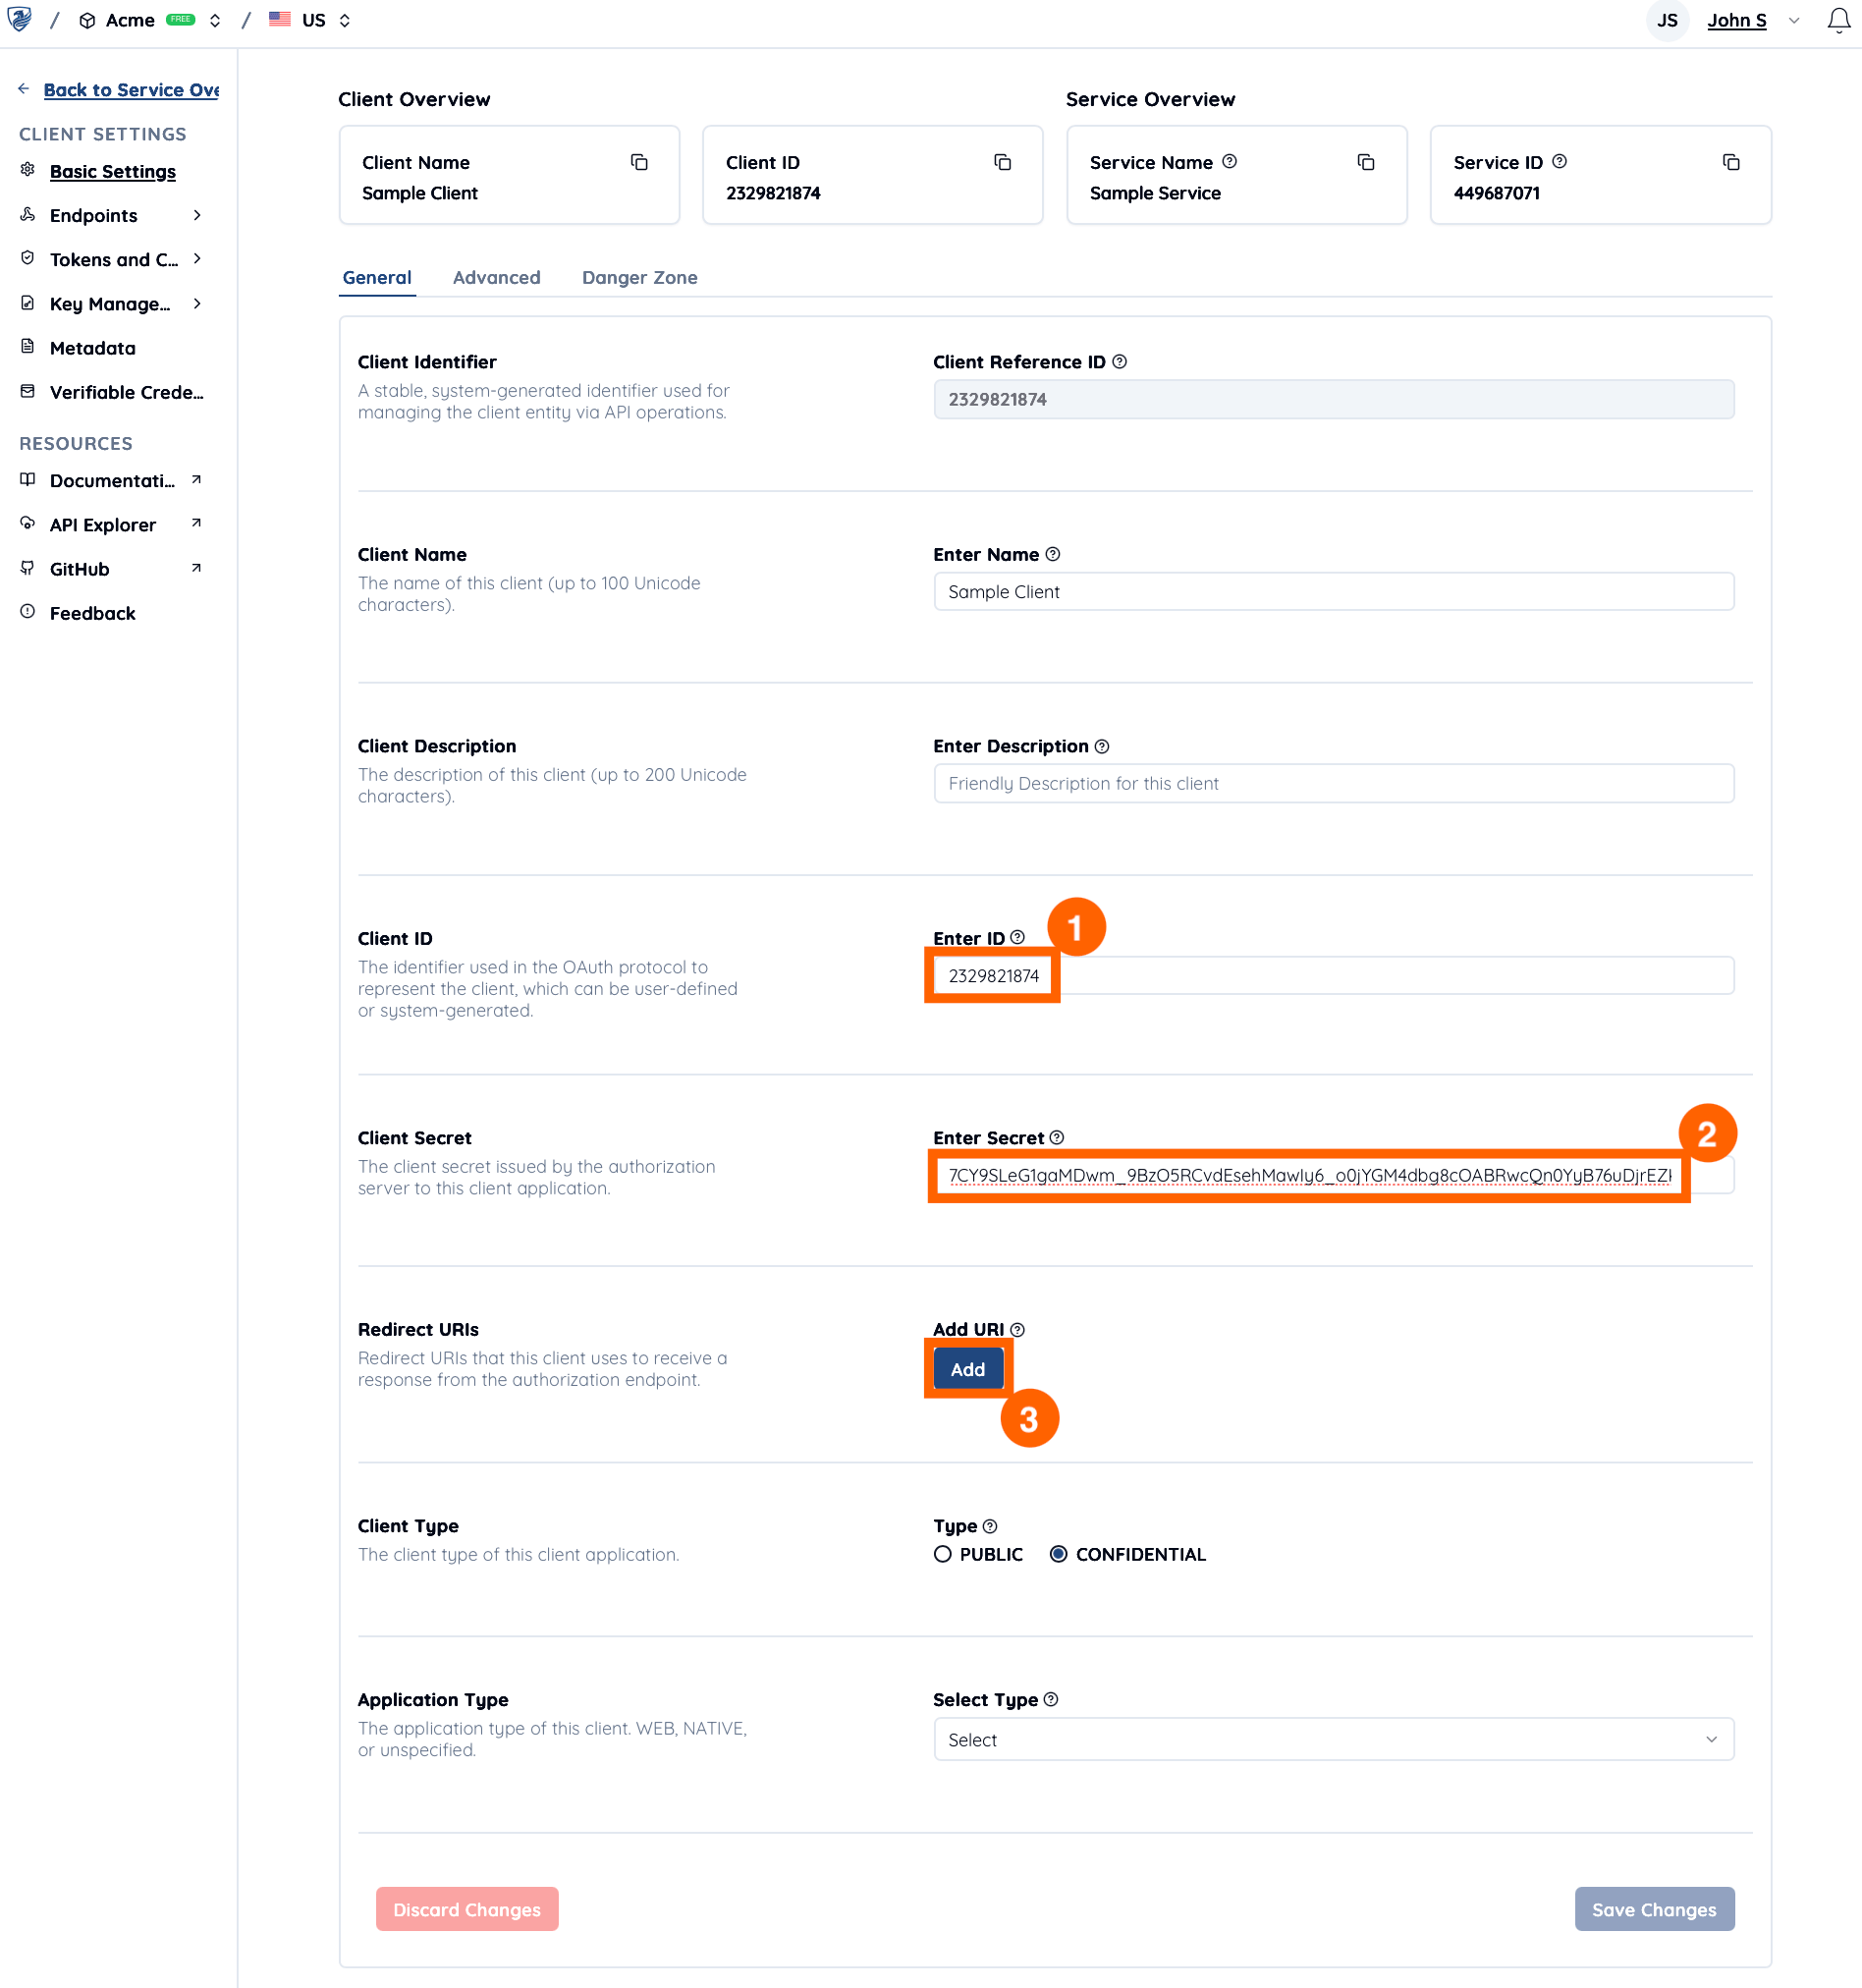 For example, enter `https://client.example.org/cb/example.com` and click **Save Changes**.
 ### Call "Process Authorization Request" API
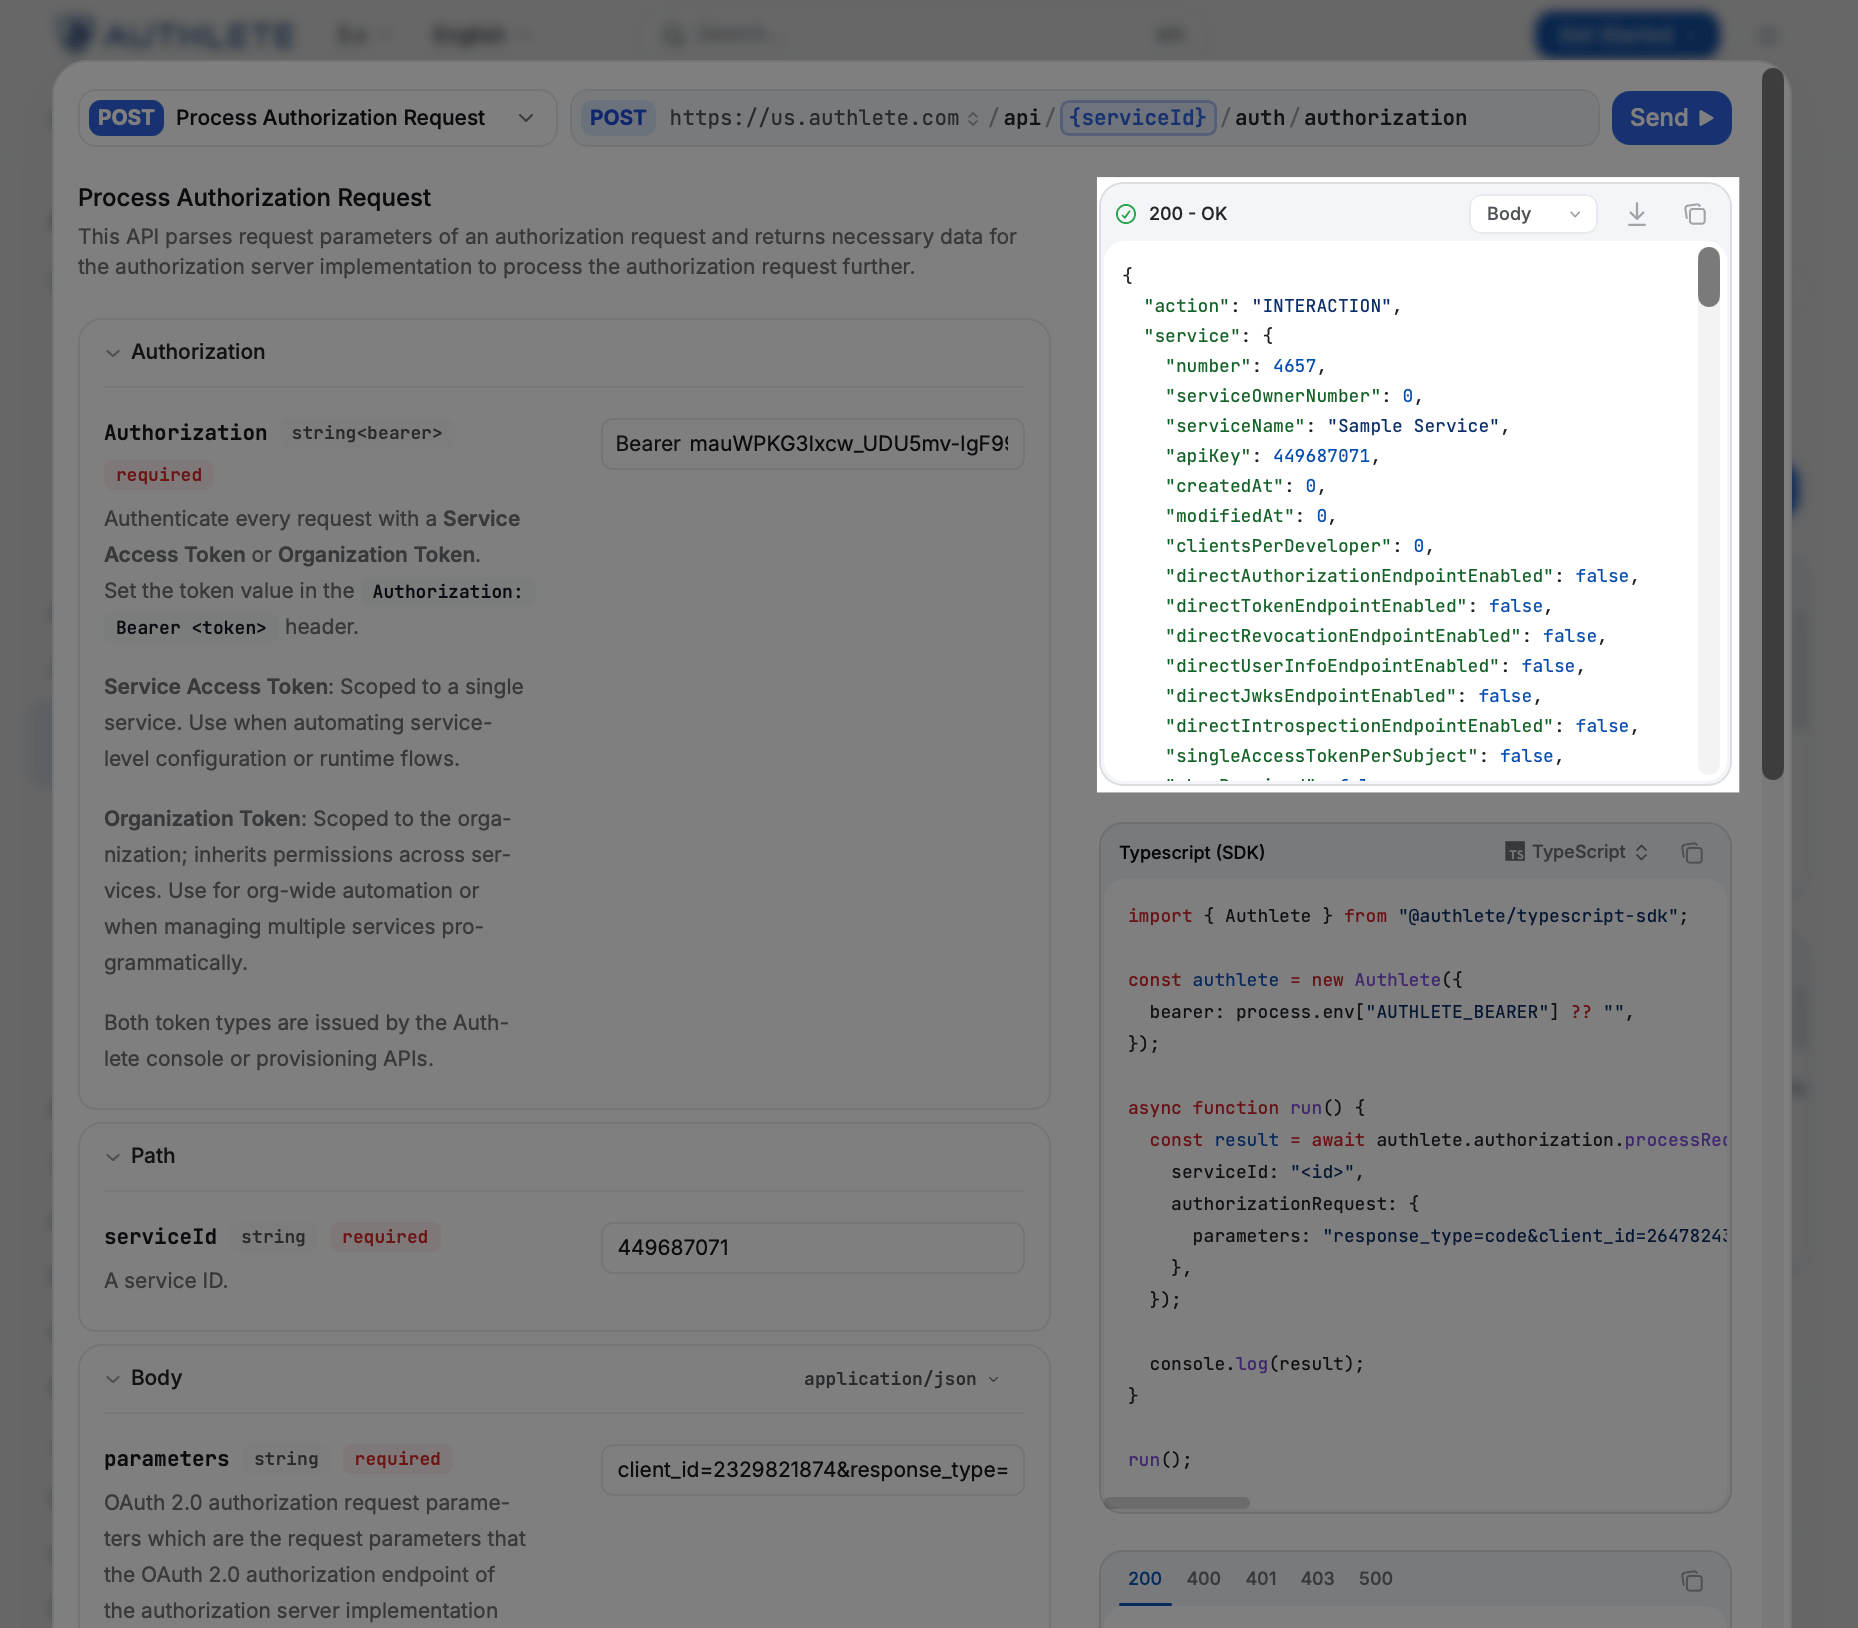
Navigate to the [Try /auth/authorization API](/api-reference/authorization-endpoint/process-authorization-request?playground=open) tool.
1. Choose the **API Cluster Hostname**.
2. Enter the **Service Access Token**.
3. Enter the **Service ID**.
4. Enter the authorization request content below into the **parameters** field. Please note that you must replace the example `client_id` value (`2329821874`) with the one you created in the previous step.
5. Click **Send**.
| Parameter | Value |
| :------------- | ------------------------------------------------------------------------------------------------ |
| **parameters** | `redirect_uri=https://client.example.org/cb/example.com&client_id=2329821874&response_type=code` |
### Call "Process Authorization Request" API
Navigate to the [Try /auth/authorization API](/api-reference/authorization-endpoint/process-authorization-request?playground=open) tool.
1. Choose the **API Cluster Hostname**.
2. Enter the **Service Access Token**.
3. Enter the **Service ID**.
4. Enter the authorization request content below into the **parameters** field. Please note that you must replace the example `client_id` value (`2329821874`) with the one you created in the previous step.
5. Click **Send**.
| Parameter | Value |
| :------------- | ------------------------------------------------------------------------------------------------ |
| **parameters** | `redirect_uri=https://client.example.org/cb/example.com&client_id=2329821874&response_type=code` |
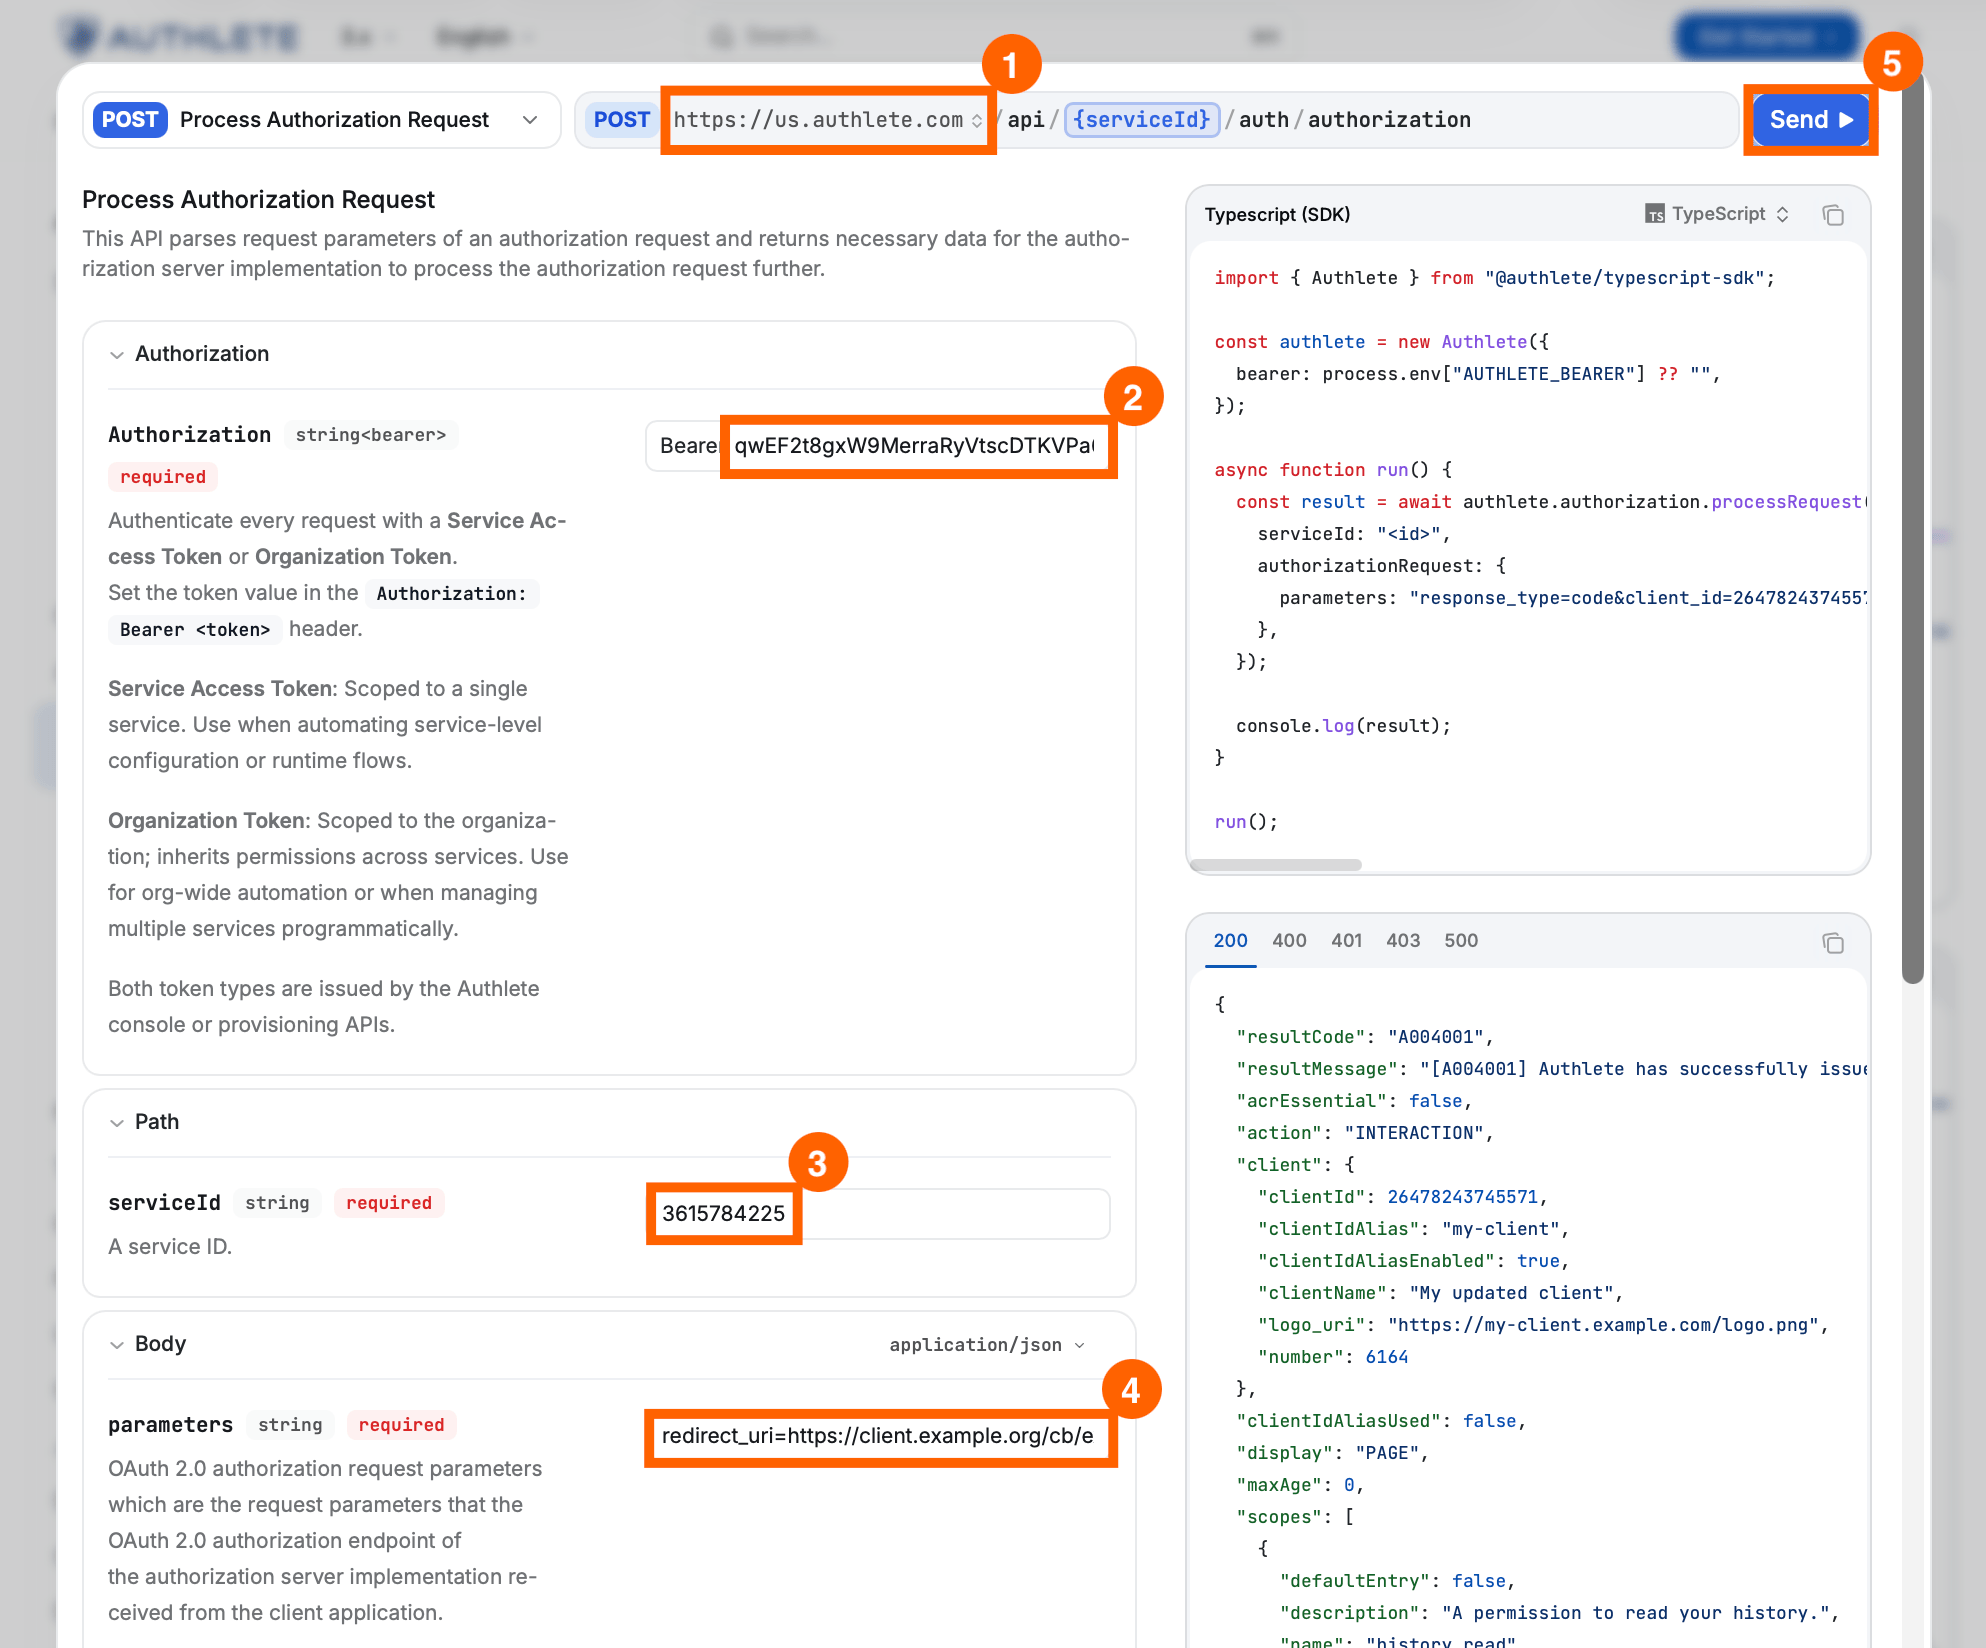 You will see the API response in the Response section.