> ## Documentation Index
> Fetch the complete documentation index at: https://developers.authlete.com/llms.txt
> Use this file to discover all available pages before exploring further.
# Financial-grade Amazon API Gateway
> A tutorial to explain how to protect APIs built on Amazon API Gateway more securely than ever before by utilizing certificate-bound access tokens (RFC 8705).
# Introduction
This tutorial shows how to protect APIs built on **[Amazon API Gateway][APIGW]** more securely than ever before by utilizing "**certificate-bound access tokens**".
Once a traditional OAuth access token is leaked, an attacker can access APIs with the access token. Traditional access tokens are like a train ticket which anyone can use once it is stolen.
The vulnerability can be mitigated by requiring the API caller to present not only an access token but also evidence that proves the API caller is the legitimate holder of the access token. The evidence is called "**proof of possession**", which is often shortened to **PoP**. Access tokens that need PoP on their use are like a plane ticket for international flight whose boarding procedure requires the passenger to present not only the ticket but also her passport.
**[RFC 8705][8705]**, **OAuth 2.0 Mutual-TLS Client Authentication and Certificate-Bound Access Tokens**, has standardized a PoP mechanism. The mechanism is called **MTLS** in the OAuth community, but I personally call it "**certificate binding**" to avoid confusion. Anyway, in short, the mechanism requires the API caller to present not only an access token but also the same **[X.509 certificate][X509]** as was used when the access token was issued from the token endpoint. The diagram below illustrates the concept of certificate binding.
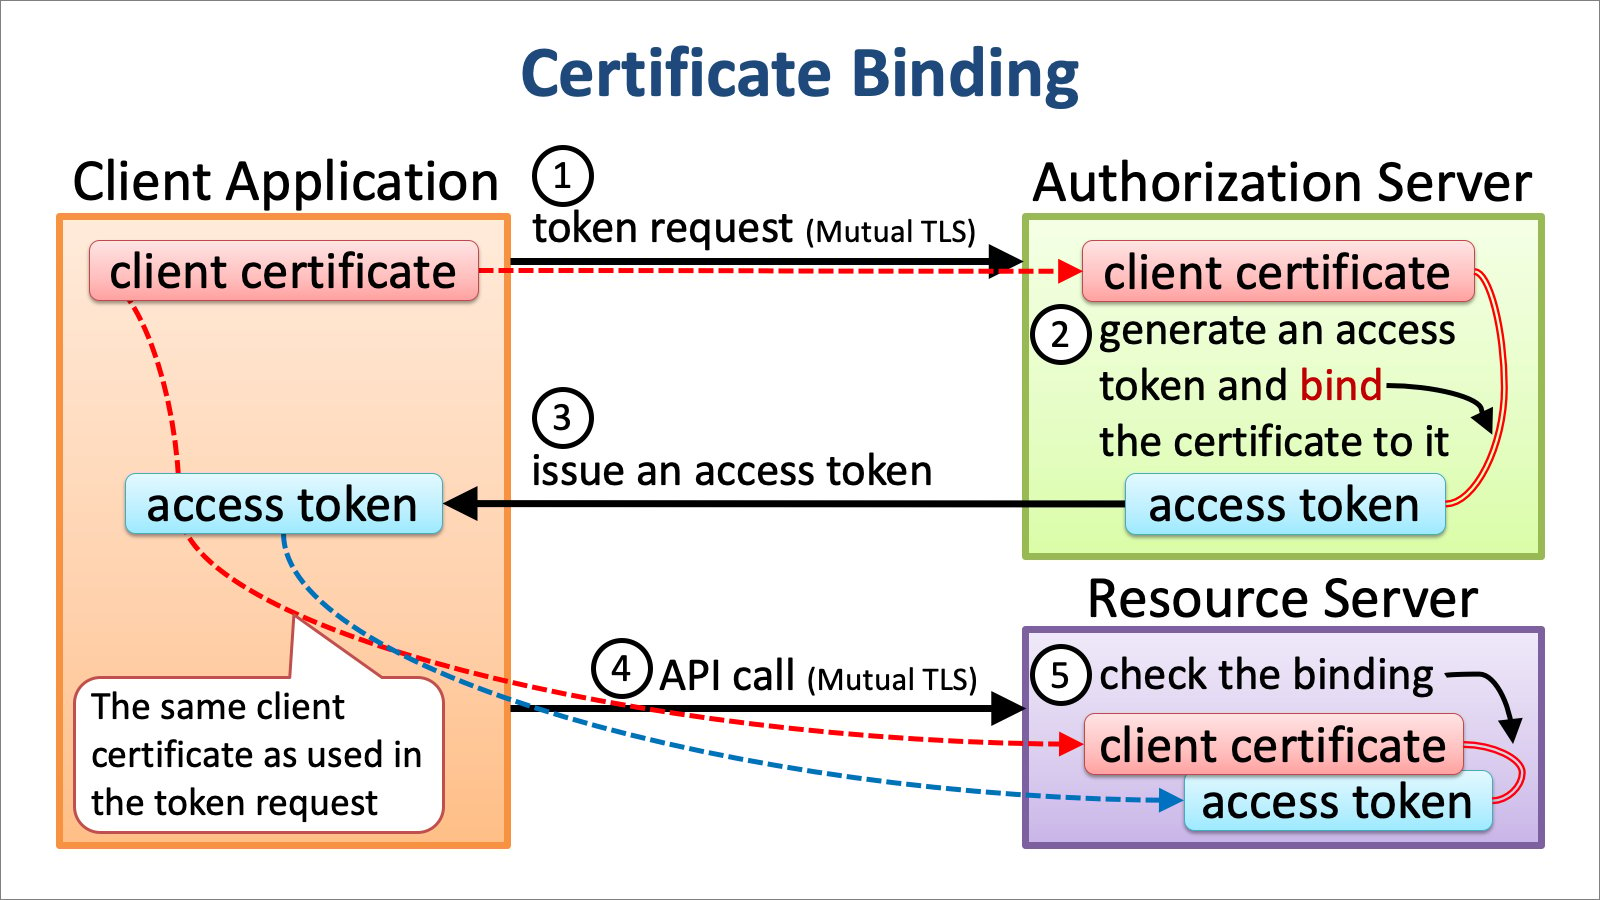 You may know **[Financial-grade API][FAPI]** (FAPI). It is a specification built on top of **OAuth 2.0** and **[OpenID Connect][OIDC]** for enhanced API security. [UK Open Banking][UKOB] has adopted FAPI as the base of Open Banking Profile and now other countries are following. The point I want you to pay attention to here is that FAPI requires certificate binding as a must technical component.
The major premise for cetificate binding is that connections between APIs and client applications are established by using **mutual TLS** where client applications are required to present their X.509 **client certificate** during TLS handshake. On September 17, 2020, AWS finally announced in *"[Introducing mutual TLS authentication for Amazon API Gateway][MTLSIntro]"* that Amazon API Gateway has become ready for mutual TLS. Amazon API Gateway has opened a door to Financial-grade API security.
# Authorizer's Role
Amazon API Gateway provides a mechanism called **[Lambda Authorizer][LAUTH]** whereby you can implement custom logic for API protection. A Lambda authorizer that offers OAuth-based API protection extracts an access token and a client certificate from an API call and performs the following validation.
1. the access token exists,
2. the access token has not expired,
3. the access token covers scopes required to access the resource,
4. the access token has not been revoked, and
5. the access token is bound to the client certificate. (**certificate binding**)
Then, the authorizer takes one of the following actions based on the result of the validation.
* return an IAM policy that allows the resource access.
* return an IAM policy that denies the resource access.
* throw an exception with an error message `'Unauthorized'` to tell Amazon API Gateway to reject the resource access with HTTP status code "401 Unauthorized".
* throw an exception with a different error message to tell Amazon API Gateway to reject the resource access with HTTP status code "500 Internal Server Error".
You may choose "format 2.0" for Lambda authorizer response where you may return a simpler response than IAM policy. See [Lambda authorizer response format](https://docs.aws.amazon.com/apigateway/latest/developerguide/http-api-lambda-authorizer.html#http-api-lambda-authorizer.payload-format-response) for details.
Is there any other way to tell Amazon API Gateway to respond with "401 Unauthorized" instead of throwing an exception? Let us know if you know. A Lambda authorizer should be able to specify a value for `WWW-Authenticate` HTTP header and make Amazon API Gateway use it in order to conform to
[RFC 6750](https://tools.ietf.org/html/rfc6750), The OAuth 2.0 Authorization Framework: Bearer Token Usage.
# Authorizer Implementation
The lambda authorizer implementation I'm going to show you soon delegates validation of access token to **Authlete**'s introspection API (`/api/auth/introspection`), so the authorizer implementation won't contain complex logic. The diagram below depicts the relationship among Amazon API Gateway, Lambda Authorizer and Authlete.
You may know **[Financial-grade API][FAPI]** (FAPI). It is a specification built on top of **OAuth 2.0** and **[OpenID Connect][OIDC]** for enhanced API security. [UK Open Banking][UKOB] has adopted FAPI as the base of Open Banking Profile and now other countries are following. The point I want you to pay attention to here is that FAPI requires certificate binding as a must technical component.
The major premise for cetificate binding is that connections between APIs and client applications are established by using **mutual TLS** where client applications are required to present their X.509 **client certificate** during TLS handshake. On September 17, 2020, AWS finally announced in *"[Introducing mutual TLS authentication for Amazon API Gateway][MTLSIntro]"* that Amazon API Gateway has become ready for mutual TLS. Amazon API Gateway has opened a door to Financial-grade API security.
# Authorizer's Role
Amazon API Gateway provides a mechanism called **[Lambda Authorizer][LAUTH]** whereby you can implement custom logic for API protection. A Lambda authorizer that offers OAuth-based API protection extracts an access token and a client certificate from an API call and performs the following validation.
1. the access token exists,
2. the access token has not expired,
3. the access token covers scopes required to access the resource,
4. the access token has not been revoked, and
5. the access token is bound to the client certificate. (**certificate binding**)
Then, the authorizer takes one of the following actions based on the result of the validation.
* return an IAM policy that allows the resource access.
* return an IAM policy that denies the resource access.
* throw an exception with an error message `'Unauthorized'` to tell Amazon API Gateway to reject the resource access with HTTP status code "401 Unauthorized".
* throw an exception with a different error message to tell Amazon API Gateway to reject the resource access with HTTP status code "500 Internal Server Error".
You may choose "format 2.0" for Lambda authorizer response where you may return a simpler response than IAM policy. See [Lambda authorizer response format](https://docs.aws.amazon.com/apigateway/latest/developerguide/http-api-lambda-authorizer.html#http-api-lambda-authorizer.payload-format-response) for details.
Is there any other way to tell Amazon API Gateway to respond with "401 Unauthorized" instead of throwing an exception? Let us know if you know. A Lambda authorizer should be able to specify a value for `WWW-Authenticate` HTTP header and make Amazon API Gateway use it in order to conform to
[RFC 6750](https://tools.ietf.org/html/rfc6750), The OAuth 2.0 Authorization Framework: Bearer Token Usage.
# Authorizer Implementation
The lambda authorizer implementation I'm going to show you soon delegates validation of access token to **Authlete**'s introspection API (`/api/auth/introspection`), so the authorizer implementation won't contain complex logic. The diagram below depicts the relationship among Amazon API Gateway, Lambda Authorizer and Authlete.
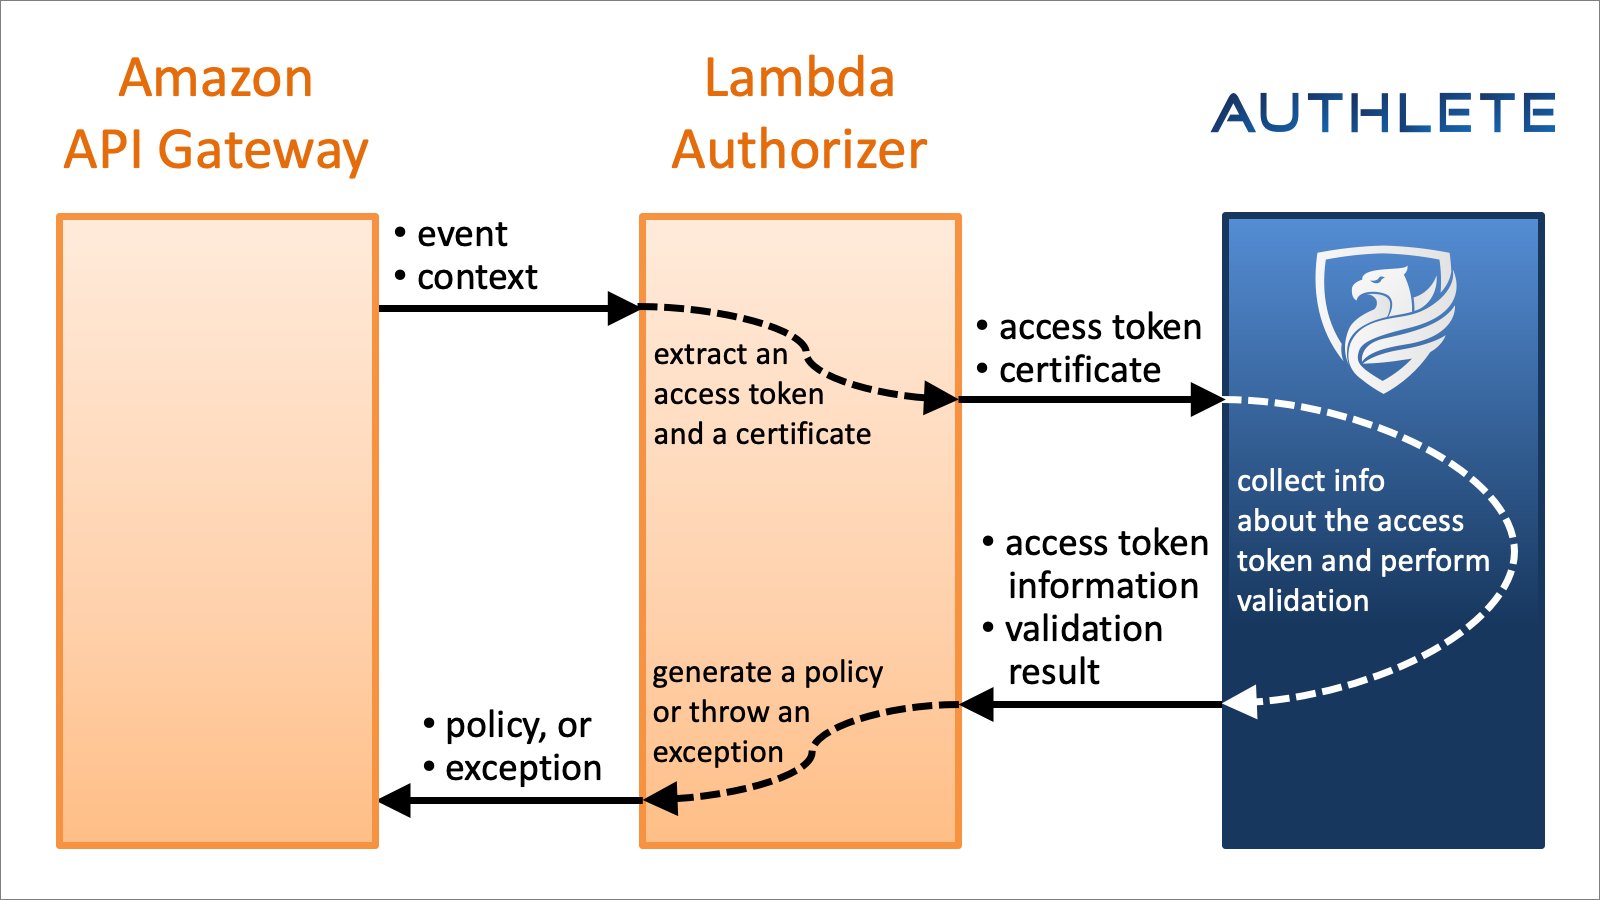 In addition, because [Authorizer][Authorizer] class in [Authlete's Python library][AuthletePython] does almost all the necessary stuff, implementations can be very small. Actually, the code below is a complete example of Lambda authorizer implementation that supports certificate binding.
```python theme={null}
from authlete.aws.apigateway.authorizer import Authorizer
authorizer = Authorizer()
def lambda_handler(event, context):
return authorizer.handle(event, context)
```
## Scopes Required For Resource Access
In real cases, however, you will need to configure which resource requires what scopes. This can be achieved by either (1) giving a function to `Authorizer`'s `handle()` method or (2) making a subclass of `Authorizer` and overriding `determine_scopes()` method in the subclass.
Both the function and the method take 4 arguments as listed in the table below and are required to return a list of scope names that are necessary to access the resource.
| Argument | Description |
| :-------- | :-------------------------------------- |
| `event` | The event given to the authorizer. |
| `context` | The context given to the authorizer. |
| `method` | The HTTP method of the resource access. |
| `path` | The path of the resource. |
Two examples below have the same effect stating that `time:query` scope is required to access `time` resource by HTTP `GET` method.
```python theme={null}
from authlete.aws.apigateway.authorizer import Authorizer
authorizer = Authorizer()
def determine_scopes(event, context, method, path):
if method == 'GET' and path == 'time':
return ['time:query']
return None
def lambda_handler(event, context):
return authorizer.handle(event, context, determine_scopes)
```
```python theme={null}
from authlete.aws.apigateway.authorizer import Authorizer
class CustomAuthorizer(Authorizer):
def determine_scopes(self, event, context, method, path):
if method == 'GET' and path == 'time':
return ['time:query']
return None
authorizer = CustomAuthorizer()
def lambda_handler(event, context):
return authorizer.handle(event, context)
```
## Policy Or Exception
To conform to specifications related to OAuth 2.0, a Lambda authorizer has to tell Amazon API Gateway to return "401 Unauthorized" to the API caller in some cases (e.g. when the presented access token has expired). According to AWS's technical documents and sample programs, the authorizer has to throw an exception with a message `'Unauthorized'` to achieve it. However, such simple exception drops all valuable information about the "Unauthorized" response and makes debugging very hard.
Therefore, by default, in other words, when `policy` property is `True` (default), `Authorizer`'s `handle()` method always returns an IAM policy which represents either "Allow" or "Deny" even in error cases where an exception with a message `'Unauthorized'` should be thrown.
If you want to make `Authorizer` throw an exception in "Unauthorized" and "Internal Server Error" cases, set `False` to `policy` property. You can achieve it by giving `policy=False` to `Authorizer`'s constructor.
```python theme={null}
authorizer = Authorizer(policy=False)
```
## Context In Policy
`Authorizer`'s `handle()` method returns a `dict` instance which represents an IAM policy. In the dictionary, there is `context` key whose value is a dictionary. `Authorizer` embeds some pieces of information there. The table below shows keys that `context` dictionary may contain.
| Property | Description |
| :------------------------ | :----------------------------------------------------------------------------------------------------------------------------- |
| `introspection_request` | JSON string that represents the request to Authlete's introspection API. |
| `introspection_response` | JSON string that represents the response from Authlete's introspection API. |
| `introspection_exception` | String that represents an exception raised during the call to Authlete's introspection API. |
| `scope` | String of a space-delimited list of scopes covered by the presented access token. |
| `client_id` | The client ID of the client application to which the access token was issued. |
| `sub` | String that represents the subject of the resource owner who permitted issuance of the access token to the client application. |
| `exp` | The expiration datetime of the access token in seconds since the Unix epoch (January 1, 1970). |
| `challenge` | The value for `WWW-Authenticate` HTTP header in error cases. |
| `action` | The value of `action` in the response from the Authlete's introspection API. |
| `resultMessage` | The value of `resultMessage` in the response from the Authlete's introspection API. |
You can add entries to `context` by overriding `update_policy_context()` method in a subclass of `Authorizer`. Be careful not to use JSON object and array as values in `context`. This is a technical restriction imposed by AWS.
```python theme={null}
class CustomAuthorizer(Authorizer):
def update_policy_context(self, event, context, request, response, exception, ctx):
ctx.update({
'my_key': 'my_value'
})
```
Entries in `context` in the policy returned from a Lambda authorizer can be used at other places later. See *"[Output from an Amazon API Gateway Lambda authorizer][LAUTHOUT]"* for details.
## Hooks
`Authorizer` class offers following hook methods for subclass implementations. Override them as necessary.
| Method | Description |
| :--------------------------- | :----------------------------------------------------------------- |
| `determine_scopes()` | determines scopes required for the resource access. |
| `update_policy_context()` | updates `context` that is to be embedded in the policy. |
| `on_enter()` | is called when `handle()` method starts. |
| `on_introspection_error()` | is called when the call to Authlete introspection API failed. |
| `on_introspection()` | is called after Authlete introspection API succeeded. |
| `on_allow()` | is called when an Allow policy is generated. |
| `on_deny()` | is called when a Deny policy is generated. |
| `on_unauthorized()` | is called when an exception for "Unauthorized" is thrown. |
| `on_internal_server_error()` | is called when an exception for "Internal Server Error" is thrown. |
# Authorizer Configuration
## Lambda Event Payload
The most important thing in creating a Lambda authorizer is to **choose "Request" for Lambda Event Payload**. Otherwise, the authorizer cannot access information about the client certificate. It means that the authorizer cannot check whether the access token is bound to the client certificate.
In addition, because [Authorizer][Authorizer] class in [Authlete's Python library][AuthletePython] does almost all the necessary stuff, implementations can be very small. Actually, the code below is a complete example of Lambda authorizer implementation that supports certificate binding.
```python theme={null}
from authlete.aws.apigateway.authorizer import Authorizer
authorizer = Authorizer()
def lambda_handler(event, context):
return authorizer.handle(event, context)
```
## Scopes Required For Resource Access
In real cases, however, you will need to configure which resource requires what scopes. This can be achieved by either (1) giving a function to `Authorizer`'s `handle()` method or (2) making a subclass of `Authorizer` and overriding `determine_scopes()` method in the subclass.
Both the function and the method take 4 arguments as listed in the table below and are required to return a list of scope names that are necessary to access the resource.
| Argument | Description |
| :-------- | :-------------------------------------- |
| `event` | The event given to the authorizer. |
| `context` | The context given to the authorizer. |
| `method` | The HTTP method of the resource access. |
| `path` | The path of the resource. |
Two examples below have the same effect stating that `time:query` scope is required to access `time` resource by HTTP `GET` method.
```python theme={null}
from authlete.aws.apigateway.authorizer import Authorizer
authorizer = Authorizer()
def determine_scopes(event, context, method, path):
if method == 'GET' and path == 'time':
return ['time:query']
return None
def lambda_handler(event, context):
return authorizer.handle(event, context, determine_scopes)
```
```python theme={null}
from authlete.aws.apigateway.authorizer import Authorizer
class CustomAuthorizer(Authorizer):
def determine_scopes(self, event, context, method, path):
if method == 'GET' and path == 'time':
return ['time:query']
return None
authorizer = CustomAuthorizer()
def lambda_handler(event, context):
return authorizer.handle(event, context)
```
## Policy Or Exception
To conform to specifications related to OAuth 2.0, a Lambda authorizer has to tell Amazon API Gateway to return "401 Unauthorized" to the API caller in some cases (e.g. when the presented access token has expired). According to AWS's technical documents and sample programs, the authorizer has to throw an exception with a message `'Unauthorized'` to achieve it. However, such simple exception drops all valuable information about the "Unauthorized" response and makes debugging very hard.
Therefore, by default, in other words, when `policy` property is `True` (default), `Authorizer`'s `handle()` method always returns an IAM policy which represents either "Allow" or "Deny" even in error cases where an exception with a message `'Unauthorized'` should be thrown.
If you want to make `Authorizer` throw an exception in "Unauthorized" and "Internal Server Error" cases, set `False` to `policy` property. You can achieve it by giving `policy=False` to `Authorizer`'s constructor.
```python theme={null}
authorizer = Authorizer(policy=False)
```
## Context In Policy
`Authorizer`'s `handle()` method returns a `dict` instance which represents an IAM policy. In the dictionary, there is `context` key whose value is a dictionary. `Authorizer` embeds some pieces of information there. The table below shows keys that `context` dictionary may contain.
| Property | Description |
| :------------------------ | :----------------------------------------------------------------------------------------------------------------------------- |
| `introspection_request` | JSON string that represents the request to Authlete's introspection API. |
| `introspection_response` | JSON string that represents the response from Authlete's introspection API. |
| `introspection_exception` | String that represents an exception raised during the call to Authlete's introspection API. |
| `scope` | String of a space-delimited list of scopes covered by the presented access token. |
| `client_id` | The client ID of the client application to which the access token was issued. |
| `sub` | String that represents the subject of the resource owner who permitted issuance of the access token to the client application. |
| `exp` | The expiration datetime of the access token in seconds since the Unix epoch (January 1, 1970). |
| `challenge` | The value for `WWW-Authenticate` HTTP header in error cases. |
| `action` | The value of `action` in the response from the Authlete's introspection API. |
| `resultMessage` | The value of `resultMessage` in the response from the Authlete's introspection API. |
You can add entries to `context` by overriding `update_policy_context()` method in a subclass of `Authorizer`. Be careful not to use JSON object and array as values in `context`. This is a technical restriction imposed by AWS.
```python theme={null}
class CustomAuthorizer(Authorizer):
def update_policy_context(self, event, context, request, response, exception, ctx):
ctx.update({
'my_key': 'my_value'
})
```
Entries in `context` in the policy returned from a Lambda authorizer can be used at other places later. See *"[Output from an Amazon API Gateway Lambda authorizer][LAUTHOUT]"* for details.
## Hooks
`Authorizer` class offers following hook methods for subclass implementations. Override them as necessary.
| Method | Description |
| :--------------------------- | :----------------------------------------------------------------- |
| `determine_scopes()` | determines scopes required for the resource access. |
| `update_policy_context()` | updates `context` that is to be embedded in the policy. |
| `on_enter()` | is called when `handle()` method starts. |
| `on_introspection_error()` | is called when the call to Authlete introspection API failed. |
| `on_introspection()` | is called after Authlete introspection API succeeded. |
| `on_allow()` | is called when an Allow policy is generated. |
| `on_deny()` | is called when a Deny policy is generated. |
| `on_unauthorized()` | is called when an exception for "Unauthorized" is thrown. |
| `on_internal_server_error()` | is called when an exception for "Internal Server Error" is thrown. |
# Authorizer Configuration
## Lambda Event Payload
The most important thing in creating a Lambda authorizer is to **choose "Request" for Lambda Event Payload**. Otherwise, the authorizer cannot access information about the client certificate. It means that the authorizer cannot check whether the access token is bound to the client certificate.
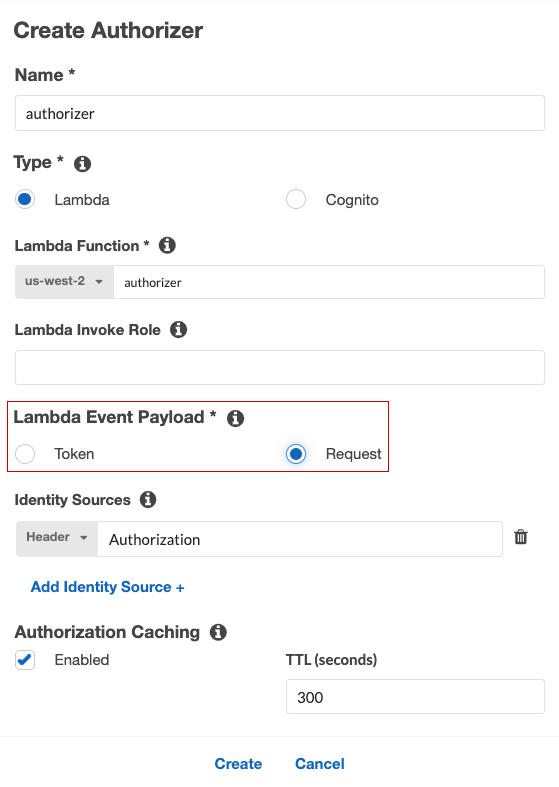 See *"[Input to an Amazon API Gateway Lambda authorizer][LAUTHIN]"* for details about how the choice of Lambda Event Payload type changes the input to the authorizer.
## Environment Variables
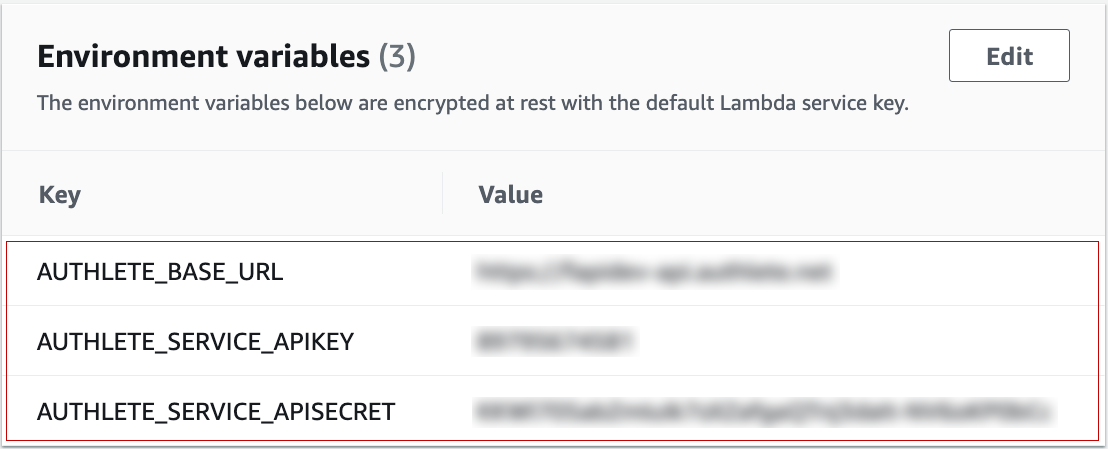
If an instance of [AuthleteApi][AuthleteApi] is not given, `Authorizer`'s constructor internally creates one by calling `AuthleteApiImpl(AuthleteEnvConfiguration())` and uses the instance to access Authlete APIs. Because [AuthleteEnvConfiguration][AuthleteEnvConfiguration] used there assumes that Authlete configuration is available via environment variables, the following environment variables need to be set to the Lambda function that is used as the implementation of your Lambda authorizer.
| Environment variable | Description |
| :--------------------------- | :--------------------------------------- |
| `AUTHLETE_BASE_URL` | The base URL of Authlete server. |
| `AUTHLETE_SERVICE_APIKEY` | The API key assigned to your service. |
| `AUTHLETE_SERVICE_APISECRET` | The API secret assigned to your service. |
See *"[Input to an Amazon API Gateway Lambda authorizer][LAUTHIN]"* for details about how the choice of Lambda Event Payload type changes the input to the authorizer.
## Environment Variables
If an instance of [AuthleteApi][AuthleteApi] is not given, `Authorizer`'s constructor internally creates one by calling `AuthleteApiImpl(AuthleteEnvConfiguration())` and uses the instance to access Authlete APIs. Because [AuthleteEnvConfiguration][AuthleteEnvConfiguration] used there assumes that Authlete configuration is available via environment variables, the following environment variables need to be set to the Lambda function that is used as the implementation of your Lambda authorizer.
| Environment variable | Description |
| :--------------------------- | :--------------------------------------- |
| `AUTHLETE_BASE_URL` | The base URL of Authlete server. |
| `AUTHLETE_SERVICE_APIKEY` | The API key assigned to your service. |
| `AUTHLETE_SERVICE_APISECRET` | The API secret assigned to your service. |
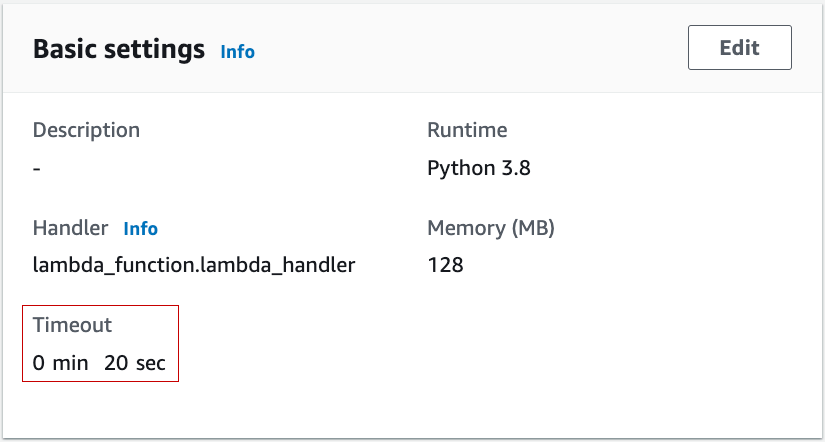
 ## Timeout
It is recommended to increase the timeout value of the Lambda function from the default value because the call to Authlete's introspection API may happen to take more time depending on various conditions.
## Timeout
It is recommended to increase the timeout value of the Lambda function from the default value because the call to Authlete's introspection API may happen to take more time depending on various conditions.
 # Authorizer Packaging
How to create and upload a ZIP package of Lambda function is explained at *"[Updating a function with additional dependencies][LPKG_DEP]"* in *"[AWS Lambda deployment package in Python][LPKG]"*.
Below is an example that creates and uploads a ZIP file of Lambda authorizer with the [authlete][AuthletePython] package.
```
~$ mkdir authorizer
~$ cd authorizer
~/authorizer$ vi lambda_function.py
~/authorizer$ pip install --target ./package authlete
~/authorizer$ (cd package; zip -r9 ../function.zip .)
~/authorizer$ zip -g function.zip lambda_function.py
~/authorizer$ aws lambda update-function-code --function-name authorizer --zip-file fileb://function.zip
```
# Testing
Testing may be the hardest part in this tutorial because there are many steps to set up the testing environment illustrated below.
# Authorizer Packaging
How to create and upload a ZIP package of Lambda function is explained at *"[Updating a function with additional dependencies][LPKG_DEP]"* in *"[AWS Lambda deployment package in Python][LPKG]"*.
Below is an example that creates and uploads a ZIP file of Lambda authorizer with the [authlete][AuthletePython] package.
```
~$ mkdir authorizer
~$ cd authorizer
~/authorizer$ vi lambda_function.py
~/authorizer$ pip install --target ./package authlete
~/authorizer$ (cd package; zip -r9 ../function.zip .)
~/authorizer$ zip -g function.zip lambda_function.py
~/authorizer$ aws lambda update-function-code --function-name authorizer --zip-file fileb://function.zip
```
# Testing
Testing may be the hardest part in this tutorial because there are many steps to set up the testing environment illustrated below.
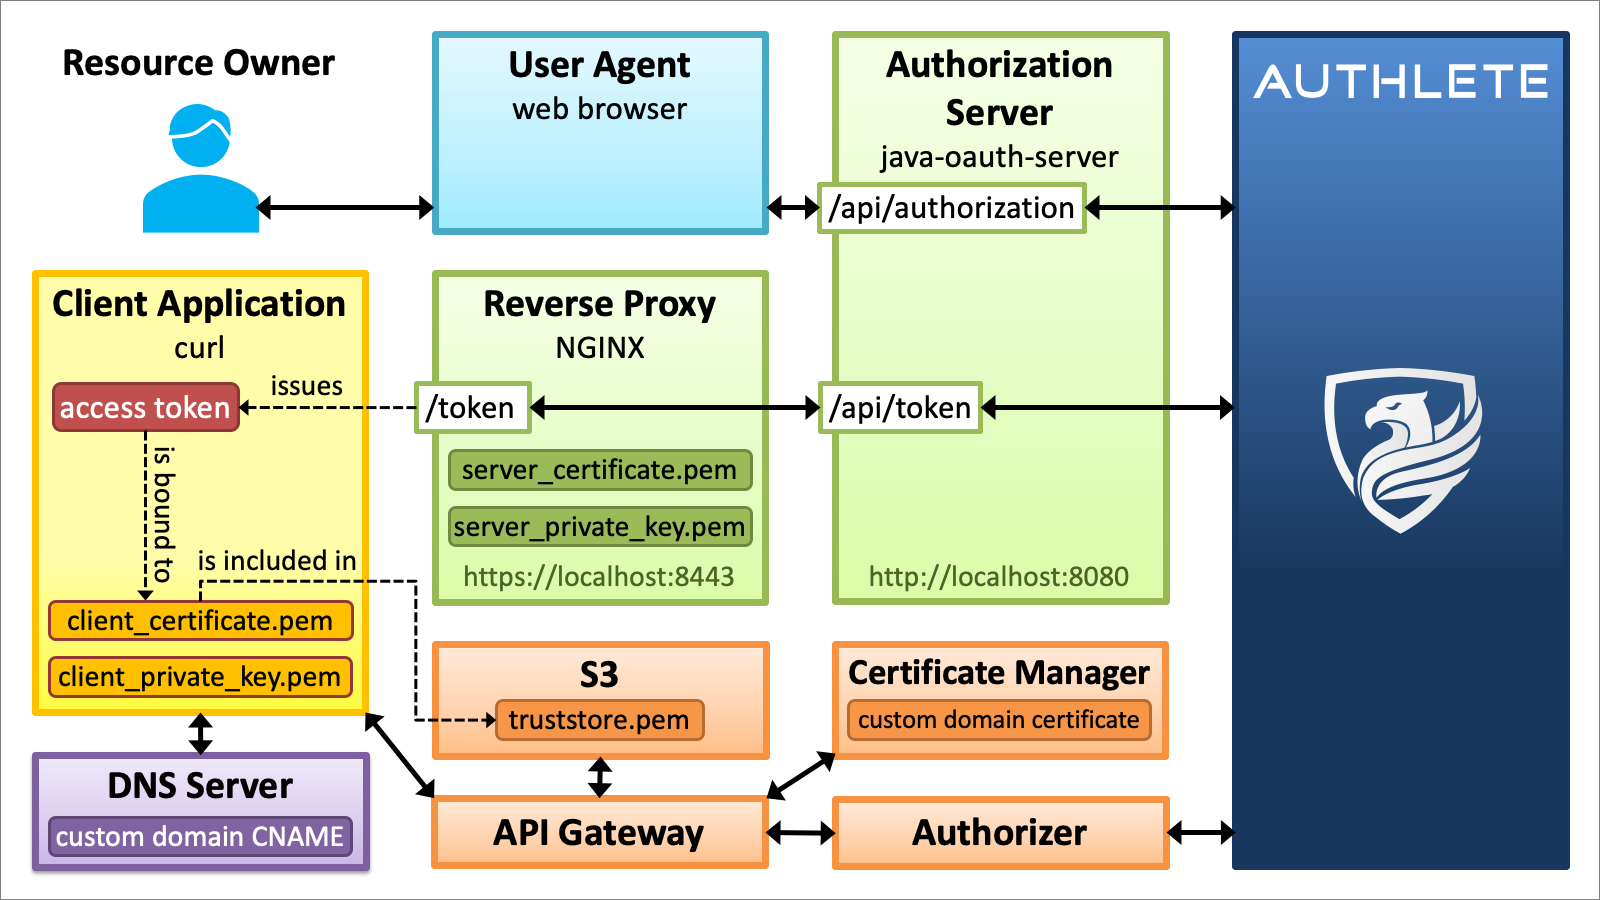 Let's take the following steps one by one together.
1. Prepare an **authorization server** that supports certificate binding.
2. Prepare a **server certificate** for the authorization server.
3. Set up a **reverse proxy** for mutual TLS at the token endpoint of the authorization server.
4. Prepare a **client application** that is configured for certificate binding.
5. Prepare a **client certificate** for the client application.
6. Set up a **custom domain** for Amazon API Gateway.
7. Get a **certificate-bound access token**.
8. **Access a resource** (make an API call).
## Authorization Server
Let's use [java-oauth-server][java-oauth-server] as an authorization server. It's a sample implementation of authorization server written in Java that uses Authlete as a backend service.
```
$ git clone https://github.com/authlete/java-oauth-server
$ cd java-oauth-server
$ vi authlete.properties
$ docker-compose up
```
Command lines above will start an authorization server (java-oauth-server) on your local machine at `http://localhost:8080`.
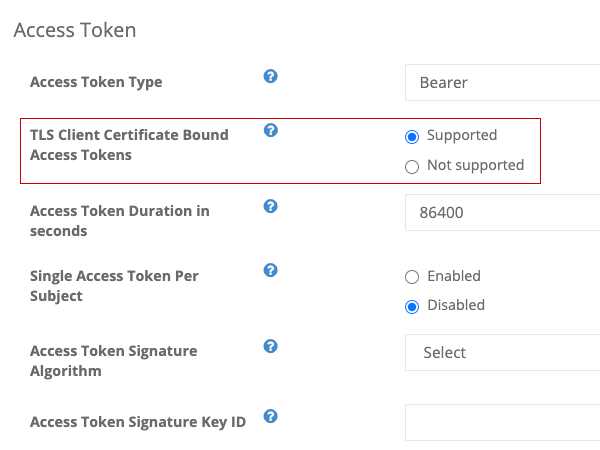
Then, login [Service Owner Console][SO] and configure the service corresponding to the authorization server so that it can support certificate binding.
Let's take the following steps one by one together.
1. Prepare an **authorization server** that supports certificate binding.
2. Prepare a **server certificate** for the authorization server.
3. Set up a **reverse proxy** for mutual TLS at the token endpoint of the authorization server.
4. Prepare a **client application** that is configured for certificate binding.
5. Prepare a **client certificate** for the client application.
6. Set up a **custom domain** for Amazon API Gateway.
7. Get a **certificate-bound access token**.
8. **Access a resource** (make an API call).
## Authorization Server
Let's use [java-oauth-server][java-oauth-server] as an authorization server. It's a sample implementation of authorization server written in Java that uses Authlete as a backend service.
```
$ git clone https://github.com/authlete/java-oauth-server
$ cd java-oauth-server
$ vi authlete.properties
$ docker-compose up
```
Command lines above will start an authorization server (java-oauth-server) on your local machine at `http://localhost:8080`.
Then, login [Service Owner Console][SO] and configure the service corresponding to the authorization server so that it can support certificate binding.
 ## Server Certificate
Create a private key and then a self-signed certificate for the authorization server.
```
$ openssl genpkey -algorithm EC -pkeyopt ec_paramgen_curve:P-256 > server_private_key.pem
$ openssl req -x509 -key server_private_key.pem -subj /CN=localhost > server_certificate.pem
```
Note that `openssl` command used in this tutorial is OpenSSL's. Because `openssl` command installed on macOS is LibraSSL's since High Sierra, you have to install OpenSSL's `openssl` to try command lines in this tutorial as they are.
```
$ /usr/bin/openssl version -a
LibreSSL 2.6.5
......
$ brew install openssl
$ /usr/local/opt/openssl/bin/openssl version -a
OpenSSL 1.1.1g 21 Apr 2020
......
```
## Reverse Proxy
Because java-oauth-server itself does not protect its endpoints by TLS, a reverse proxy needs to be placed in front of java-oauth-server to accept TLS connections. Below is an example of configuration file that sets up [Nginx][NGINX] as a reverse proxy.
```nginx theme={null}
events {}
http {
server {
# Accept TLS connections at port 8443.
listen 8443 ssl;
# Server certificate in PEM format
ssl_certificate /path/to/server_certificate.pem;
# Servicer private key in PEM format
ssl_certificate_key /path/to/server_private_key.pem;
# Enable mutual TLS. 'optional_no_ca' requests a client certificate but
# does not require it to be signed by a trusted CA certificate. This is
# enough for this tutorial. See the document of ngx_http_ssl_module for
# details: http://nginx.org/en/docs/http/ngx_http_ssl_module.html
ssl_verify_client optional_no_ca;
# Pass the client certificate in the mutual TLS connection to the proxied
# server (java-oauth-server) as the value of 'X-Ssl-Cert' HTTP header.
# The proxied server has to be able to recognize the HTTP header, and
# java-oauth-server does recognize it. To be exact, authlete-java-jaxrs
# library used by java-oauth-server recognizes it.
proxy_set_header X-Ssl-Cert $ssl_client_escaped_cert;
# Pass requests that Nginx receives at 'https://localhost:8443/token' to
# 'http://localhost:8080/api/token' ('/api/token' of java-oauth-server).
# Note that TLS is terminated here.
location = /token {
proxy_pass http://localhost:8080/api/token;
}
}
}
```
This configuration makes Nginx run at `https://localhost:8443` and forward requests to `/token` to `http://localhost:8080/api/token`.
If the name of the configuration file is `nginx.conf`, Nginx can be started by typing the command below.
```
$ nginx -c $PWD/nginx.conf
```
When you want to stop Nginx, type this:
```
$ nginx -s stop
```
## Client Application
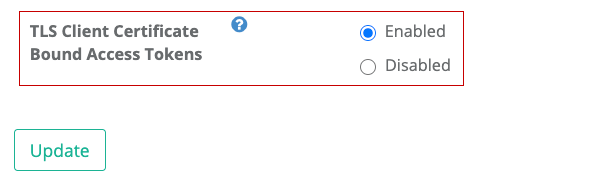
Login [Developer Console][DC] and change the configuration of a client application you are going to use for testing to enable certificate binding.
## Server Certificate
Create a private key and then a self-signed certificate for the authorization server.
```
$ openssl genpkey -algorithm EC -pkeyopt ec_paramgen_curve:P-256 > server_private_key.pem
$ openssl req -x509 -key server_private_key.pem -subj /CN=localhost > server_certificate.pem
```
Note that `openssl` command used in this tutorial is OpenSSL's. Because `openssl` command installed on macOS is LibraSSL's since High Sierra, you have to install OpenSSL's `openssl` to try command lines in this tutorial as they are.
```
$ /usr/bin/openssl version -a
LibreSSL 2.6.5
......
$ brew install openssl
$ /usr/local/opt/openssl/bin/openssl version -a
OpenSSL 1.1.1g 21 Apr 2020
......
```
## Reverse Proxy
Because java-oauth-server itself does not protect its endpoints by TLS, a reverse proxy needs to be placed in front of java-oauth-server to accept TLS connections. Below is an example of configuration file that sets up [Nginx][NGINX] as a reverse proxy.
```nginx theme={null}
events {}
http {
server {
# Accept TLS connections at port 8443.
listen 8443 ssl;
# Server certificate in PEM format
ssl_certificate /path/to/server_certificate.pem;
# Servicer private key in PEM format
ssl_certificate_key /path/to/server_private_key.pem;
# Enable mutual TLS. 'optional_no_ca' requests a client certificate but
# does not require it to be signed by a trusted CA certificate. This is
# enough for this tutorial. See the document of ngx_http_ssl_module for
# details: http://nginx.org/en/docs/http/ngx_http_ssl_module.html
ssl_verify_client optional_no_ca;
# Pass the client certificate in the mutual TLS connection to the proxied
# server (java-oauth-server) as the value of 'X-Ssl-Cert' HTTP header.
# The proxied server has to be able to recognize the HTTP header, and
# java-oauth-server does recognize it. To be exact, authlete-java-jaxrs
# library used by java-oauth-server recognizes it.
proxy_set_header X-Ssl-Cert $ssl_client_escaped_cert;
# Pass requests that Nginx receives at 'https://localhost:8443/token' to
# 'http://localhost:8080/api/token' ('/api/token' of java-oauth-server).
# Note that TLS is terminated here.
location = /token {
proxy_pass http://localhost:8080/api/token;
}
}
}
```
This configuration makes Nginx run at `https://localhost:8443` and forward requests to `/token` to `http://localhost:8080/api/token`.
If the name of the configuration file is `nginx.conf`, Nginx can be started by typing the command below.
```
$ nginx -c $PWD/nginx.conf
```
When you want to stop Nginx, type this:
```
$ nginx -s stop
```
## Client Application
Login [Developer Console][DC] and change the configuration of a client application you are going to use for testing to enable certificate binding.
 ## Client Certificate
Create a private key and then a self-signed certificate for the client application.
```
$ openssl genpkey -algorithm EC -pkeyopt ec_paramgen_curve:P-256 > client_private_key.pem
$ openssl req -x509 -key client_private_key.pem -subj /CN=client.example.com > client_certificate.pem
```
Create one more pair of private key and certificate to use for testing later. Make sure to specify a different value for the common name (for `/CN=`) because the custom domain configuration of Amazon API Gateway, which we'll cover in the next section, rejects a truststore file that contains certificates having the same subject.
```
$ openssl genpkey -algorithm EC -pkeyopt ec_paramgen_curve:P-256 > client_private_key_2.pem
$ openssl req -x509 -key client_private_key_2.pem -subj /CN=client2.example.com > client_certificate_2.pem
```
## Custom Domain
To enable mutual TLS on Amazon API Gateway, at the time of this writing, you have to assign a **custom domain** (e.g. `api.example.com`) to your API.
The Web console of Amazon API Gateway provides "Custom domain names" menu. To set up a custom domain there smoothly, it is better to prepare the following items beforehand.
1. **Server certificate** for the custom domain
2. **Truststore**, a file containing trusted client certificates in PEM format
### Server Certificate For Custom Domain
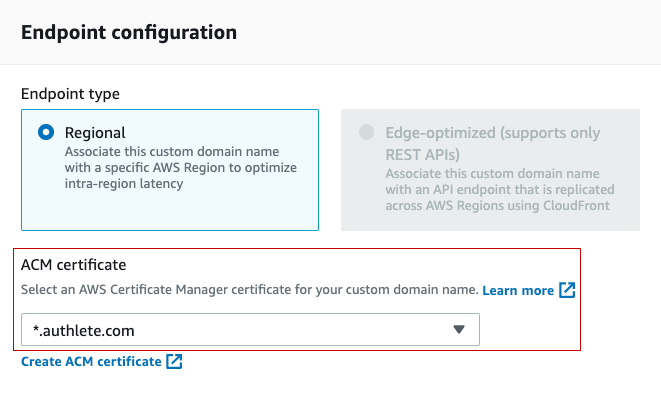
A server certificate for a custom domain for Amazon API Gateway must be under management of **[AWS Certificate Manager][ACM]** (ACM). You can import existing certificates or create new ones at [ACM console][ACMConsole]. However, imported certificates cannot be used for custom domains for Amazon API Gateway when mutual TLS is enabled. So, create a new one there.
### Truststore
When you setup mutual TLS, you will be asked to input the location of a file that contains trusted client certificates. The file is called "**truststore**". The implementation of Amazon API Gateway mutual TLS checks whether the client certificate presented during the TLS handshake is included in the truststore. If it is not included, Amazon API Gateway rejects the connection without invoking a Lambda authorizer.
Truststore is a text file listing client certificates in PEM format like below.
```PEM theme={null}
-----BEGIN CERTIFICATE-----
-----END CERTIFICATE-----
-----BEGIN CERTIFICATE-----
-----END CERTIFICATE-----
-----BEGIN CERTIFICATE-----
-----END CERTIFICATE-----
...
```
See *"[Illustrated X.509 Certificate](https://medium.com/@darutk/illustrated-x-509-certificate-84aece2c5c2e)"* for details about the PEM format.
A truststore for this tutorial can be created by typing the commands below.
```
$ cat client_certificate.pem > truststore.pem
$ cat client_certificate_2.pem >> truststore.pem
```
The truststore needs to be uploaded to **[S3][S3]** so that Amazon API Gateway can refer to it.
```
$ aws s3 cp truststore.pem s3://{your-s3-bucket}
```
Steps above are described in *"[Configuring mutual TLS authentication for a REST API][MTLSConfig]"*. See the document for details.
### Custom Domain Setup
Now you are ready to register a custom domain to Amazon API Gateway.
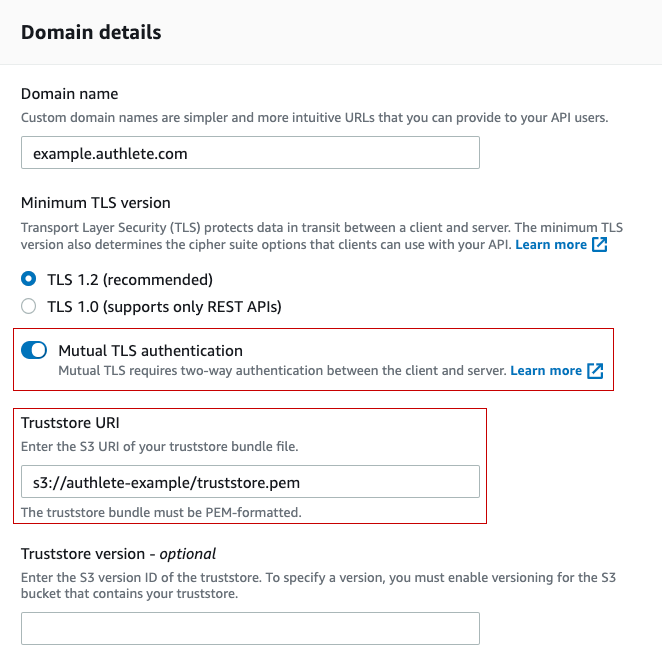
Enable **Mutual TLS authentication** in "Domain details" box, and a field for Truststore URI will appear. Input the S3 URI of your truststore into the field.
## Client Certificate
Create a private key and then a self-signed certificate for the client application.
```
$ openssl genpkey -algorithm EC -pkeyopt ec_paramgen_curve:P-256 > client_private_key.pem
$ openssl req -x509 -key client_private_key.pem -subj /CN=client.example.com > client_certificate.pem
```
Create one more pair of private key and certificate to use for testing later. Make sure to specify a different value for the common name (for `/CN=`) because the custom domain configuration of Amazon API Gateway, which we'll cover in the next section, rejects a truststore file that contains certificates having the same subject.
```
$ openssl genpkey -algorithm EC -pkeyopt ec_paramgen_curve:P-256 > client_private_key_2.pem
$ openssl req -x509 -key client_private_key_2.pem -subj /CN=client2.example.com > client_certificate_2.pem
```
## Custom Domain
To enable mutual TLS on Amazon API Gateway, at the time of this writing, you have to assign a **custom domain** (e.g. `api.example.com`) to your API.
The Web console of Amazon API Gateway provides "Custom domain names" menu. To set up a custom domain there smoothly, it is better to prepare the following items beforehand.
1. **Server certificate** for the custom domain
2. **Truststore**, a file containing trusted client certificates in PEM format
### Server Certificate For Custom Domain
A server certificate for a custom domain for Amazon API Gateway must be under management of **[AWS Certificate Manager][ACM]** (ACM). You can import existing certificates or create new ones at [ACM console][ACMConsole]. However, imported certificates cannot be used for custom domains for Amazon API Gateway when mutual TLS is enabled. So, create a new one there.
### Truststore
When you setup mutual TLS, you will be asked to input the location of a file that contains trusted client certificates. The file is called "**truststore**". The implementation of Amazon API Gateway mutual TLS checks whether the client certificate presented during the TLS handshake is included in the truststore. If it is not included, Amazon API Gateway rejects the connection without invoking a Lambda authorizer.
Truststore is a text file listing client certificates in PEM format like below.
```PEM theme={null}
-----BEGIN CERTIFICATE-----
-----END CERTIFICATE-----
-----BEGIN CERTIFICATE-----
-----END CERTIFICATE-----
-----BEGIN CERTIFICATE-----
-----END CERTIFICATE-----
...
```
See *"[Illustrated X.509 Certificate](https://medium.com/@darutk/illustrated-x-509-certificate-84aece2c5c2e)"* for details about the PEM format.
A truststore for this tutorial can be created by typing the commands below.
```
$ cat client_certificate.pem > truststore.pem
$ cat client_certificate_2.pem >> truststore.pem
```
The truststore needs to be uploaded to **[S3][S3]** so that Amazon API Gateway can refer to it.
```
$ aws s3 cp truststore.pem s3://{your-s3-bucket}
```
Steps above are described in *"[Configuring mutual TLS authentication for a REST API][MTLSConfig]"*. See the document for details.
### Custom Domain Setup
Now you are ready to register a custom domain to Amazon API Gateway.
Enable **Mutual TLS authentication** in "Domain details" box, and a field for Truststore URI will appear. Input the S3 URI of your truststore into the field.
 Then, select the server certificate for the custom domain in "Endpoint configuration" box.
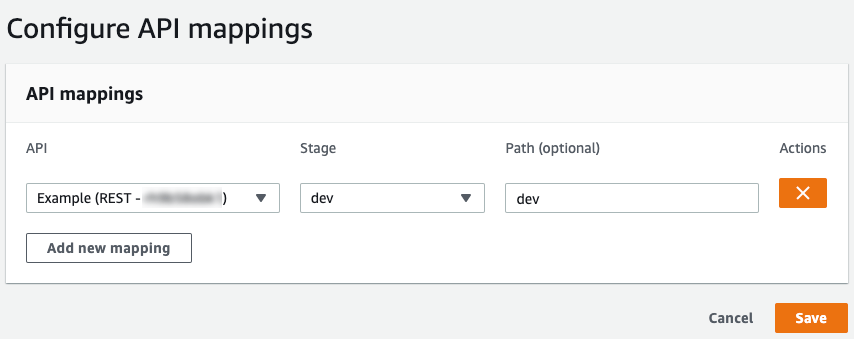
 After registering a custom domain, you can configure how to map "API" & "Stage" to "Path" under the custom domain. In the screenshot below, "Example" API's `dev` stage is mapped to the custom domain's path `dev`.
 ### Routing
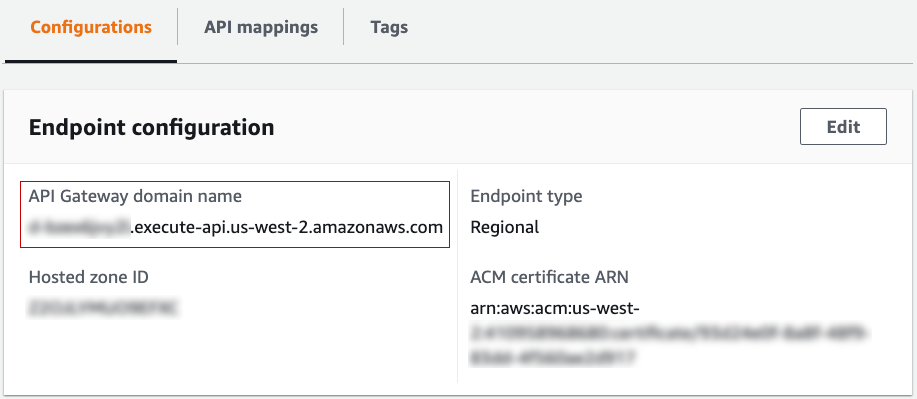
The final step for custom domain configuration is to add a CNAME record to your DNS server so that the custom domain can be routed to "API Gateway domain name".
### Routing
The final step for custom domain configuration is to add a CNAME record to your DNS server so that the custom domain can be routed to "API Gateway domain name".
 ## Certificate-Bound Access Token
We have done all preparation. Let's get a **certificate-bound access token** by the **[authorization code flow][6749_41]**.
### Authorization Request
In the authorization code flow, the first step is to send an **authorization request** to the **[authorization endpoint][6749_31]** of the authorization server via a web browser. In this tutorial, the authorization endpoint is `http://localhost:8080/api/authorization` hosted on java-oauth-server. Replace `${CLIENT_ID}` in the URL below that represents an authorization request with the actual client ID of your client application and then access the URL with your web browser.
```
http://localhost:8080/api/authorization?response_type=code&client_id=${CLIENT_ID}&scope=profile+email&state=123
```
Your web browser will display an **authorization page** generated by the authorization server. It will look like below.
## Certificate-Bound Access Token
We have done all preparation. Let's get a **certificate-bound access token** by the **[authorization code flow][6749_41]**.
### Authorization Request
In the authorization code flow, the first step is to send an **authorization request** to the **[authorization endpoint][6749_31]** of the authorization server via a web browser. In this tutorial, the authorization endpoint is `http://localhost:8080/api/authorization` hosted on java-oauth-server. Replace `${CLIENT_ID}` in the URL below that represents an authorization request with the actual client ID of your client application and then access the URL with your web browser.
```
http://localhost:8080/api/authorization?response_type=code&client_id=${CLIENT_ID}&scope=profile+email&state=123
```
Your web browser will display an **authorization page** generated by the authorization server. It will look like below.
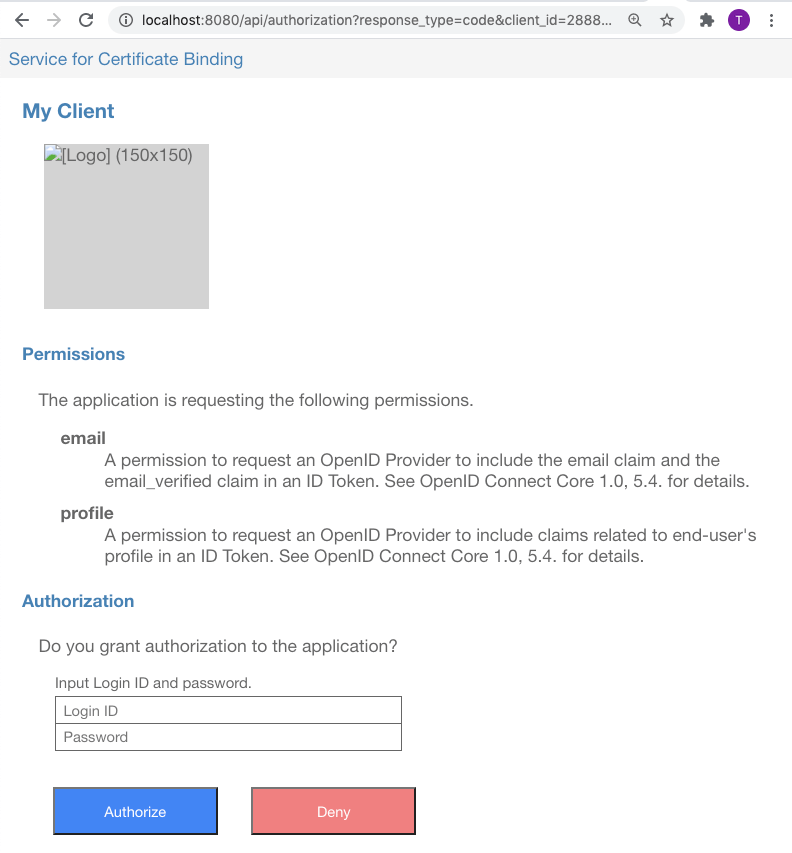 The page has input fields for Login ID and Password. Input `john` and `john` there and press "Authorize" button, and your web browser will be redirected to the redirection endpoint of your client application.
`john` and `john` are values hard-coded in the dummy database in java-oauth-server.
Append `&prompt=login` at the end of the authorization request to show the input fields again when you revisit the authorization endpoint. Regarding the `prompt` parameter, see "[3.1.2.1. Authentication Request](https://openid.net/specs/openid-connect-core-1_0.html#AuthRequest)" in "[OpenID Connect Core 1.0](https://openid.net/specs/openid-connect-core-1_0.html)".
If you have not changed **redirect URI** of your client application from the default value, the URL of the redirection endpoint is `https://{authlete-server}/api/mock/redirection/{service-api-key}`.
The URL of the redirection endpoint which you can see in the address bar of your browser contains `code` response parameter like below.
```
https://{authlete-server}/api/mock/redirection/{service-api-key}?state=123&code=RwRq2Lp0bJVMiLPKAFz4qB1hxieBD1X5HKuv8EPkJeM
```
The value of `code` response parameter is the **authorization code** which has been issued from the authorization server to your client application. The authorization code is needed when your client application makes a token request.
### Token Request
After getting an authorization code, the client application sends a **token request** to the **[token endpoint][6749_32]** of the authorization server. In this tutorial, the token endpoint is `https://localhost:8443/token` hosted on Nginx.
A token request can be made by `curl` command in a shell terminal. Below is an example of token request. Don't forget to replace `$CLIENT_ID` and `$CODE` with the actual client ID and the actual authorization code before typing.
```
$ curl -k --key client_private_key.pem --cert client_certificate.pem https://localhost:8443/token -d grant_type=authorization_code -d client_id=$CLIENT_ID -d code=$CODE
```
| Argument | Description |
| :--------------------------------- | :------------------------------------------------------------------------------------------------------------------------ |
| `-k` | not verify the server certificate. Because this tutorial uses a self-signed server certificate, this option is necessary. |
| `--key client_private_key.pem` | specifies the private key of the client. |
| `--cert client_certificate.pem` | specifies the certificate of the client. |
| `https://localhost:8443/token` | The URL of the token endpoint. |
| `-d grant_type=authorization_code` | indicates that the flow is the authorization code flow. |
| `-d client_id=$CLIENT_ID` | specifies the client ID. Replace `$CLIENT_ID` with the actual client ID of your client application. |
| `-d code=$CODE` | specifies the authorization code. Replace `$CODE` with the actual authorization code. |
The point here is that it is necessary to pass the client's private key and certificate to `curl` command by using `--key` option and `--cert` option because the token endpoint requires mutual TLS (i.e. requires a client certificate during TLS handshake). **The access token being issued from the token endpoint will be bound to the client certificate used in the token request.**
When a token request succeeds, the token endpoint returns JSON that includes `access_token` property like below.
```json theme={null}
{
"access_token": "b5qgqkXpzObRyceBqKeGPDCT9NX9GGXSt_oSYBSj7GQ",
"refresh_token": "1iSpvpeznTzwdUJzwRbt-abqE4znWn_yhN5PbBKV9zw",
"scope": "email profile",
"token_type": "Bearer",
"expires_in": 86400
}
```
The value of the `access_token` property is the issued access token. The client application uses the access token when it makes API calls.
## Resource Access (API Call)
At last, we have become ready to access resources (APIs) on Amazon API Gateway which are protected by certificate-bound access tokens.
First, access a resource with the access token and the right client certificate. Replace `${ACCESS_TOKEN}`, `${CUSTOM_DOMAIN}` and `${RESOURCE}` in the example below with actual values of yours. If all things have been set up correctly, you can get the resource successfully without being blocked.
```
$ curl --key client_private_key.pem --cert client_certificate.pem -H "Authorization: Bearer ${ACCESS_TOKEN}" https://${CUSTOM_DOMAIN}/${RESOURCE}
```
Next, access the resource with the same access token and a wrong client certificate (`client_certificate_2.pem` in this tutorial).
```
$ curl --key client_private_key_2.pem --cert client_certificate_2.pem -H "Authorization: Bearer ${ACCESS_TOKEN}" https://${CUSTOM_DOMAIN}/${RESOURCE}
```
You will receive the following error response.
```json theme={null}
{"Message":"User is not authorized to access this resource with an explicit deny"}
```
This inidicates that Amazon API Gateway rejected the resource access. The most important point here is that **the resource access was rejected although the access token was a legitimate one and it was because the client certificate presented together was not the legitimate one bound to the access token**. This is certificate binding.
# Congratulations!
You've completed this tutorial and now can protect your APIs on Amazon API Gateway more securely than ever before utilizing certificate binding ([RFC 8705][8705])!
**[Contact us][CONTACT]** if you need support. You are always welcome!
[6749_31]: https://tools.ietf.org/html/rfc6749#section-3.1
[6749_32]: https://tools.ietf.org/html/rfc6749#section-3.2
[6749_41]: https://tools.ietf.org/html/rfc6749#section-4.1
[8705]: https://www.rfc-editor.org/rfc/rfc8705.html
[ACM]: https://aws.amazon.com/certificate-manager/
[ACMConsole]: https://console.aws.amazon.com/acm/home
[APIGW]: https://aws.amazon.com/api-gateway/
[AuthleteApi]: https://github.com/authlete/authlete-python/blob/master/authlete/api/authlete_api.py
[AuthleteEnvConfiguration]: https://github.com/authlete/authlete-python/blob/master/authlete/conf/authlete_env_configuration.py
[AuthletePython]: https://github.com/authlete/authlete-python
[Authorizer]: https://github.com/authlete/authlete-python/blob/master/authlete/aws/apigateway/authorizer.py
[CONTACT]: https://www.authlete.com/contact/
[DC]: https://www.authlete.com/developers/cd_console/
[FAPI]: https://openid.net/wg/fapi/
[java-oauth-server]: https://github.com/authlete/java-oauth-server
[LAUTH]: https://docs.aws.amazon.com/apigateway/latest/developerguide/apigateway-use-lambda-authorizer.html
[LAUTHIN]: https://docs.aws.amazon.com/apigateway/latest/developerguide/api-gateway-lambda-authorizer-input.html
[LAUTHOUT]: https://docs.aws.amazon.com/apigateway/latest/developerguide/api-gateway-lambda-authorizer-output.html
[LPKG]: https://docs.aws.amazon.com/lambda/latest/dg/python-package.html
[LPKG_DEP]: https://docs.aws.amazon.com/lambda/latest/dg/python-package.html#python-package-dependencies
[MTLSConfig]: https://docs.aws.amazon.com/apigateway/latest/developerguide/rest-api-mutual-tls.html
[MTLSIntro]: https://aws.amazon.com/blogs/compute/introducing-mutual-tls-authentication-for-amazon-api-gateway/
[NGINX]: https://nginx.org/
[OIDC]: https://openid.net/connect/
[S3]: https://aws.amazon.com/s3/
[SO]: https://www.authlete.com/developers/so_console/
[UKOB]: https://www.openbanking.org.uk/
[X509]: https://medium.com/@darutk/illustrated-x-509-certificate-84aece2c5c2e
The page has input fields for Login ID and Password. Input `john` and `john` there and press "Authorize" button, and your web browser will be redirected to the redirection endpoint of your client application.
`john` and `john` are values hard-coded in the dummy database in java-oauth-server.
Append `&prompt=login` at the end of the authorization request to show the input fields again when you revisit the authorization endpoint. Regarding the `prompt` parameter, see "[3.1.2.1. Authentication Request](https://openid.net/specs/openid-connect-core-1_0.html#AuthRequest)" in "[OpenID Connect Core 1.0](https://openid.net/specs/openid-connect-core-1_0.html)".
If you have not changed **redirect URI** of your client application from the default value, the URL of the redirection endpoint is `https://{authlete-server}/api/mock/redirection/{service-api-key}`.
The URL of the redirection endpoint which you can see in the address bar of your browser contains `code` response parameter like below.
```
https://{authlete-server}/api/mock/redirection/{service-api-key}?state=123&code=RwRq2Lp0bJVMiLPKAFz4qB1hxieBD1X5HKuv8EPkJeM
```
The value of `code` response parameter is the **authorization code** which has been issued from the authorization server to your client application. The authorization code is needed when your client application makes a token request.
### Token Request
After getting an authorization code, the client application sends a **token request** to the **[token endpoint][6749_32]** of the authorization server. In this tutorial, the token endpoint is `https://localhost:8443/token` hosted on Nginx.
A token request can be made by `curl` command in a shell terminal. Below is an example of token request. Don't forget to replace `$CLIENT_ID` and `$CODE` with the actual client ID and the actual authorization code before typing.
```
$ curl -k --key client_private_key.pem --cert client_certificate.pem https://localhost:8443/token -d grant_type=authorization_code -d client_id=$CLIENT_ID -d code=$CODE
```
| Argument | Description |
| :--------------------------------- | :------------------------------------------------------------------------------------------------------------------------ |
| `-k` | not verify the server certificate. Because this tutorial uses a self-signed server certificate, this option is necessary. |
| `--key client_private_key.pem` | specifies the private key of the client. |
| `--cert client_certificate.pem` | specifies the certificate of the client. |
| `https://localhost:8443/token` | The URL of the token endpoint. |
| `-d grant_type=authorization_code` | indicates that the flow is the authorization code flow. |
| `-d client_id=$CLIENT_ID` | specifies the client ID. Replace `$CLIENT_ID` with the actual client ID of your client application. |
| `-d code=$CODE` | specifies the authorization code. Replace `$CODE` with the actual authorization code. |
The point here is that it is necessary to pass the client's private key and certificate to `curl` command by using `--key` option and `--cert` option because the token endpoint requires mutual TLS (i.e. requires a client certificate during TLS handshake). **The access token being issued from the token endpoint will be bound to the client certificate used in the token request.**
When a token request succeeds, the token endpoint returns JSON that includes `access_token` property like below.
```json theme={null}
{
"access_token": "b5qgqkXpzObRyceBqKeGPDCT9NX9GGXSt_oSYBSj7GQ",
"refresh_token": "1iSpvpeznTzwdUJzwRbt-abqE4znWn_yhN5PbBKV9zw",
"scope": "email profile",
"token_type": "Bearer",
"expires_in": 86400
}
```
The value of the `access_token` property is the issued access token. The client application uses the access token when it makes API calls.
## Resource Access (API Call)
At last, we have become ready to access resources (APIs) on Amazon API Gateway which are protected by certificate-bound access tokens.
First, access a resource with the access token and the right client certificate. Replace `${ACCESS_TOKEN}`, `${CUSTOM_DOMAIN}` and `${RESOURCE}` in the example below with actual values of yours. If all things have been set up correctly, you can get the resource successfully without being blocked.
```
$ curl --key client_private_key.pem --cert client_certificate.pem -H "Authorization: Bearer ${ACCESS_TOKEN}" https://${CUSTOM_DOMAIN}/${RESOURCE}
```
Next, access the resource with the same access token and a wrong client certificate (`client_certificate_2.pem` in this tutorial).
```
$ curl --key client_private_key_2.pem --cert client_certificate_2.pem -H "Authorization: Bearer ${ACCESS_TOKEN}" https://${CUSTOM_DOMAIN}/${RESOURCE}
```
You will receive the following error response.
```json theme={null}
{"Message":"User is not authorized to access this resource with an explicit deny"}
```
This inidicates that Amazon API Gateway rejected the resource access. The most important point here is that **the resource access was rejected although the access token was a legitimate one and it was because the client certificate presented together was not the legitimate one bound to the access token**. This is certificate binding.
# Congratulations!
You've completed this tutorial and now can protect your APIs on Amazon API Gateway more securely than ever before utilizing certificate binding ([RFC 8705][8705])!
**[Contact us][CONTACT]** if you need support. You are always welcome!
[6749_31]: https://tools.ietf.org/html/rfc6749#section-3.1
[6749_32]: https://tools.ietf.org/html/rfc6749#section-3.2
[6749_41]: https://tools.ietf.org/html/rfc6749#section-4.1
[8705]: https://www.rfc-editor.org/rfc/rfc8705.html
[ACM]: https://aws.amazon.com/certificate-manager/
[ACMConsole]: https://console.aws.amazon.com/acm/home
[APIGW]: https://aws.amazon.com/api-gateway/
[AuthleteApi]: https://github.com/authlete/authlete-python/blob/master/authlete/api/authlete_api.py
[AuthleteEnvConfiguration]: https://github.com/authlete/authlete-python/blob/master/authlete/conf/authlete_env_configuration.py
[AuthletePython]: https://github.com/authlete/authlete-python
[Authorizer]: https://github.com/authlete/authlete-python/blob/master/authlete/aws/apigateway/authorizer.py
[CONTACT]: https://www.authlete.com/contact/
[DC]: https://www.authlete.com/developers/cd_console/
[FAPI]: https://openid.net/wg/fapi/
[java-oauth-server]: https://github.com/authlete/java-oauth-server
[LAUTH]: https://docs.aws.amazon.com/apigateway/latest/developerguide/apigateway-use-lambda-authorizer.html
[LAUTHIN]: https://docs.aws.amazon.com/apigateway/latest/developerguide/api-gateway-lambda-authorizer-input.html
[LAUTHOUT]: https://docs.aws.amazon.com/apigateway/latest/developerguide/api-gateway-lambda-authorizer-output.html
[LPKG]: https://docs.aws.amazon.com/lambda/latest/dg/python-package.html
[LPKG_DEP]: https://docs.aws.amazon.com/lambda/latest/dg/python-package.html#python-package-dependencies
[MTLSConfig]: https://docs.aws.amazon.com/apigateway/latest/developerguide/rest-api-mutual-tls.html
[MTLSIntro]: https://aws.amazon.com/blogs/compute/introducing-mutual-tls-authentication-for-amazon-api-gateway/
[NGINX]: https://nginx.org/
[OIDC]: https://openid.net/connect/
[S3]: https://aws.amazon.com/s3/
[SO]: https://www.authlete.com/developers/so_console/
[UKOB]: https://www.openbanking.org.uk/
[X509]: https://medium.com/@darutk/illustrated-x-509-certificate-84aece2c5c2e