> ## Documentation Index
> Fetch the complete documentation index at: https://developers.authlete.com/llms.txt
> Use this file to discover all available pages before exploring further.
# Amazon Cognito and Latest OAuth/OIDC Specifications
> A tutorial that explains how to use Amazon Cognito just as a user database and delegate OAuth/OIDC-related tasks to Authlete so that your system can continue to use Cognito and at the same time support the latest OAuth/OIDC specifications such as Financial-grade API.
# Introduction
*"**[Amazon Cognito][COGNITO]** user pools implements ID, access, and refresh tokens as defined by the OpenID Connect (OIDC) open standard"* --- excerpted from "[Using Tokens with UserPools][COGNITO_USING_TOKENS]"
However, because the OIDC implementation of Cognito is very limited and inflexible, it is common that Cognito's OIDC implementation cannot satisfy requirements of your system. For example, the signature algorithm of ID tokens issued by Cognito is `RS256` and there is no way to change it although the algorithm is prohibited by **[Financial-grade API][FAPI]** (**FAPI**) for security reasons.
This tutorial explains how to use Cognito just as a user database and delegate OAuth/OIDC-related tasks to **Authlete** so that your system can continue to use Cognito and at the same time support the latest OAuth/OIDC specifications such as Financial-grade API (cf. [Authlete Spec Sheet][SPEC_SHEET]).
# Architecture
In the OAuth 2.0 context, a server that issues **access token**s (and optionally **refresh token**s) is called **authorization server**. On the other hand, in the OpenID Connect context, a server that issues **ID token**s is called **OpenID Provider** (**IdP**). Because OIDC has been defined intentionally on top of OAuth 2.0, it is common that one server has both the roles. Therefore, the same server may be differently called "authorization server" or "IdP" depending on contexts. This tutorial refers to the server as "authorization server" uniformly.
To support the **authorization code flow** ([RFC 6749 Section 4.1][6749_41]), which is the most common flow in OAuth/OIDC, an authorization server has to implement two endpoints. They are called **authorization endpoint** ([RFC 6749 Section 3.1][6749_31]) and **token endpoint** ([RFC 6749 Section 3.2][6749_32]). Cognito User Pool provides implementations of the two endpoints, but you need to implement your own custom endpoints when Cognito's OIDC implementation is not satisfactory.
The diagram below illustrates the relationship among components in the authorization code flow when Cognito and Authlete are used combinedly.
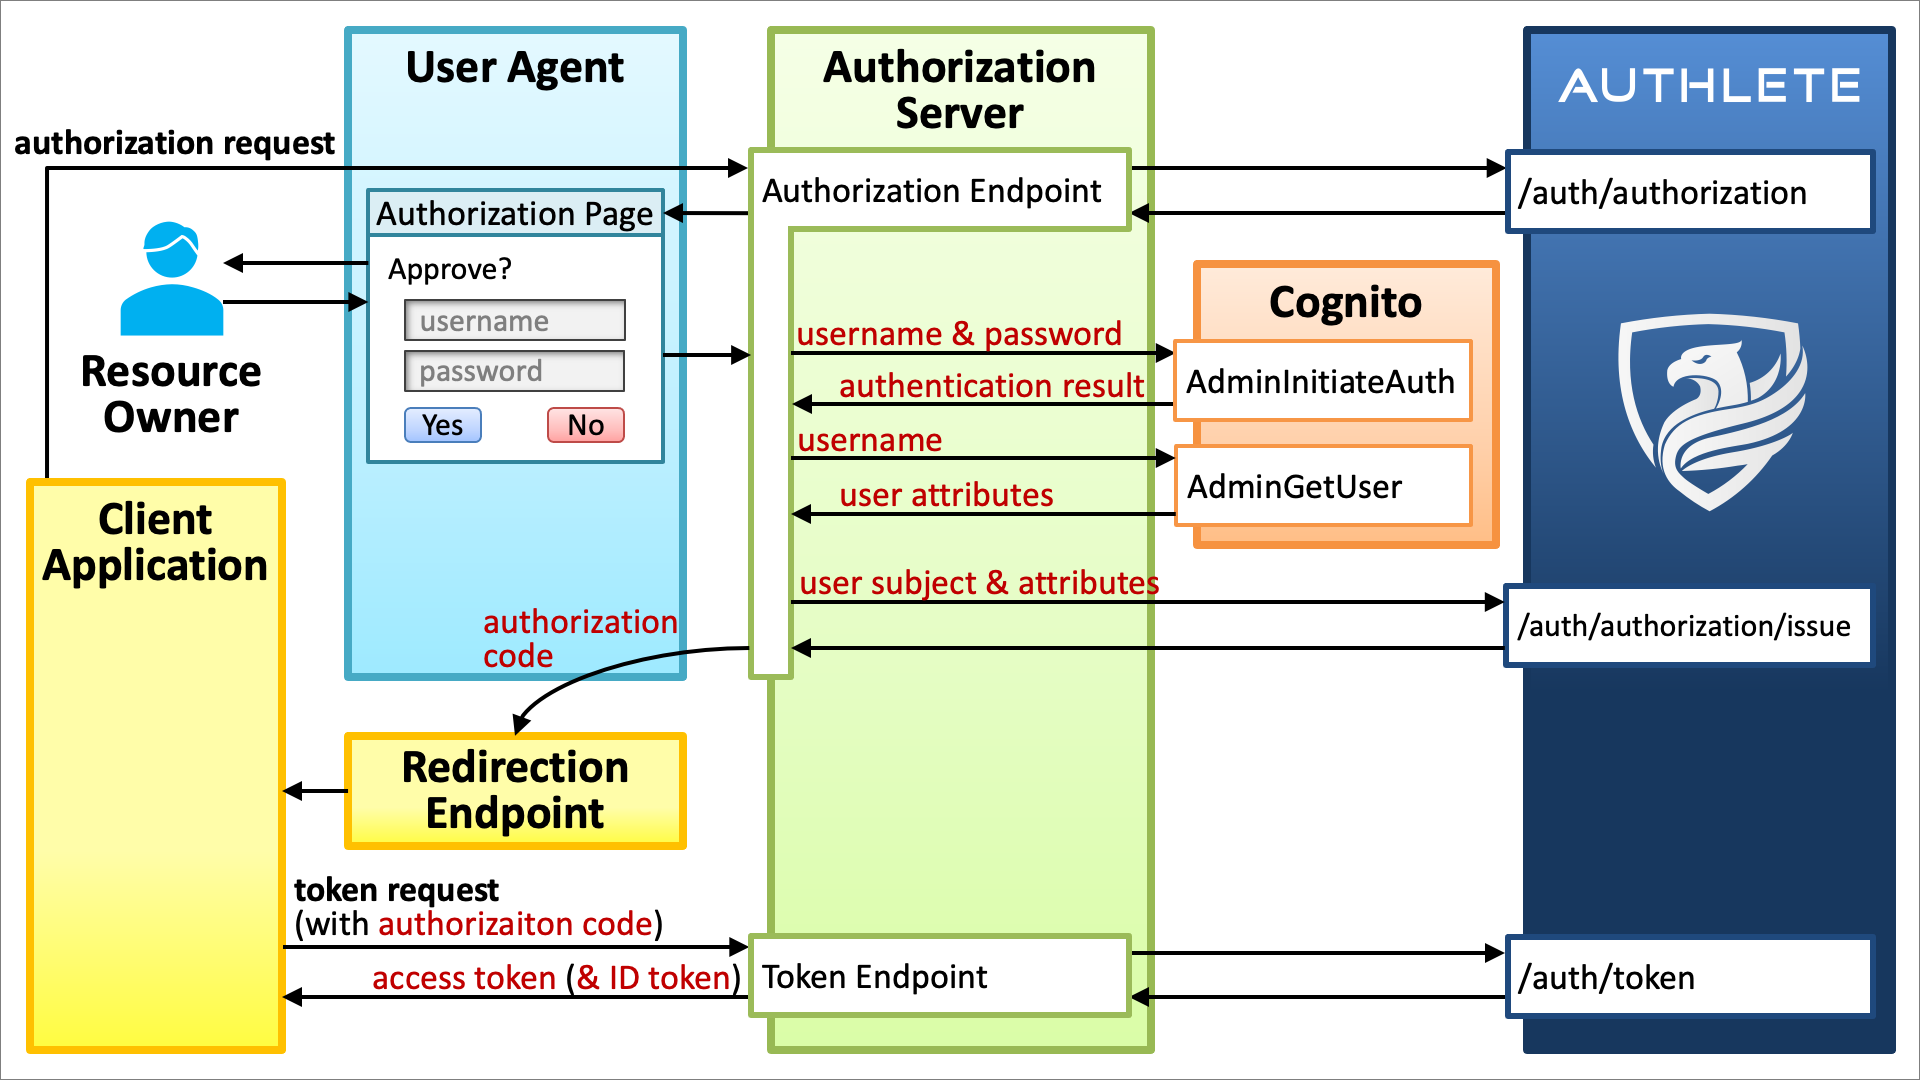 The point in the diagram is that **user authentication is performed by Cognito but OAuth/OIDC-related tasks are delegated to Authlete**. Considering the fact that the core specification of OAuth 2.0 ([RFC 6749][6749]) states *"The way in which the authorization server authenticates the resource owner (e.g., username and password login, session cookies) is **beyond the scope of this specification**."*, this clear separation brings about much more benefits than the approach where a user management solution directly supports OAuth/OIDC.
The following sections describe in detail what the authorization server prepared for this tutorial does in its implementations of the authorization endpoint and the token endpoint.
## Authorization Endpoint
The authorization endpoint in the sample authorization server:
1. accepts an **authorization request** ([RFC 6749 Section 4.1.1][6749_411]) from a client application via a web browser,
2. extracts the query parameters of the authorization request,
3. passes the extracted query parameters to Authlete's [/api/auth/authorization][AUTH_AUTHORIZATION] API,
4. builds an **authorization page** based on the information returned from the Authlete API,
5. sends the authorization page back to the web browser,
6. gets the user's username and password from the user via the login form embedded in the authorization page,
7. passes the username and password to Cognito's [AdminInitiateAuth][ADMIN_INITIATE_AUTH] API to authenticate the user,
8. passes the username to Cognito's [AdminGetUser][ADMIN_GET_USER] API to get user attributes,
9. passes the user's subject (unique identifier) and user attributes to Authlete's [/api/auth/authorization/issue][AUTH_AUTHORIZATION_ISSUE] API,
10. builds an **authorization response** ([RFC 6749 Section 4.1.2][6749_412]) based on the information returned from the Authlete API, and
11. sends the authorization response to the web browser.
The authorization response will be delivered to the **redirection endpoint** (and in turn to the client application) because the HTTP status code of the authorization response is "`302 Found`" (unless `response_mode=form_post` is used).
Cognito's AdminInitiateAuth API issues an access token, an ID token and a refresh token. However, they are not used. Instead, the tokens are issued by Authlete.
## Token Endpoint
The token endpoint in the sample authorization server:
1. accepts a **token request** ([RFC 6749 Section 4.1.3][6749_413]) from a client application,
2. extracts the form parameters of the token request,
3. passes the extracted form parameters to Authlete's [/api/auth/token][AUTH_TOKEN] API,
4. builds a **token response** ([RFC 6749 Section 4.1.4][6749_414]) based on the information returned from the Authlete API, and
5. sends the token response to the client application.
# Implementation
The architecture explained above is implemented in **[django-oauth-server][DJANGO_OAUTH_SERVER]**, which is an open-source authorization server written in Python with the **[Django][DJANGO]** web framework. To run the server, follow the steps below.
## Setup Cognito
1. Create a Cognito user pool. Make sure that the `email` attribute is included because we will use the attribute later for testing.
2. Add a client to the Cognito user pool and enable `ALLOW_ADMIN_USER_PASSWORD_AUTH` in the "Auth Flows Configuration" section of the client configuration so that the client can use the "[Server-Side Authentication Flow][SERVER_SIDE_AUTHENTICATION_FLOW]".
3. Add a user to the Cognito user pool.
4. Make sure that your AWS account has permissions neccesary to call Cognito's [AdminInitiateAuth][ADMIN_INITIATE_AUTH] API and [AdminGetUser][ADMIN_GET_USER] API.
## Setup Authorization Server
Install necessary Python libraries.
```
$ pip install authlete # Authlete Library for Python
$ pip install authlete-django # Authlete Library for Django
$ pip install boto3 # AWS SDK for Python
```
Download the source code of the authorization server implementation.
```
$ git clone https://github.com/authlete/django-oauth-server.git
$ cd django-oauth-server
```
Edit the Authlete configuration file (`authlete.ini`) to access Authlete APIs.
```
$ vi authlete.ini
```
Open the Django configuration file (`django_oauth_server/settings.py`),
```
$ vi django_oauth_server/settings.py
```
and add `backends.CognitoBackend` to `AUTHENTICATION_BACKENDS`. See "[Specifying authentication backends][DJANGO_AUTH_BACKENDS]" in "[Customizing authentication in Django][DJANGO_AUTH_CUSTOMIZATION]" for details about Django authentication backends.
```python theme={null}
AUTHENTICATION_BACKENDS = ('backends.CognitoBackend',)
```
Also, edit `COGNITO_USER_POOL_ID` and `COGNITO_CLIENT_ID` in the same file properly.
```python theme={null}
COGNITO_USER_POOL_ID = 'YOUR_COGNITO_USER_POOL_ID'
COGNITO_CLIENT_ID = 'YOUR_COGNITO_CLIENT_ID'
```
If you are interested in how to call Cognito's [AdminInitiateAuth][ADMIN_INITIATE_AUTH] API and [AdminGetUesr][ADMIN_GET_USER] API, look into the source code `[cognito_backend.py][COGNITO_BACKEND_PY]`.
## Start Authorization Server
To start the authorization server, type the command below.
```
$ python manage.py runserver
```
"`make run`" does the same thing.
```
$ make run
```
The authorization server exposes some endpoints as listed in the table below. An easy way to confirm that Authlete setup (`authlete.ini`) is correct is to access the **discovery endpoint** ([http://localhost:8000/.well-known/openid-configuration](http://localhost:8000/.well-known/openid-configuration)) and see if it returns JSON conforming to [OpenID Connect Discovery 1.0][OIDC_DISCOVERY].
| Endpoint | URL |
| :--------------------- | :------------------------------------------------------- |
| Authorization Endpoint | `http://localhost:8000/api/authorization` |
| Token Endpoint | `http://localhost:8000/api/token` |
| Discovery Endpoint | `http://localhost:8000/.well-known/openid-configuration` |
# Test
We have done all preparation. Let's get an access token and an ID token by the authorization code flow.
## Authorization Request
In the authorization code flow, the first step is to send an **authorization request** to the **authorization endpoint** of the authorization server via a web browser. In this tutorial, the authorization endpoint is `http://localhost:8000/api/authorization` hosted on django-oauth-server. Replace `CLIENT_ID` and `REDIRECT_URI` in the URL below (which represents an authorization request) properly and access the URL with your web browser.
```
http://localhost:8000/api/authorization?response_type=code&client_id=CLIENT_ID&scope=openid+email&state=123&nonce=abc&redirect_uri=REDIRECT_URI
```
Note that `CLIENT_ID` in the authorization request is NOT the client ID of the Cognito client. Instead, it must be a client ID issued by Authlete.
If you have not changed the redirection endpoint of the client, the default value "`https://api.authlete.com/api/mock/redirection/SERVICE_API_KEY`" can be used as the value of `REDIRECT_URI`. Don't forget to replace `SERVICE_API_KEY` properly in the default redirection endpoint when you use it as the value of `REDIRECT_URI`.
Your web browser will display an **authorization page** generated by the authorization server. It will look like below.
The point in the diagram is that **user authentication is performed by Cognito but OAuth/OIDC-related tasks are delegated to Authlete**. Considering the fact that the core specification of OAuth 2.0 ([RFC 6749][6749]) states *"The way in which the authorization server authenticates the resource owner (e.g., username and password login, session cookies) is **beyond the scope of this specification**."*, this clear separation brings about much more benefits than the approach where a user management solution directly supports OAuth/OIDC.
The following sections describe in detail what the authorization server prepared for this tutorial does in its implementations of the authorization endpoint and the token endpoint.
## Authorization Endpoint
The authorization endpoint in the sample authorization server:
1. accepts an **authorization request** ([RFC 6749 Section 4.1.1][6749_411]) from a client application via a web browser,
2. extracts the query parameters of the authorization request,
3. passes the extracted query parameters to Authlete's [/api/auth/authorization][AUTH_AUTHORIZATION] API,
4. builds an **authorization page** based on the information returned from the Authlete API,
5. sends the authorization page back to the web browser,
6. gets the user's username and password from the user via the login form embedded in the authorization page,
7. passes the username and password to Cognito's [AdminInitiateAuth][ADMIN_INITIATE_AUTH] API to authenticate the user,
8. passes the username to Cognito's [AdminGetUser][ADMIN_GET_USER] API to get user attributes,
9. passes the user's subject (unique identifier) and user attributes to Authlete's [/api/auth/authorization/issue][AUTH_AUTHORIZATION_ISSUE] API,
10. builds an **authorization response** ([RFC 6749 Section 4.1.2][6749_412]) based on the information returned from the Authlete API, and
11. sends the authorization response to the web browser.
The authorization response will be delivered to the **redirection endpoint** (and in turn to the client application) because the HTTP status code of the authorization response is "`302 Found`" (unless `response_mode=form_post` is used).
Cognito's AdminInitiateAuth API issues an access token, an ID token and a refresh token. However, they are not used. Instead, the tokens are issued by Authlete.
## Token Endpoint
The token endpoint in the sample authorization server:
1. accepts a **token request** ([RFC 6749 Section 4.1.3][6749_413]) from a client application,
2. extracts the form parameters of the token request,
3. passes the extracted form parameters to Authlete's [/api/auth/token][AUTH_TOKEN] API,
4. builds a **token response** ([RFC 6749 Section 4.1.4][6749_414]) based on the information returned from the Authlete API, and
5. sends the token response to the client application.
# Implementation
The architecture explained above is implemented in **[django-oauth-server][DJANGO_OAUTH_SERVER]**, which is an open-source authorization server written in Python with the **[Django][DJANGO]** web framework. To run the server, follow the steps below.
## Setup Cognito
1. Create a Cognito user pool. Make sure that the `email` attribute is included because we will use the attribute later for testing.
2. Add a client to the Cognito user pool and enable `ALLOW_ADMIN_USER_PASSWORD_AUTH` in the "Auth Flows Configuration" section of the client configuration so that the client can use the "[Server-Side Authentication Flow][SERVER_SIDE_AUTHENTICATION_FLOW]".
3. Add a user to the Cognito user pool.
4. Make sure that your AWS account has permissions neccesary to call Cognito's [AdminInitiateAuth][ADMIN_INITIATE_AUTH] API and [AdminGetUser][ADMIN_GET_USER] API.
## Setup Authorization Server
Install necessary Python libraries.
```
$ pip install authlete # Authlete Library for Python
$ pip install authlete-django # Authlete Library for Django
$ pip install boto3 # AWS SDK for Python
```
Download the source code of the authorization server implementation.
```
$ git clone https://github.com/authlete/django-oauth-server.git
$ cd django-oauth-server
```
Edit the Authlete configuration file (`authlete.ini`) to access Authlete APIs.
```
$ vi authlete.ini
```
Open the Django configuration file (`django_oauth_server/settings.py`),
```
$ vi django_oauth_server/settings.py
```
and add `backends.CognitoBackend` to `AUTHENTICATION_BACKENDS`. See "[Specifying authentication backends][DJANGO_AUTH_BACKENDS]" in "[Customizing authentication in Django][DJANGO_AUTH_CUSTOMIZATION]" for details about Django authentication backends.
```python theme={null}
AUTHENTICATION_BACKENDS = ('backends.CognitoBackend',)
```
Also, edit `COGNITO_USER_POOL_ID` and `COGNITO_CLIENT_ID` in the same file properly.
```python theme={null}
COGNITO_USER_POOL_ID = 'YOUR_COGNITO_USER_POOL_ID'
COGNITO_CLIENT_ID = 'YOUR_COGNITO_CLIENT_ID'
```
If you are interested in how to call Cognito's [AdminInitiateAuth][ADMIN_INITIATE_AUTH] API and [AdminGetUesr][ADMIN_GET_USER] API, look into the source code `[cognito_backend.py][COGNITO_BACKEND_PY]`.
## Start Authorization Server
To start the authorization server, type the command below.
```
$ python manage.py runserver
```
"`make run`" does the same thing.
```
$ make run
```
The authorization server exposes some endpoints as listed in the table below. An easy way to confirm that Authlete setup (`authlete.ini`) is correct is to access the **discovery endpoint** ([http://localhost:8000/.well-known/openid-configuration](http://localhost:8000/.well-known/openid-configuration)) and see if it returns JSON conforming to [OpenID Connect Discovery 1.0][OIDC_DISCOVERY].
| Endpoint | URL |
| :--------------------- | :------------------------------------------------------- |
| Authorization Endpoint | `http://localhost:8000/api/authorization` |
| Token Endpoint | `http://localhost:8000/api/token` |
| Discovery Endpoint | `http://localhost:8000/.well-known/openid-configuration` |
# Test
We have done all preparation. Let's get an access token and an ID token by the authorization code flow.
## Authorization Request
In the authorization code flow, the first step is to send an **authorization request** to the **authorization endpoint** of the authorization server via a web browser. In this tutorial, the authorization endpoint is `http://localhost:8000/api/authorization` hosted on django-oauth-server. Replace `CLIENT_ID` and `REDIRECT_URI` in the URL below (which represents an authorization request) properly and access the URL with your web browser.
```
http://localhost:8000/api/authorization?response_type=code&client_id=CLIENT_ID&scope=openid+email&state=123&nonce=abc&redirect_uri=REDIRECT_URI
```
Note that `CLIENT_ID` in the authorization request is NOT the client ID of the Cognito client. Instead, it must be a client ID issued by Authlete.
If you have not changed the redirection endpoint of the client, the default value "`https://api.authlete.com/api/mock/redirection/SERVICE_API_KEY`" can be used as the value of `REDIRECT_URI`. Don't forget to replace `SERVICE_API_KEY` properly in the default redirection endpoint when you use it as the value of `REDIRECT_URI`.
Your web browser will display an **authorization page** generated by the authorization server. It will look like below.
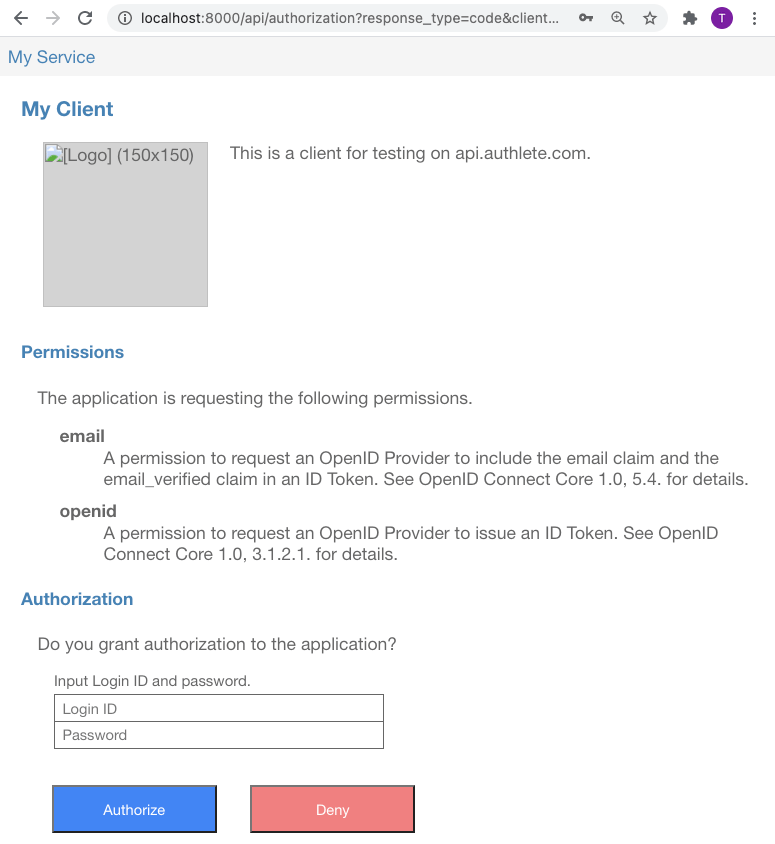 The page has input fields for Login ID and Password. Input the username and the password of the user that you have added to the Cognito user pool there and press "Authorize" button, and your web browser will be redirected to the redirection endpoint of your client application.
The URL of the redirection endpoint which you can see in the address bar of your browser contains `code` response parameter like below.
```
REDIRECT_URI?state=123&code=RwRq2Lp0bJVMiLPKAFz4qB1hxieBD1X5HKuv8EPkJeM
```
The value of `code` response parameter is the **authorization code** which has been issued from the authorization server to your client application. The authorization code is needed when your client application makes a token request.
## Token Request
After getting an authorization code, the client application sends a **token request** to the **token endpoint** of the authorization server. In this tutorial, the token endpoint is `http://localhost:8000/api/token` hosted on django-oauth-server.
A token request can be made by `curl` command in a shell terminal. Below is an example of token request. Don't forget to replace `CLIENT_ID`, `REDIRECT_URI` and `CODE` with the actual values before typing.
```
$ curl http://localhost:8000/api/token -d grant_type=authorization_code -d client_id=CLIENT_ID -d redirect_uri=REDIRECT_URI -d code=CODE
```
| Argument | Description |
| :--------------------------------- | :--------------------------------------------------------------------------------------------------------- |
| `http://localhost:8000/api/token` | The URL of the token endpoint. |
| `-d grant_type=authorization_code` | indicates that the flow is the authorization code flow. |
| `-d client_id=CLIENT_ID` | specifies the client ID. Replace `CLIENT_ID` with the actual client ID of your client application. |
| `-d redirect_uri=REDIRECT_URI` | specifies the redirect URI. Replace `REDIRECT_URI` with the same value given in the authorization request. |
| `-d code=CODE` | specifies the authorization code. Replace `CODE` with the actual authorization code. |
The lifetime of an authorization code is short. The default value is 10 minutes. A token request must be made before the authorization code expires.
When the token request succeeds, the token endpoint returns JSON that includes `access_token` and `id_token` like below.
```json theme={null}
{
"access_token": "FrGIJQpW51-l5mYJHcqGUNIKGJ1W23fFlW6c9AQEZEc",
"refresh_token": "jhvKm9-haLQwnIR4CfkL6bfPIBBlqluFeqZKAgdPNjM",
"scope": "email openid",
"id_token": "eyJhbGciOiJIUzI1NiJ9.eyJlbWFpbCI6InRha2FAYXV0aGxldGUuY29tIiwiaXNzIjoiaHR0cHM6Ly9leGFtcGxlLmNvbSIsInN1YiI6IjIiLCJhdWQiOlsiNDMyNjM4NTY3MCJdLCJleHAiOjE2MTY0MTI3NDIsImlhdCI6MTYxNjMyNjM0MiwiYXV0aF90aW1lIjoxNjE2MzI2MTAwLCJub25jZSI6ImFiYyIsInNfaGFzaCI6InBtV2tXU0JDTDUxQmZraG43OXhQdUEifQ.7sXy2FcELxHo3LCQkb9teLaUE9jtRxXsa8diJKnkwAo",
"token_type": "Bearer",
"expires_in": 86400
}
```
The value of `access_token` is the issued access token. Likewise, the value of `id_token` is the issued ID token.
The payload part of the issued ID token in this tutorial is decoded as follows. We can confirm that the authorization server has communicated with the Congnito user pool successfully by checking whether the value of `email` in the payload matches the `email` attribute of the user in the Cognito user pool.
```json theme={null}
{
"email": "taka@authlete.com",
"iss": "https://example.com",
"sub": "2",
"aud": [
"4326385670"
],
"exp": 1616412742,
"iat": 1616326342,
"auth_time": 1616326100,
"nonce": "abc",
"s_hash": "pmWkWSBCL51Bfkhn79xPuA"
}
```
# Congratulations!
You've completed this tutorial and learned how to enable your authorization server to use Amazon Cognito as a user database and at the same time support the latest OAuth/OIDC specifications by using Authlete.
**[Contact us][CONTACT]** if you need support. You are always welcome!
[6749]: https://tools.ietf.org/html/rfc6749
[6749_31]: https://tools.ietf.org/html/rfc6749#section-3.1
[6749_32]: https://tools.ietf.org/html/rfc6749#section-3.2
[6749_41]: https://tools.ietf.org/html/rfc6749#section-4.1
[6749_411]: https://tools.ietf.org/html/rfc6749#section-4.1.1
[6749_412]: https://tools.ietf.org/html/rfc6749#section-4.1.2
[6749_413]: https://tools.ietf.org/html/rfc6749#section-4.1.3
[6749_414]: https://tools.ietf.org/html/rfc6749#section-4.1.4
[ADMIN_GET_USER]: https://docs.aws.amazon.com/cognito-user-identity-pools/latest/APIReference/API_AdminGetUser.html
[ADMIN_INITIATE_AUTH]: https://docs.aws.amazon.com/cognito-user-identity-pools/latest/APIReference/API_AdminInitiateAuth.html
[AUTH_AUTHORIZATION]: /api-reference/authorization-endpoint/process-authorization-request
[AUTH_AUTHORIZATION_ISSUE]: /api-reference/authorization-endpoint/issue-authorization-response
[AUTH_TOKEN]: /api-reference/token-endpoint/process-token-request
[COGNITO]: https://aws.amazon.com/cognito/
[COGNITO_BACKEND_PY]: https://github.com/authlete/django-oauth-server/blob/master/backends/cognito_backend.py
[COGNITO_USING_TOKENS]: https://docs.aws.amazon.com/cognito/latest/developerguide/amazon-cognito-user-pools-using-tokens-with-identity-providers.html
[CONTACT]: https://www.authlete.com/contact/
[DJANGO]: https://www.djangoproject.com/
[DJANGO_AUTH_BACKENDS]: https://docs.djangoproject.com/en/3.1/topics/auth/customizing/#specifying-authentication-backends
[DJANGO_AUTH_CUSTOMIZATION]: https://docs.djangoproject.com/en/3.1/topics/auth/customizing/
[DJANGO_OAUTH_SERVER]: https://github.com/authlete/django-oauth-server
[FAPI]: https://fapi.openid.net/
[OIDC_DISCOVERY]: https://openid.net/specs/openid-connect-discovery-1_0.html
[SERVER_SIDE_AUTHENTICATION_FLOW]: https://docs.aws.amazon.com/cognito/latest/developerguide/amazon-cognito-user-pools-authentication-flow.html#amazon-cognito-user-pools-server-side-authentication-flow
[SPEC_SHEET]: https://www.authlete.com/legal/spec_sheet/
The page has input fields for Login ID and Password. Input the username and the password of the user that you have added to the Cognito user pool there and press "Authorize" button, and your web browser will be redirected to the redirection endpoint of your client application.
The URL of the redirection endpoint which you can see in the address bar of your browser contains `code` response parameter like below.
```
REDIRECT_URI?state=123&code=RwRq2Lp0bJVMiLPKAFz4qB1hxieBD1X5HKuv8EPkJeM
```
The value of `code` response parameter is the **authorization code** which has been issued from the authorization server to your client application. The authorization code is needed when your client application makes a token request.
## Token Request
After getting an authorization code, the client application sends a **token request** to the **token endpoint** of the authorization server. In this tutorial, the token endpoint is `http://localhost:8000/api/token` hosted on django-oauth-server.
A token request can be made by `curl` command in a shell terminal. Below is an example of token request. Don't forget to replace `CLIENT_ID`, `REDIRECT_URI` and `CODE` with the actual values before typing.
```
$ curl http://localhost:8000/api/token -d grant_type=authorization_code -d client_id=CLIENT_ID -d redirect_uri=REDIRECT_URI -d code=CODE
```
| Argument | Description |
| :--------------------------------- | :--------------------------------------------------------------------------------------------------------- |
| `http://localhost:8000/api/token` | The URL of the token endpoint. |
| `-d grant_type=authorization_code` | indicates that the flow is the authorization code flow. |
| `-d client_id=CLIENT_ID` | specifies the client ID. Replace `CLIENT_ID` with the actual client ID of your client application. |
| `-d redirect_uri=REDIRECT_URI` | specifies the redirect URI. Replace `REDIRECT_URI` with the same value given in the authorization request. |
| `-d code=CODE` | specifies the authorization code. Replace `CODE` with the actual authorization code. |
The lifetime of an authorization code is short. The default value is 10 minutes. A token request must be made before the authorization code expires.
When the token request succeeds, the token endpoint returns JSON that includes `access_token` and `id_token` like below.
```json theme={null}
{
"access_token": "FrGIJQpW51-l5mYJHcqGUNIKGJ1W23fFlW6c9AQEZEc",
"refresh_token": "jhvKm9-haLQwnIR4CfkL6bfPIBBlqluFeqZKAgdPNjM",
"scope": "email openid",
"id_token": "eyJhbGciOiJIUzI1NiJ9.eyJlbWFpbCI6InRha2FAYXV0aGxldGUuY29tIiwiaXNzIjoiaHR0cHM6Ly9leGFtcGxlLmNvbSIsInN1YiI6IjIiLCJhdWQiOlsiNDMyNjM4NTY3MCJdLCJleHAiOjE2MTY0MTI3NDIsImlhdCI6MTYxNjMyNjM0MiwiYXV0aF90aW1lIjoxNjE2MzI2MTAwLCJub25jZSI6ImFiYyIsInNfaGFzaCI6InBtV2tXU0JDTDUxQmZraG43OXhQdUEifQ.7sXy2FcELxHo3LCQkb9teLaUE9jtRxXsa8diJKnkwAo",
"token_type": "Bearer",
"expires_in": 86400
}
```
The value of `access_token` is the issued access token. Likewise, the value of `id_token` is the issued ID token.
The payload part of the issued ID token in this tutorial is decoded as follows. We can confirm that the authorization server has communicated with the Congnito user pool successfully by checking whether the value of `email` in the payload matches the `email` attribute of the user in the Cognito user pool.
```json theme={null}
{
"email": "taka@authlete.com",
"iss": "https://example.com",
"sub": "2",
"aud": [
"4326385670"
],
"exp": 1616412742,
"iat": 1616326342,
"auth_time": 1616326100,
"nonce": "abc",
"s_hash": "pmWkWSBCL51Bfkhn79xPuA"
}
```
# Congratulations!
You've completed this tutorial and learned how to enable your authorization server to use Amazon Cognito as a user database and at the same time support the latest OAuth/OIDC specifications by using Authlete.
**[Contact us][CONTACT]** if you need support. You are always welcome!
[6749]: https://tools.ietf.org/html/rfc6749
[6749_31]: https://tools.ietf.org/html/rfc6749#section-3.1
[6749_32]: https://tools.ietf.org/html/rfc6749#section-3.2
[6749_41]: https://tools.ietf.org/html/rfc6749#section-4.1
[6749_411]: https://tools.ietf.org/html/rfc6749#section-4.1.1
[6749_412]: https://tools.ietf.org/html/rfc6749#section-4.1.2
[6749_413]: https://tools.ietf.org/html/rfc6749#section-4.1.3
[6749_414]: https://tools.ietf.org/html/rfc6749#section-4.1.4
[ADMIN_GET_USER]: https://docs.aws.amazon.com/cognito-user-identity-pools/latest/APIReference/API_AdminGetUser.html
[ADMIN_INITIATE_AUTH]: https://docs.aws.amazon.com/cognito-user-identity-pools/latest/APIReference/API_AdminInitiateAuth.html
[AUTH_AUTHORIZATION]: /api-reference/authorization-endpoint/process-authorization-request
[AUTH_AUTHORIZATION_ISSUE]: /api-reference/authorization-endpoint/issue-authorization-response
[AUTH_TOKEN]: /api-reference/token-endpoint/process-token-request
[COGNITO]: https://aws.amazon.com/cognito/
[COGNITO_BACKEND_PY]: https://github.com/authlete/django-oauth-server/blob/master/backends/cognito_backend.py
[COGNITO_USING_TOKENS]: https://docs.aws.amazon.com/cognito/latest/developerguide/amazon-cognito-user-pools-using-tokens-with-identity-providers.html
[CONTACT]: https://www.authlete.com/contact/
[DJANGO]: https://www.djangoproject.com/
[DJANGO_AUTH_BACKENDS]: https://docs.djangoproject.com/en/3.1/topics/auth/customizing/#specifying-authentication-backends
[DJANGO_AUTH_CUSTOMIZATION]: https://docs.djangoproject.com/en/3.1/topics/auth/customizing/
[DJANGO_OAUTH_SERVER]: https://github.com/authlete/django-oauth-server
[FAPI]: https://fapi.openid.net/
[OIDC_DISCOVERY]: https://openid.net/specs/openid-connect-discovery-1_0.html
[SERVER_SIDE_AUTHENTICATION_FLOW]: https://docs.aws.amazon.com/cognito/latest/developerguide/amazon-cognito-user-pools-authentication-flow.html#amazon-cognito-user-pools-server-side-authentication-flow
[SPEC_SHEET]: https://www.authlete.com/legal/spec_sheet/